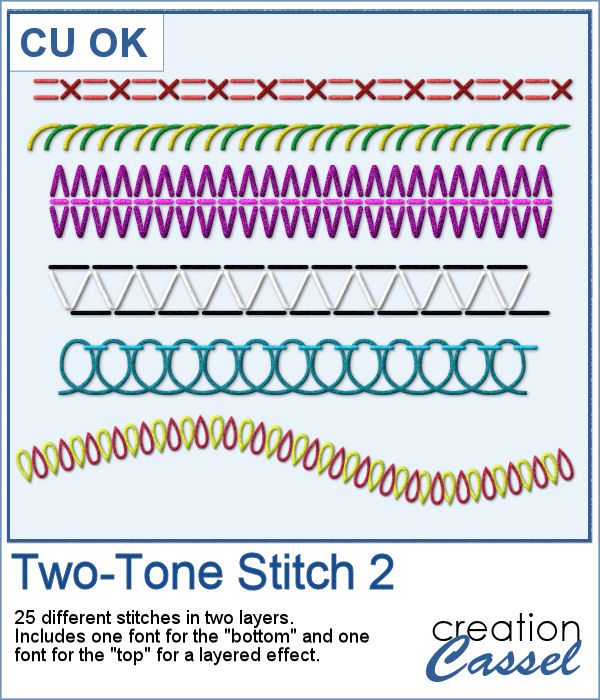
If you like the idea of coordinating various elements in a page or a kit, using a set color palette is an easy way to do it.
This script will generate a color palette for you starting with any photo you have. Each color will be displayed as a brush stroke on the right or the bottom of the image. The hex code for each color is optional.
Get this script: Palette Maker 2
In order to win these tubes, add a comment on this Facebook post telling us if you have ever created a color palette from an image (remember, add a comment, not just a Like!) The winner will be announced in the newsletter, next week. Not a subscriber yet? Not a problem. You can register here and it is free (and you only get one email per week).
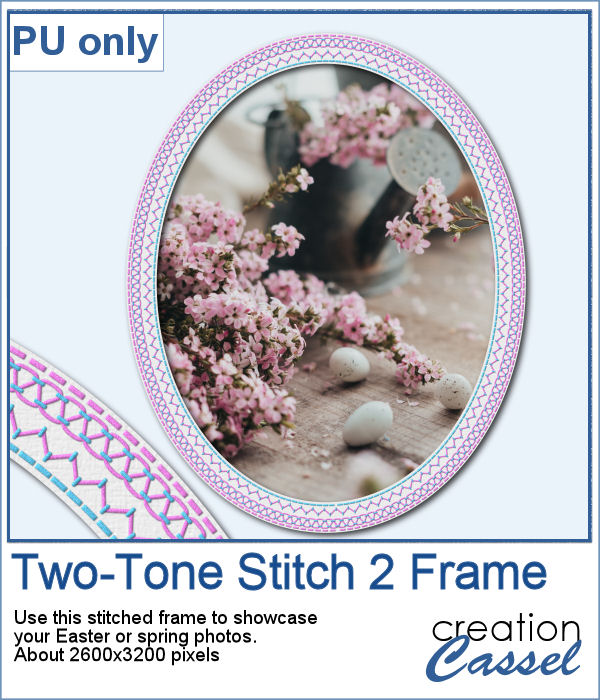
As a sampler, I am including a color palette generated from a fall photo. You get to use 10 colors from this photo. The hex code for the colors is included inside the zip file.
You need to be logged in to download this sample. You can either login, or register on the top of this page.

Tatting is a long process to create those delicate edges and designs. If you want to create them and then extract the designs for yourself, it will take you a long time.
For a sampler, I created a diamond-shaped frame, in a layered format that you can colorize to suit your project.
You can place elements along a circle or a spiral manually, but it is quite tedious.
For a sampler, I created two large circle frames and one spiral with bats coming at you. Each element is in png format and about 3000 pixels wide, so you can resize them as needed.
In order to create a paper fringe with PaintShop Pro, you will need to cut your element multiple times, and then, warp each piece one by one. But there is a problem: how do you warp one piece of paper without warping the next one? Well, there is a way to do it, but it is tedious, which is why this script will be a time saver.
As a sample, I created this square frame from four strips of paper that were run through the script, one by one, and then put together to make the frame. I added a little contrasting border to add some interest. Now, you can showcase your favorite photo.
Sometimes, it can look interesting to have a series of paper strips of different colors or patterns to serve as a background for a project. However, that can be tedious and time-consuming.
As a sample, I chose to create a series of strips, aligned to the bottom, and turned them into a template so you can use it with your favorite papers. These strips are grouped so you can copy and paste them onto your project in one step (instead of copying them one by one!).
Using bows and knots can be quite versatile as long as you have variety. This is the 19th type of bow in the store (and we have knots too) so using your own straight ribbon, you will have the option to create some matching bows. The script uses a random location on the ribbon so if you run the script multiple times on a patterned ribbon, you will get different results.
As a sampler, I created six little bows using ribbons from Janet Kemp. I layered a grosgrain ribbon with lace and flattened both. Then, I ran the script. I then ran the script on the grosgrain ribbon alone (without the lace), and since the layers were not merged, I copied and pasted the knot part only to replace the one on the "lacy" bow. It is a little more work but it shows how versatile this script can be with unmerged layers.
I released the first set of gold chain picture tubes over 10 years ago and they were VERY popular especially since those were totally new among the PSP tools. Today, I created another series of gold chains picture tubes. Those are mostly double-links chains.
As a sampler, I created a vector shape with wavy edges and ran the VectorTube script to place the gold chains neatly along that edge. For the double frame, I used the same method to create two "matching" shapes and then used the interlacing technique to give the frame that twisted appearance.
Creating a pinwheel out of paper might sound simple using a template, but would NOT respect the correct orientation when the paper is flipped.
As a sampler, I used papers from a kit called Summer Fun from Janet Kemp and created four simple pinwheels. You can get all the matching papers from this kit
Time flies and in the fall, those vines will often change color. These picture tubes are made from vines that have already turned to a pink or orange color due to the season.
As a sampler, I created a large frame, covered it with chicken wire (from the Chicken Wire tubes) and added some vines, and some clothespins to hold some photos. These photos are showing as a mask group so you won't have to do any cutout of your photo to place it in the frame.
You can now create your own admission ticket (or other types of tickets) with this script. You get various options to incorporate into the making of it, including colors, text, fonts, texture and design.
For a sample, I created some generic seasonal tickets with little shapes in the boxes to match the season.