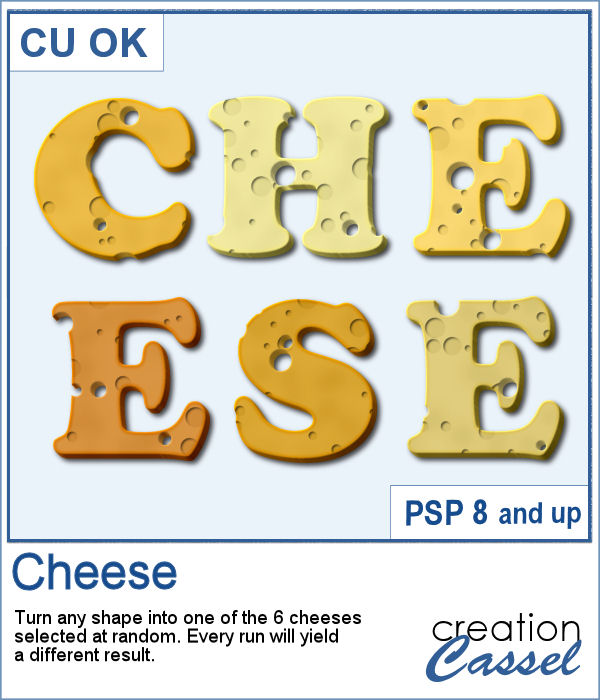
Whether you are a food lover or a cook, or have had a food-related experience you want to share, this script will be a fun tool for you.
You will be able to convert any shape (whether it is a letter, a digit, a symbol or any other shape) into a fun looking cheese, full of holes. The color of the cheese and the holes are all selected at random. Every run of the script will yield a different piece of cheese even if you start with the same shape.
In order to win this script, add a comment on this Facebook post telling whether you use beads in your projects (remember, add a comment, not just a Like!) The winner will be announced in the newsletter, next week. Not a subscriber yet? Not a problem. You can register here and it is free (and you only get one email per week).
As a sample, I created digits that will perfectly match the hamburger digits, so if you want to layer them, you will just have to melt the cheese using the Warp Brush tool and it will make a delicious burger.
You need to be logged in to download this sample. You can either login, or register on the top of this page.
Would you have known the name of those trims? I remembered seeing them in sewing and craft stores, but we dont have those around anymore so it was a real hunt for the name.
Doesn’t that look FANTASTIC as a trim? Best of all you can “draw” them any way you want because they are unique picture tubes for Paintshop Pro. As you move your cursor, the trim gets created. You can have them in a straight line, a curved line or around any shape you want. If you ever used those Gimp trims in traditional scrapbooking, now, you can do the same with digital scrapbooking. Add those to your layout, and best of all, you can make them any shape you need.
You can make frames with them, weave them like ribbons, place them on the seam between two papers, etc. You have so many options with those 10 different tubes. And if you want to change the colors, you can do that too (although i have 10 more in stock for another release!)
You can grab those 10 tubes in my stores: Creation Cassel and DigiScrapWarehouse.
And of course, as usual, you can get this set for free by adding your name to the Happy Place thread HERE. Not only will there be one winner, bur EVERYONE who post will get SOMETHING, just for posting! So go ahead and add your name. Tell your friends to come, so they can also get a surprise just for posting. I will be back on Monday with the name of a winner.
I was happy to have had 6 colors from the rainbow. Strangely, i had not planned it but it allowed me to create this rainbow for you. This was made using the Gimp Trims in this set. The rainbow is very large so you can resize it to meet your own needs.
You need to be logged in to download this sample. You can either login, or register on the top of this page.
What will you do with this rainbow? Show us what you do with it. I might just post this in the newsletter! I know you all love to see what can be done with my products, right? So don’t be shy. Share your masterpieces.
The Build your own discount coupon is still on for the rest of the month. Make sure you add up those purchases so you can get a nice coupon for May!
Last week, i had picked 5 random products that were on sale this week. You didn’t get them? Darn. The special ended today. BUT i have another offer for you. This next week YOU will choose what you want to see on sale. Post here (by adding a comment) or on our Facebook page (so you can also see what else is listed by other members), and i will pick the 5 most listed items to be on sale, starting Sunday night. Invite your friends to join in the listing too and you might just get YOUR favorite products on special.
A couple of weeks ago, there was a freebie with some plastic pockets. I was thrilled to get an email from Marj showing me what she did with that set of pockets. Here it is:
I love cats, and they all look so cute, don’t they? Did you miss that freebie? Check here for the Plastic Pocket sampler you can download and use, just like Marj did.
News from the Campus
After the hectic week when we had two workshop, this week is much more quiet. The Introduction to Scripts workshop, is available on Youtube and has already had 500 views! Yayyy! Did you miss it? You can view it all HERE.
The video for the Color your world workshop in the Campus is still available online only, but you can purchase the complete package so you wont have to worry about it not being there anymore, since it WILL be removed from view when the next workshop gets uploaded (likely the second week of May). The complete package includes the downloadable version of the video AND the complete written document you can also download.
Did you want all the documents in the previous workshops? They are all available too. View them and review them at your own pace, as often as you want. Print out the written documents, add your own handwritten notes if you want. This is a perfect way to built your own reference library for advanced Paintshop Pro users (even if you feel you are still a beginner!).
Are you afraid or intimidated by vectors? Are you wondering how to use vectors? This workshop will help you understand how they work so you can use them to create some pretty unique shape, or even text effects!
And of course, keep an eye on our next tutorials for the Element Creation Tutorials section. Did you know we already have 40 different tutorials available? Yup, they are adding up fast! Well, they are added on a weekly basis, but that is still becoming a fun list of tutorials.
This little script for Paintshop Pro might not seem like much but how often did you want to get a flower shape and had to do all the duplicating and rotating manually? This script will do just that for you. With a random feature integrated, you might get between 6 and 15 petals, and each petal will be slightly different in size and shape, so you will always get a new shape.
In addition to creating a different shape, you can generate it as a vector shape to be exported as a custom shape, so you can use it at any time, later on. You can choose to have it in layered raster with your choice of color, gradient or pattern, or you can ask for a plain basic flat sample, again in the color of your choice (perfect for layering).
Once the script is run, you can keep adding details, modify the individual petals, add glitters on the edge, re-arrange the petal order, remove one petal, etc. So many things you could do!
You can get this script in my stores: CreationCassel and DigiScrapWarehouse.
If you want a chance to win this script, simply go over to the DST forum, and add your name to this thread. I will be back on Monday with the name of a winner.
I am sure you are also looking for a freebie sample for this script. That is exactly what i did. I ran the script and got a few random shapes and i played with them. On one layered shape, i added a glittered edge with the Glittered Edge script on each individual petal, then i slipped the last petal under the first one for the gold color flower. Then, i played with the Felt script to add a felt texture on 3 coloured copies of the same flower, and layered them. You get one PNG sample and the matching PSD format flower. Finally, i ran the Inked Edge script on a purple flower, petal by petal, and then, i removed the petals themselves, leaving only the inked border. I think it does give a really fun result that i didn’t even expect! What can you do with that script?
You want to play with those? You need to be logged in to download this sample. You can either login, or register on the top of this page.
For the fun of it, this week i took the time to create a scrap page about one day of geogaching with my husband. It was a fun day, and since i have been meaning to make a whole album on our geocaching adventures, which started 3 years ago with my sons, i think i just found a style that might work for this. What do you think? I might just post the other pages as i create them. Do you do geocaching? Tell me about it!
This is getting more and more exciting. Several people emailed me saying they would like to learn how to create this and that element with their Paintshop Pro, and i kept smiling because that is exactly what i am preparing! Many tutorials are in the making to create papers, elements, textures, fasteners, text effects, and more. So keep an eye on the Element Creation Tutorials of the Campus, subscribe to the mailing list if you want to be first to learn when registrations open so you can take advantage of the special price.
You know how cookie cutters are used to cut out cookies always in the same shape, of the same size out of cookie dough. This script for Paintshop Pro will do just about the same thing (without the dough). Unlike actual physical cookie cutters, you can use ANY SHAPE you want. You can use circles, rectangles, hearts, stars, arrows, spirals, ovals, frames, etc.
And more than choosing the shape, you can use any paper you have, colored or not, textured or not, big or small, from your stash or your kit. You can choose 1, 2, 10 papers, or how many your computer can handle open at once. The script will cut out the same shape, with some options of whether you want always the same size or slightly different, but it will cut from different sections of the papers every time. This means that even if you were to get 10 shapes from the same paper, the end result would be 10 different pieces. Isn’t this great?
Now, what can you do with so many little pieces of papers? You can create clusters, strings, mosaic, borders, patchworks, and probably more.
You can get this script in both of my stores: Creation Cassel and DigiScrapWarehouse.
And why not try to get it for free too? Check this thread in the DST forum, add your name and wait for Monday night.
I am sure you would love to see something made with this script. Initially, i was wondering what i could make as a sampler, since this is mostly at TOOL script and useable with your own papers, but i found some textures i scanned a while ago and used just as texture, so i used those “images”, colored them in red/pink shades and used a heart shape to run the Cookie Cutter script. Once done, i simply aligned the hearts, mirrored some of them and added some bead tubes i had. I think it looks cool, dont you? This string is 4000 pixels long so you can size it down a bit if you want.
You need to be logged in to download this sample. You can either login, or register on the top of this page.
Do you want to see something else made with this script? Suzy, who was the one who suggested this idea made this layout using the kit Chatterbox from Sandra of Studio 68. Click on the image to reach my gallery where she posted it, so you can give her some love. How long do you think it would have taken to cut out all those circles?
I thought of this script when i saw some great templates that had many many spots for pictures. I felt it was too much work to open, resize, crop, copy, paste, and adjust each photo for each spot. Lucky for me (and for you), i coded a script that does all that, in the blink of an eye. It does not matter if you have 6 photos to place, or 50. It does not matter if they are all square, or round, or all odd shapes. The script work well in all those situations. And i can tell you that it will take only seconds to place them. The longest part will be… to choose the pictures!
Heather worked with this script and this is her layout. Can you imagine how long it would have taken her to place all the photos on that layout, manually? I count no less than 39 photos! She used Scrapdragon’s kit, Elegance, and a template from [Collages] by Chrissy Williams.
Do you want to see this script in action? Check this short video.
What do you think of a video to show how the scripts work?
As i told you recently, i teamed up with Diosa to participate in the ADSR over at NDISB. Yesterday, we got our first challenge. We had to use a pic of our partner, and scraplift a LO of theirs to introduce her to the world. So here is my LO to present you Diosa, my race partner.
You are more than welcome (hint, hint, hint) to go to the NDISB gallery to leave some comments to our layouts. Click here to get to mine. And here is the lovely page Diosa made about me.
And you can also add comments to HER layout. Just click here. She really did a beautiful job, didn't she?
Marilo is one of my script tester. Here is a sample layout she made using the Parallel Lines script.
Isn't that lovely? Click on the image to see the page in a larger format. Marilo is also a member of my teaching group where she learned to create all those elements on her page.
Did you like the first Crochet lace script? This is my second one (and probably not the last either). I love to code those laces. And this time, you can also have a fringe added or not. It is your choice.
Since this script allows you to colorise the rows separately, i found a great trick. Look at the bottom sample lace: i colorised the first few rows with a certain setting, with the Lightness set to about -75. Later on, i would just change the lightness and go -55, -35, -15, 15, 35, 55, etc. That is how i got that gradient effect. Neat isn't it?
You can get this lovely lace script at any of my stores, listed on the left. If you get it, and like it, be sure to leave some feedback.
Now, look at what Linda did with this script (and also the Curved photo script and the Ribbon #1 script). She used kits from Eden and Millcreek Canyon from Amanda Thorderson. Isn't that layout gorgeous?
 Whether you are a food lover or a cook, or have had a food-related experience you want to share, this script will be a fun tool for you.
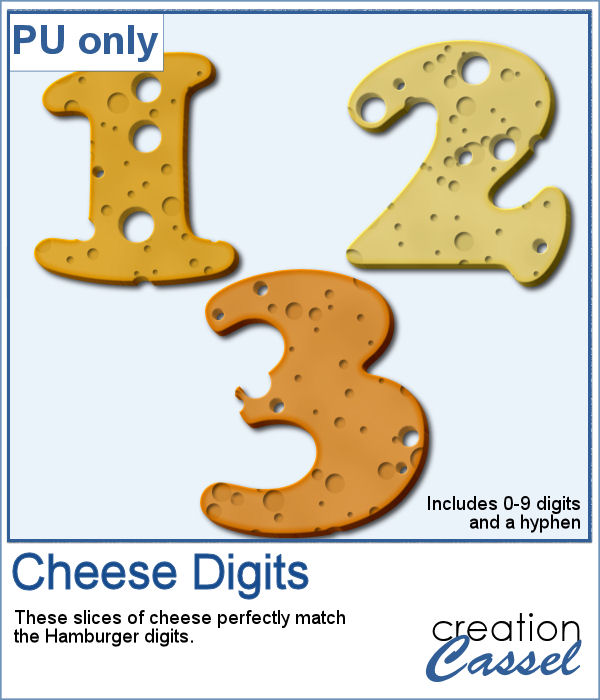


