Web
Analytics

New script – Wood Frame

Wood frame script for Paintshop ProI know, you can probably create a wood frame very easily, right? Using Paintshop Pro, some tasks are quite easy and creating a wood frame is one of those. However, it still takes a bit of time, and if you want to create a series of frames, for a kit or a collage, it can quickly add up.

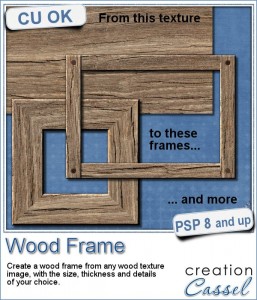
This script will create the frame in less than 30 seconds. Yes! You will start with a texture image of wood (you can choose fine wood or old wood), and the script will literally cut pieces to create your frame. No two pieces will be identical (in real life, they never are, right?). The script will also calculate the size of frame you can do based on the starting image dimensions. Also, once you have chosen the inside size of the frame, it will calculate how thick you CAN create the rest of the frame.

As an added detail, there is the option to add rusted nails to the corners, if you chose the overlapped type of corners. Those are picture tubes that you can also use in other projects if you want.

Grab this script in the store: Wood Frame

Would you like to get this script for free? Tell  me if you tend to prefer the overlapped type of corner or the mitered type. Tell me in the comments below and i'll pick a winner next week to be announced in the newsletter. Not a subscriber yet? Not a problem. You can register here and it is free (and you only get one email per week).

Wood frames in png formatHow about a few frames to play with? I created 10 frames for you: 5 have mitered corners and 5 have overlapped corners. Their sizes range from 1000 to 2000 pixels, but you can easily resize them if you need.

They are all in png format so they can be used in just about any program you have.

Most of those frames are pretty rustic as i used worn, old or painted wood images to start. I also adjusted the color of the nails when they were used so they would match the rest of the frame a little better (that is something you can do with the script since everything is left unmerged for you to tweak the individual pieces).

You need to be logged in to download this sample. You can either login, or register on the top of this page.

Corel Challenge

Time-300Do you have photos of your clock or watch? Maybe a photo from New Year's Eve? How about an in-review project where the time is illustrated with a clock or a watch or other time ticking device? Post it on the Corel page HERE.

Remember that they don't need to be only PHOTOS, but you can post scrapbook projects too!

I would love to see one of your projects posted on the Corel page.


New script – Ribbon Banner

Ribbon Banner script for digital scrapbooking with Paintshop ProYou might have seen those vector banners on various sites, but you wish you could have something using real ribbons, right? Now, you can do that with this script and Paintshop Pro.

Pick any straight ribbon (it could work with a ricrac but it is not as pretty) or a long piece of paper and run the script. Answer the prompts, select the area you want in the center and voilà!

You can use any kind of straight ribbon: lace, translucent, directional, etc. The script is coded to use the whole length of the ribbon so nothing is lost, especially those frayed edges if you have them.

This is even better than using layered templates because it really curves the center piece so you can use patterned designs, text, or stripes and it will follow that curve. In addition, you can have the central part as wide or narrow as you want, and even use a section of the ribbon that is not in the very center.

Grab this fun script in the store: Ribbon Banner.

Banners are often used to announce something and in a layout, it could be a way to label or date it. What would you use it for? Would you add text? If so, what text? Tell me in the comments below and i'll pick someone who will win this script next week. I'll announce it in the newsletter. Not a subscriber yet? Not a problem. You can register here and it is free (and you only get one email per week).

Ribbon banner sampler with the seasonsSince it is harder to add text on a curved ribbon, i figured i might as well create a banner with the text already in for you to use. I could have done a banner for each month of the year, or each day of the week, but i thought it would be interesting to have the four seasons for you to share various photos in a layout.

Each banner is about 3000 pixels wide, so they would nicely fit on top of a layout, almost as a title. Yet, you can size them down, or even trim the ends if you want.

You need to be logged in to download this sample. You can either login, or register on the top of this page.


News in the Campus


WeatherWise-400Have you registered to the live presentation this coming Sunday?

We will play alongside Mother Nature in adding rain and snow to photos.

It is FREE, as usual!

Register now


Corel Paintshop Pro Challenge


Silhouette-300

Do you have a photo with silhouettes? Do you have photos you have edited to create silhouettes? Or do you have other projects (not photos) that use silhouettes, like a card, or a layout?

Submit it to the #CorelChallenge

Let's show the world what we can do with PSP (and not just photography)!

Check out the collage i made for the Create Magic with PSP class. I posted it on that #CorelChallenge thread. Now it is your turn.

And if you want to create your own silhouette, there is a brief tutorial in the Campus HERE.

New script – Painted wood

Painted wood script for Paintshop ProWhether you are creating a scrapbook page or any other graphic project, painted wood elements could add a special touch. And when you can choose one of SIX types of wood, when you can choose any shape, any design and any color, you are sure that your elements will be unique.

There are so many ways to coordinate them with your project, the theme and the the colors.

The script will use a black and white version of your design, leaving the white as bare wood and the black as painted. You will also get a textured paint that will match the grain of the wood, even though the script will randomize the angle and the scale.

You can get this script in the store: Painted Wood.

For a chance to win this script, add a comment below telling me what design you would first use to run this script on. Would you rather do alphabets, arrows, frames, basic shapes, etc.  A winner will be announced next week. Not a subscriber yet? Not a problem. You can register here and it is free (and you only get one email per week).

Painted Wood DigitsAs a free sample, this week, i created a fun set of digits. I used a black fill and a white outline to set the inside to be painted by the script. And instead of a solid color, i used a gradient with the 3 primary colors.

I have to say that i am particularly pleased with the end result. With those primary colors, you can easily embellish a child theme project, or a school theme layout.

You can use those to indicate the child's grade, his age, or the actual year a photo was taken.

You need to be logged in to download this sample. You can either login, or register on the top of this page.


#CorelChallenge

Primary-300

Did you hear about the #CorelChallenge?

This week, you can send in photo, scrapbook page or other graphic projects based on primary colors. Here are some ideas for you:

  • create a monochrome layout
  • use an ordinary photo, turn it in black and white and make one of those primary colors reappear (here is a tutorial).
  • create clusters with elements in primary colors (buttons, ribbons, flowers)
  • use the free digits above to add a colorful date

Go for it. Let's show how we can use primary colors in projects OTHER than just photos. You can do it!

Post your project here.


New script – Text Confetti

Text Confetti script for Paintshop ProIf you want to scatter some confetti in the shape of a "50" or a "Mom", you can use the Picture Tubes function in Paintshop Pro, but you still have to create those custom picture tubes.

This script will let you create exactly that. You can pick the font and the text you want (numbers, or short words work best). You can pick any single or multiple papers to punch the text out from. And you can also add some brightness variation on each individual image.

In the end, you will get a set of picture tubes that will include 81 different "punched" versions of the word or number, so you can scatter them all over your page, if you want to.

Grab this fun script in the store: Text Confetti.

Do you want to win this script? Tell me, in the comments below, what would be your first word or number you would create when you get your hands on this script (and tell me why... i am curious). I'll announce the winner in next week's newsletter. Not a subscriber yet? Not a problem. You can register here and it is free (and you only get one email per week).

For free samples, i decided to offer two. One will be exclusively for Paintshop Pro users, and one will be for everyone.

The first freebie is a set of confetti picture tubes for "1st". In fact, you get TWO sets: one in black and white and grey (which you CAN colorize if you want), and one in primary colors. You just have to drop the .psptube files in the Picture Tubes folder, and you will be able to access them from your Picture tube tool. Then, it will just be up to you to scatter them over your project for a fun accent.

The second freebie is a set of two frames. They are both made from the picture tubes above, but if you can't use a picture tube because you are not a Paintshop Pro user, you can still use those frames. They are 3600x3600 in png format, so almost all graphic programs can use those.

Text Confetti picture tubes - 1st   Text Confetti frames in png format


You need to be logged in to download these samples. You can either login, or register on the top of this page.

#CorelChallenge

Firsts-300

Did you hear about the #CorelChallenge?

Every week, Corel proposes some specific topics or themes and invite viewers to submit projects, photos, or scrapbook pages on Facebook. You just have to tag your post with #CorelChallenge.

Well, last Monday, the theme was "Firsts". So it could be the first tooth, the first kiss, but since it is the start of school, it is a perfect time for the first day of school. Did you take a picture of your child on their first day of school? If so, why not take the freebie from today, and create a fun "First" layout and submit it to the #CorelChallenge? That would be a PERFECT opportunity to showcase something OTHER than photos (since we all know that Paintshop Pro can do much more than just photo editing, right?)

Last week's theme was "Letters and numbers". View my layout HERE. (comments, likes and shares are more than welcome)

Now, it is your turn: use those tubes and create a fun "First" layout for this challenge.

ADSR5 – Challenge #4

For our challenge #4, we had to create, as a team, 4 ATC: 2 for/about our race partner, and 2 for our real life love. Here is the set of 4 ATCs made by our team:

adsr5-ch4-team99-01-lrg

How about you hop over the NDISB gallery and add some comments? Or if you dont want to go and register to post a comment, you can still post something here!

ADSR5 – Challenge #2

I have to say that the first challenge was a tiny bit challenging, but this one was definitely tougher. Finding 5 pictures was the easy part. finding a picture with a 5 in it, well, let's just say i got lucky as one of the pic i wanted to use DID have a 5 in it so i didn`t have to take another shot or do any magic to get it. So, here is my layout.

challenge2-800

What do you think of that layout? You can comment here, on this blog, or in the NDISB gallery, here (or both!)

I am still waiting for the correction of the challenge to see if we are good to go.