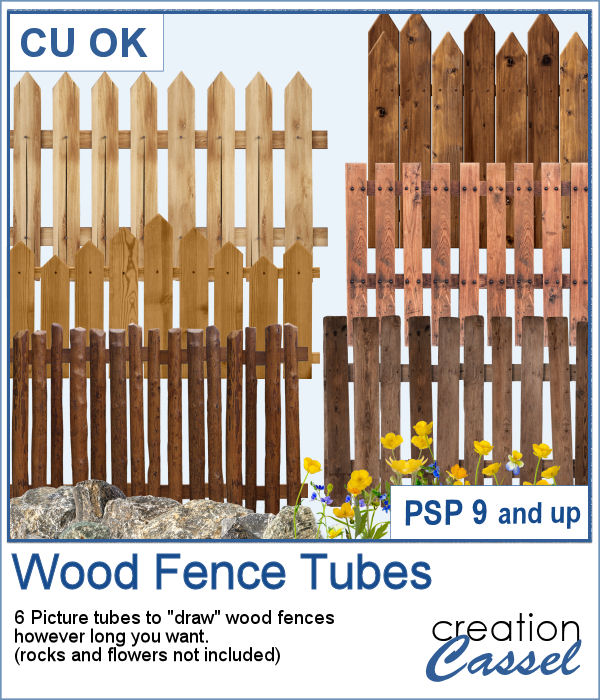
You can add one of our 6 types of wood fence, in just about any size but also, in any length. You can draw those fences on a perfectly straight line or follow a slight hill.
Add some paint on the fences, surround them with grass, flowers, vines, or place additional elements in front, behind or on them. Make the fence a main feature of your project or just a decorative element.
Get these tubes in the store: Wood Fence
In order to win this script, add a comment on this Facebook post telling us what would paint or glue on it (remember, add a comment, not just a Like!) The winner will be announced in the newsletter, next week. Not a subscriber yet? Not a problem. You can register here and it is free (and you only get one email per week).
As a sampler, I created one long fence (4000 pixels) and added some vines and a lovely cat. It is in PNG format so you can use it with any program.
You need to be logged in to download this sample. You can either login, or register on the top of this page.

You can draw any design in one of the 20 picture tubes of icing. You can hand draw any design or use one of the included four preset shapes as paths. Or you can use your own vector work to create a custom path, and then use the VectorTube script to add the icing evenly.
For a sample, I created two phrases (with separate words) that you can use for any summer project. Arrange the words as you want, since they are individual files in PNG format. No shadow is included so you can add your own.
Sometimes, you have long filenames for your supplies and for whatever reason, you would like to shorten them. Doing it manually, one file at a time is tedious to say the least.
For today's free sample, I created a series of summer-themed phrase strips. A set of 15 strips are available for you to embellish any summer project.
Another way to add a date, a name, a location, or a short phrase in a unique way on your project.
For a sample, I created four seasonal tags and left the rectangle with lines so you could add your own message or customize the tag further. You can distress it, stain it, add a stamp to it, etc. Then, tie it to something with a string or a ring.
Gradients can be really helpful to create unique patterns, but in order to make such a tile, you have to create a new gradient every time. That is tedious and a lot of work since you might not need those gradients afterward.
For a sample, I used the color palette from the DigitalScrapbook July 2023 blog train, and generated 16 different tiles. Each tile is 400x400 pixels in jpg format so you should be able to use them in most graphic programs.
This is the third of the series of edge punches. Just like the punches you would get to cut out the edges of traditional paper products, you can use the Eraser tool to cut out of the edge of your digital element.
For a sample, I created a template for a greeting card. It is simply in png format so it can be used in any program. If you have a cutting machine, you can cut this card for a unique effect, once you have customized and printed it.
With this script, you will get some custom masks to showcase sections of your photo. You can either keep a section intact or convert that section to a series of curly lines.
As a sample, I ran the script on a black image, and selected the central area to create the mask. The result is a simple jpg mask that you can use to showcase a panoramic photo, or simply focus on a horizontal section of a non-panoramic photo.
There are so many ways to add a date, a name, a location, or a short phrase to a project. This script will let you choose a main word/date to place in the center, with your choice of font. In addition, you can select the words to add in the top and bottom corners.
As a sampler, I created a set of "blank" datestamps with the days of the week. You can add whatever you want in the center area. Since they are all in greyscale, you can colorize them however you want.
This new script will create some seamless scale patterns with any color palette you want.
As a sample, I created 3 seamless tiles with green shades to go with a possible dinosaur theme. Of course, you can also use those with a garden theme or anything else. There is also a full-size paper with randomized greens. All the elements used the same color palette so they should match if you want to use them together.
Although you can create a painted frame manually, sometimes, you want to save time and work and create a simple yet precise frame that still looks hand drawn. This script will do that for you in just a few seconds.
For samplers, I created two double frames with the script, on a 5x7 photo. Since both layers are left separate, I changed the color of one of the two to create something more interesting. I used the colors from the June blog train at DigitalScrapbook.com.