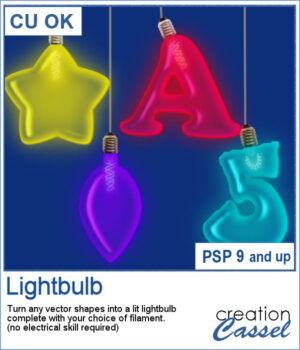
Whatever theme you are using for your next graphic project, you might want to add some light to it. I mean, literally. With this script, you will be able to turn any vector object into a lit lightbulb, with your choice of color.
In addition, you will be able to add one of the six included filament wherever you want on the edge of the bulb for a unique effect. You could even put the filament at the bottom if you want to "stand" your lightbulbs on a base instead of hanging them.
Get it in the store: Lightbulb
In order to win this product, add a comment on this Facebook post telling us how you would use these lightbulbs (remember, add a comment, not just a Like!) The winner will be announced in the newsletter, next week. Not a subscriber yet? Not a problem. You can register here and it is free (and you only get one email per week).
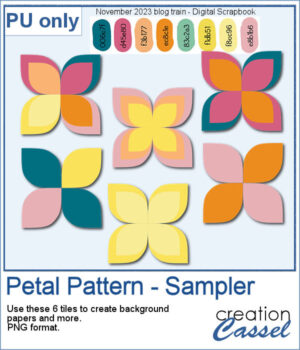
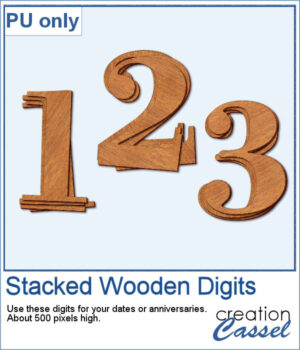
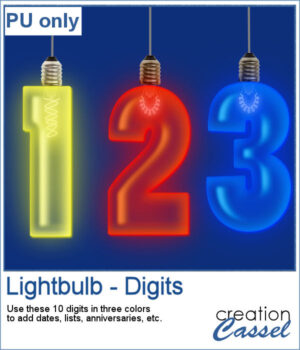
For a sampler, I created a simple set of digits for you to add any date you want. I used basic colors so they will be as versatile as possible. Each one is in png format so you can add them onto any background. They are in png format so you can use them with most graphic programs and they have some transparency so you will be able to see through them.
You need to be logged in to download this sample. You can either login, or register on the top of this page.

It might be a design of the past, but sometimes, the past comes back into fashion. You can create this design manually, but it is tedious. You can use a template, but it is still tedious to change the colors especially if you want more variety.
For a sample, I chose the color palette from the Digital Scrapbook November blog train and generated six fun designs that you can use as seamless patterns. They are in png format, and have no background so you can add whatever color you want behind it.
You can surely create stacks of wooden characters, but it is quite tedious. You have to duplicate each character, and then rotate and move them one by one, then add some thickness AND if you want to add the proper inside shadows, you have to do that on each individual layer.
For a sampler, I created a set of 10 digits, using cherry wood. Each digit is about 500 pixels high in png format.
If you want some variety in your supplies but still want something to match what you currently have, this is another script to create a bow from a straight ribbon.
For a sample, I used some ribbon templates from Marisa Lerin and colored them with some autumn colors. The freebie includes the three bows but also the matching straight ribbon I created for them so you can even use them with other scripts to create other types of bows and knots.
You can showcase your favorite photo with a custom mask based on the text of your choice. You can choose any text, in any font. You can finish the script by editing the original text to something different if you want. You can move that text where you want on the project, whether it is on top, on the bottom, or in the plain center.
For a sample, I ran the script starting with the word "Family" in a fairly thin font, but finished it with a thicker version of the same name, placed at the bottom. This allows you to showcase your photo without interruptions in the middle.
This script will let you create a variety of different triangle-patterned papers in any size you want.
For a sampler, I created two papers using Halloween colors and made them into bookmarks that you can print and cut if you want. The files are in PNG format so it can be used by anyone.
For a Halloween or witch-themed project, a broom is always welcome. But how do you get something custom? This script will yield a different result every time you run it, even though you get options to customize the broomstick by choosing the type and color of the handle, the color of the straw and the color of the string.
As a sample, I created seven broomsticks in different colors of the rainbow, each of them with a special name too.
You might already be familiar with dingbats, but very few fonts will replicate machine stitching. The Creation Cassel store is the only place where you can find those fonts. This time around, I created another set of 50 different stitches that you can add to your arsenal.
For a sampler, I created a simple rectangular 7x5 inches frame made from a decorative (and basic) stitch. They are in greyscale, so you can colorize it however you want to match your project. Then, add a texture, a bevel, and a shadow to create that 3D effect. Showcase a photo or some text inside it.
If you like the grungy style, this script will help you. It can turn any design, drawing, photo, or any flat element into a wooden item with cracked paint all over.
As a sample, I created a simple alphabet with Halloween colors and ran the script on each of those elements. You get a full alphabet of uppercase, and ten digits to match.
This script will quickly add an inked edge around any element, photo, or shape for you. It will look like a wet/watercolor ink that was added in three runs. The edges will be uneven all over and slightly more opaque on the very edges.
This week, I created a whole alphabet using the Fatty font in orange color with a brown edge. That would be very suitable for fall or Halloween themes.