Web
Analytics

Suggestion box

Suggestion-boxDid you ever envy Photoshop users because they have actions that do not have anything similar for Paintshop?

Did you ever see something in a kit or element pack and wish you could do something similar with a script?

Do you find yourself creating some elements manually and wish you could have a script to help you do them faster and more efficiently?

Well, this is the perfect time to make your suggestions. As part of the Digital Scrapbook Day events, you can actually win $$ for suggesting your ideas. Post a description of your "dream tool" in the comments below and i will draw a winner among all the suggestions received until Saturday November 14th (the draw will take place on Sunday morning).

The winner of the draw will get a $25 coupon for my store, but that is not all. If i manage to create a script following your suggestion, you will be allowed to get most beta versions, test it, give feedback  for added options, and you will also get the final script FREE. So what are you waiting for?  If you want to link to a picture, or preview of something you would like to do, it would be great!

One entry per person, but you can list as many ideas as you want! The more ideas you suggest, the more chances you have that i will make one of yours!

Put on your thinking cap and send me your ideas.

Digital Scrapbook Day 2015

DSD2015

DSD is on the first Saturday of November, and it has been the case since 2007. For the occasion, I got several activities going on, for you. Let's have a look at them.


1- Storewide sale

Everything in the store will be discounted by 25%, for Saturday and Sunday. Did you ever fill a wishlist in the store? Now it is time to stock up and get those products you want to get to complete your projects faster or create new kits for your store.

Start shopping!


2- FREE tutorials

TimeIn the Campus, there is a dedicated page where you will see 12 unique tutorials rotate, one by one, each hour. For 48 hours, you will have the possibility to view video tutorials that are normally reserved for enrolled students. The list of the 12 tutorials is this:

Brick wall texture

  • License plate
  • Ghost text
  • Paper clip (2) (not the ordinary ones)
  • Reflection
  • Wired Ribbon
  • Gold Element
  • Coffee stain
  • Folded Edge
  • Accordion
  • Separator tab
  • Flair button

Which ones will you catch? Come back often.

Check out the tutorials


3- Show off contest (with prizes to win)

In order to promote digital scrapbooking using Paintshop Pro, there is a show off contest in the Campus. There are prizes to win too:

  • One copy of Paintshop Pro X8 Ultimate (value: $99.99)
  • Two Master Classes of your choice (value: $39.98)
  • The new 12 Cards for Christmas (value: $9.99)

And what do you have to do? Simple: show off a scrapbook project you made using Paintshop Pro. But, there is a little twist to this: you have to use ANY ONE OF THE FOLLOWING:

  • a technique you learned in the Campus
  • a free element you picked from this blog (there are lots of those)
  • or a product you purchased from the store (or one of mine in the Discovery Center)

Once you have something to show off, you can post it in the Campus forum, while browsing through the other members' submissions. The winner will be picked AT RANDOM, NEXT WEEK, on November 14th (next Saturday). This will give you a chance to pick some freebies from this blog, or view new tutorials in the Campus, or grab a new product in the store, and complete up to THREE projects to enter.

Check the Campus forum


101Tricks-1504- 101 super easy tricks to work faster with Paintshop Pro

On Amazon.com, there is a countdown deal for this Kindle ebook that offers 101 tips. Since it is a countdown deal, it is now $0.99 but tomorrow, it will be up to $1.99 and then, Monday night, it will be back to its regular price of $2.99. Don't delay.

You don't have a Kindle? No problem. You can download the free app to view any Kindle book on your computer (how cool is that?). Although the deal is only available on amazon.com (in the U.S.), since it is a digital download, you are still able to get it: there is no added shipping fees!

That is 101 tips that where shared through years of newsletter, but they are all in one handy document, just for your convenience.

Grab your copy of this book

I would greatly appreciate a review of this book, when you have a chance. I am sure you will learn SOMEthing from it.


So what will you be doing this weekend??


New script – Scattered Photos

Paintshop Pro script to scatter photos
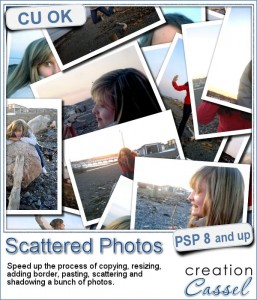
Although Paintshop Pro allows you to nicely arrange photos without too much effort of measuring (since you can use guides and templates), it might be a little bit more tedious to pretend you scattered photos randomly. Yet, it can be a great way to display lots of photos on a project.

In order to scatter photos, you need to open each of them, resize them (if needed), add a border (if you want), copy them, paste them on the base image, rotate them, move them where you want, and then repeat for each other photo. If you have 5 or 6 photos, that might be feasible, but what if you have 50 of them? That can definitely add up and take you time.

This script will take care of all the steps once you have given it the proper information: where the photos are, what size you want them, if you want a border, and where you want the photos to be scattered (in the center, on the outer edge or all over). Then, you can go get a coffee and it will be all done by the time you come back!

Since all the photos are left on unmerged layers, you can always tweak them later (after all, the script can't tell if it looks the way YOU want).

And furthermore, the script will add shadows to all the layers if you want to, saving you even more time.

Get this script in the store: Scattered Photos.

Do you want a chance to win this script (so you can display all your Halloween photos)? Tell me what is the maximum number of photos you have placed onto one layout. The winner will be announced next week, in the newsletter. Not a subscriber yet? Not a problem. You can register here and it is free (and you only get one email per week).

Facebook cover - layered template for scattered photos
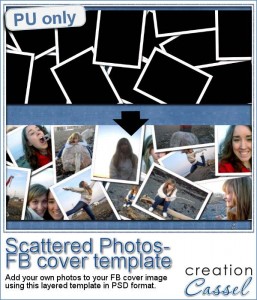
Since this script will work only on YOUR own images, I am sure you would not care much about using mine. So, instead of using photos to place them onto a base image, i simply created black rectangles, the size of regular photos, and used them instead of photos. I ran the script with those and let it place them all over the place on a Facebook cover template.

Since you surely didn't want to only have black layers, I promoted the borders to their own layers, added shadows on separate layers, and now, you can use the photo layers to place your own. Basically, with some extra work, I made a layered template for you.

Although you can manually replace each photo layer by your own photos, you can also save a lot of time by using the Speed Scrap script (especially the one for photos) as it will resize the photos, and mask them so you can tweak their placement and rotation without worrying about trimming the excess or having to use a photo of the same format.

You need to be logged in to download this sample. You can either login, or register on the top of this page.


Corel Paintshop Pro Challenge

Halloween-300Check out this week's #CorelChallenge. Obviously, for the time of year, the theme is Halloween. Do you have Halloween photos? Halloween decorations? Or maybe a Halloween theme scrapbook page? I know, they talk about Halloween PHOTOS but you definitely can show off more than just photos!

Post your project on their thread or tag it with #CorelChallenge.

I CHALLENGE you!

Did you see the one i posted on their thread? Just to test how many of you will see it, LIKE it on their thread.


News in the Campus

ToBlur-400Have you registered to the live presentation tomorrow?

We will look at how you can use the Blur command for some functional and creative effects.

It is FREE, as usual!

Register now


New script – Knot #12

Knot 12 - Paintshop Pro scriptHow you would use knots if you had a traditional ribbon can vary from day to day. You would have options to tie that ribbon in multiple manners, attach different objects, wrap that ribbon around all kinds of things. This is why, in digital scrapbooking, there are so many different knots available.

This script for Paintshop Pro will allow you to "tie" a ribbon into a simple knot, but unlike other scripts where you can only choose the color or pattern and everything looks like it is "flood filled" with that pattern, this script will use your own straight ribbon. This is perfect to have a match if you are using the other ribbon in the project, whether it is left straight, or tied into a different knot or bow created with another script.

Grab this script in the store: Knot #12.

For a chance to win this script, tell me how you would customize a knot for your project otherwise. Do you colorize greyscale ribbons? Do you manually create a knot with your ribbon? Do you use a script that asks you for the color to use? Leave a comment below and i'll announce the winner in the newsletter, next week. Not a subscriber yet? Not a problem. You can register here and it is free (and you only get one email per week).

Knot 12 - free samples in PSD formatThis week, i created three straight ribbons (from greyscale ones) and ran the script to end up with three simple knots. Each one is left in unmerged layers so you can put them around any object or insert something in the middle of the knot.

I had fun with colorizing those ribbons with a gradient instead of a solid color. I think that gives a different kind of look to the knot that makes it more interesting (at least, that is what i think).

I also included the straight ribbons so you can use them with other scripts, or as is on your project to match. Or you can insert the straight ribbon directly in the knot too. Why not?

Remember to show off what you used this knot for. What project did you create using it?

You need to be logged in to download this sample. You can either login, or register on the top of this page.


Corel Paintshop Pro Challenge

TextCheck out this week's #CorelChallenge. It is about using text on your project. Well, if you are a scrapbooker, you surely have text on your projects! It could be a fun journaling display, or an unusual title. Or how about a nice Subway art design? We can do so much with Paintshop Pro. Show off what you can do (or just what you have done already).

Post your project on their thread or tag it with #CorelChallenge

Did you see the one i posted on their thread?


News in the Campus

Text-in-silhouetteAs part of the Corel Challenge, i created a text inside a silhouette. I thought it was a great way to use the new text wrapping tool from PSP X8.

I also made a short tutorial on how to create this result. Read it HERE.

New script – Ribbon Tag Banners

Ribbon Tag Banners script for Paintshop ProSometimes, you might have some interesting straight ribbons, but you would like to use them differently. How about creating some banners with bits and pieces of those ribbons? Does it sound like too much work? Of course, it can be tedious to do by hand, but with this script, you will have it done perfectly, in no time.

You have many options and even if you used the same options with the exact same ribbons, you will always get a slightly different result. Add a rope or a stitching on the top and you get another result.

Use your Paintshop Pro and this script to create a matching decorative element for your project, especially if you are using the straight ribbons elsewhere on the page. Or, if you want to add a decorative banner in your kit.

Have fun with this script. Get it in the store: Ribbon Tag Banners.

For a chance to get this script for free, tell me how you would like to "tie" those ribbon pieces: a string or a stitching or something else? I'll announce the winner in next week's newsletter. Not a subscriber yet? Not a problem. You can register here and it is free (and you only get one email per week).

Ribbon Tag Banner for Halloween for freeFor a sample of what this script can do, I used a single ribbon and colorized it in orange, and darkened the other copy to create a Halloween theme banner. The whole element is 3600 pixels wide, but you can easily resize it down to match the the space you need on your project.

Use this banner across the page, or between two photos, or just under the journaling to add focus on it.

The string on top, was made using the VectorTube script and I applied one Rope tube.

You need to be logged in to download this sample. You can either login, or register on the top of this page.

New script – Acrylic Styles B

Acrylic Styles for Paintshop ProIf you like the idea of the Photoshop acrylic styles but can't seem to be able to replicate them in Paintshop Pro, here is the answer to you. You won't have to tweak and try various settings, as the script will do all the calculations to create a great effect, no matter what the size of the element is.

In addition, you can create a series of elements (many shapes, or an alpha) in one run as the script will also make the correct measurement to give you a proportionate result.

You get 6 different acrylic effects, that you can apply to ANY shape. Create accents with arrows, stars, frames or alpha. Create elements for a frozen theme or a dark Halloween one.

Get this script in the store: Acrylic Styles B.

If you want a chance to win this script, tell me, in the comments, what elements you would like to create with these styles OR which style seems to appeal to you the most. I'll announce a winner in the newsletter, next week. Not a subscriber yet? Not a problem. You can register here and it is free (and you only get one email per week).

Acrylic Alpha made using an Acrylic Style script in Paintshop Pro. Perfect for your scrapbookFor the sample, this week, I created a full alpha with a set of digits, using the Cracked style (that is the project that gave me the insight to adjust the script to add the possibility of creating multiple elements in one run).

Each character is 500 pixels high and in PNG format.

After creating the alpha in one run of the script, I used the Alpha Sheet Separator 2 script to separate all of them, again, in one run. That is such a time saver! Check out the video on how much time you can save with this script, if you are a designer.

You need to be logged in to download this sample. You can either login, or register on the top of this page.

New script – Ribbon Banner

Ribbon Banner script for digital scrapbooking with Paintshop ProYou might have seen those vector banners on various sites, but you wish you could have something using real ribbons, right? Now, you can do that with this script and Paintshop Pro.

Pick any straight ribbon (it could work with a ricrac but it is not as pretty) or a long piece of paper and run the script. Answer the prompts, select the area you want in the center and voilà!

You can use any kind of straight ribbon: lace, translucent, directional, etc. The script is coded to use the whole length of the ribbon so nothing is lost, especially those frayed edges if you have them.

This is even better than using layered templates because it really curves the center piece so you can use patterned designs, text, or stripes and it will follow that curve. In addition, you can have the central part as wide or narrow as you want, and even use a section of the ribbon that is not in the very center.

Grab this fun script in the store: Ribbon Banner.

Banners are often used to announce something and in a layout, it could be a way to label or date it. What would you use it for? Would you add text? If so, what text? Tell me in the comments below and i'll pick someone who will win this script next week. I'll announce it in the newsletter. Not a subscriber yet? Not a problem. You can register here and it is free (and you only get one email per week).

Ribbon banner sampler with the seasonsSince it is harder to add text on a curved ribbon, i figured i might as well create a banner with the text already in for you to use. I could have done a banner for each month of the year, or each day of the week, but i thought it would be interesting to have the four seasons for you to share various photos in a layout.

Each banner is about 3000 pixels wide, so they would nicely fit on top of a layout, almost as a title. Yet, you can size them down, or even trim the ends if you want.

You need to be logged in to download this sample. You can either login, or register on the top of this page.


News in the Campus


WeatherWise-400Have you registered to the live presentation this coming Sunday?

We will play alongside Mother Nature in adding rain and snow to photos.

It is FREE, as usual!

Register now


Corel Paintshop Pro Challenge


Silhouette-300

Do you have a photo with silhouettes? Do you have photos you have edited to create silhouettes? Or do you have other projects (not photos) that use silhouettes, like a card, or a layout?

Submit it to the #CorelChallenge

Let's show the world what we can do with PSP (and not just photography)!

Check out the collage i made for the Create Magic with PSP class. I posted it on that #CorelChallenge thread. Now it is your turn.

And if you want to create your own silhouette, there is a brief tutorial in the Campus HERE.

New script – Painted wood

Painted wood script for Paintshop ProWhether you are creating a scrapbook page or any other graphic project, painted wood elements could add a special touch. And when you can choose one of SIX types of wood, when you can choose any shape, any design and any color, you are sure that your elements will be unique.

There are so many ways to coordinate them with your project, the theme and the the colors.

The script will use a black and white version of your design, leaving the white as bare wood and the black as painted. You will also get a textured paint that will match the grain of the wood, even though the script will randomize the angle and the scale.

You can get this script in the store: Painted Wood.

For a chance to win this script, add a comment below telling me what design you would first use to run this script on. Would you rather do alphabets, arrows, frames, basic shapes, etc.  A winner will be announced next week. Not a subscriber yet? Not a problem. You can register here and it is free (and you only get one email per week).

Painted Wood DigitsAs a free sample, this week, i created a fun set of digits. I used a black fill and a white outline to set the inside to be painted by the script. And instead of a solid color, i used a gradient with the 3 primary colors.

I have to say that i am particularly pleased with the end result. With those primary colors, you can easily embellish a child theme project, or a school theme layout.

You can use those to indicate the child's grade, his age, or the actual year a photo was taken.

You need to be logged in to download this sample. You can either login, or register on the top of this page.


#CorelChallenge

Primary-300

Did you hear about the #CorelChallenge?

This week, you can send in photo, scrapbook page or other graphic projects based on primary colors. Here are some ideas for you:

  • create a monochrome layout
  • use an ordinary photo, turn it in black and white and make one of those primary colors reappear (here is a tutorial).
  • create clusters with elements in primary colors (buttons, ribbons, flowers)
  • use the free digits above to add a colorful date

Go for it. Let's show how we can use primary colors in projects OTHER than just photos. You can do it!

Post your project here.


New script – Text Confetti

Text Confetti script for Paintshop ProIf you want to scatter some confetti in the shape of a "50" or a "Mom", you can use the Picture Tubes function in Paintshop Pro, but you still have to create those custom picture tubes.

This script will let you create exactly that. You can pick the font and the text you want (numbers, or short words work best). You can pick any single or multiple papers to punch the text out from. And you can also add some brightness variation on each individual image.

In the end, you will get a set of picture tubes that will include 81 different "punched" versions of the word or number, so you can scatter them all over your page, if you want to.

Grab this fun script in the store: Text Confetti.

Do you want to win this script? Tell me, in the comments below, what would be your first word or number you would create when you get your hands on this script (and tell me why... i am curious). I'll announce the winner in next week's newsletter. Not a subscriber yet? Not a problem. You can register here and it is free (and you only get one email per week).

For free samples, i decided to offer two. One will be exclusively for Paintshop Pro users, and one will be for everyone.

The first freebie is a set of confetti picture tubes for "1st". In fact, you get TWO sets: one in black and white and grey (which you CAN colorize if you want), and one in primary colors. You just have to drop the .psptube files in the Picture Tubes folder, and you will be able to access them from your Picture tube tool. Then, it will just be up to you to scatter them over your project for a fun accent.

The second freebie is a set of two frames. They are both made from the picture tubes above, but if you can't use a picture tube because you are not a Paintshop Pro user, you can still use those frames. They are 3600x3600 in png format, so almost all graphic programs can use those.

Text Confetti picture tubes - 1st   Text Confetti frames in png format


You need to be logged in to download these samples. You can either login, or register on the top of this page.

#CorelChallenge

Firsts-300

Did you hear about the #CorelChallenge?

Every week, Corel proposes some specific topics or themes and invite viewers to submit projects, photos, or scrapbook pages on Facebook. You just have to tag your post with #CorelChallenge.

Well, last Monday, the theme was "Firsts". So it could be the first tooth, the first kiss, but since it is the start of school, it is a perfect time for the first day of school. Did you take a picture of your child on their first day of school? If so, why not take the freebie from today, and create a fun "First" layout and submit it to the #CorelChallenge? That would be a PERFECT opportunity to showcase something OTHER than photos (since we all know that Paintshop Pro can do much more than just photo editing, right?)

Last week's theme was "Letters and numbers". View my layout HERE. (comments, likes and shares are more than welcome)

Now, it is your turn: use those tubes and create a fun "First" layout for this challenge.

New script – Shattered Mirror

Shattered Mirror scriptIf you like the Shattered script, which breaks up a single image into many pieces, you might actually like this new script. It is somewhat similar to the first one, but in this case, each piece will be converted into a piece of mirror, reflecting the initial image.

You can also let the script move the pieces at random for a really scattered look, or move them yourself (and you can even remove some pieces completely). You can even let the script add a drop shadow to each piece with YOUR favorite settings.

Since every piece is left on a separate layer, you can customize the end result to your liking.

Grab this fun script: Shattered Mirror script.

Do you want to win this script? Add a comment below giving ideas on how you think this script could be used (hint, check the freebie below for another idea). I'll announce a winner in the newsletter, next week. Not a subscriber yet? Not a problem. You can register here and it is free (and you only get one email per week).

Shattered Mirror PapersSince this script should be applied on YOUR own photo, it would be totally useless to offer you a free sample with one of my photos. What would you even do with it, right? However, for the fun of it, i decided to run the script on a simple black and white gradient pattern image to see what it would look like. Well, i thought the end result was... interesting.

I ran the script once and then merged the layers, cropped the resulting image and ran the script a second time.  Since the initial image is untouched i was left with the original (the gradient), the first result, and the second one.

Now, what can you do with this odd-looking paper? Try to blur it to get an overlay. Or play with the blend mode to get something different. But if you were to use your own design or gradient, you can create a kind of "crazy quilt" effect, and add stitching along the lines.

You need to be logged in to download this sample. You can either login, or register on the top of this page.
.


Corel Paintshop Pro blog


64_32-bitWhat do you know about 32 bits and 64 bits as far as PSP is concerned? Do you have plugins that don't seem to work on your new PSP versions? check out this blog post on the Corel Paintshop Pro blog for some information from LeviFiction, a regular contributor on the Corel user-to-user forum.