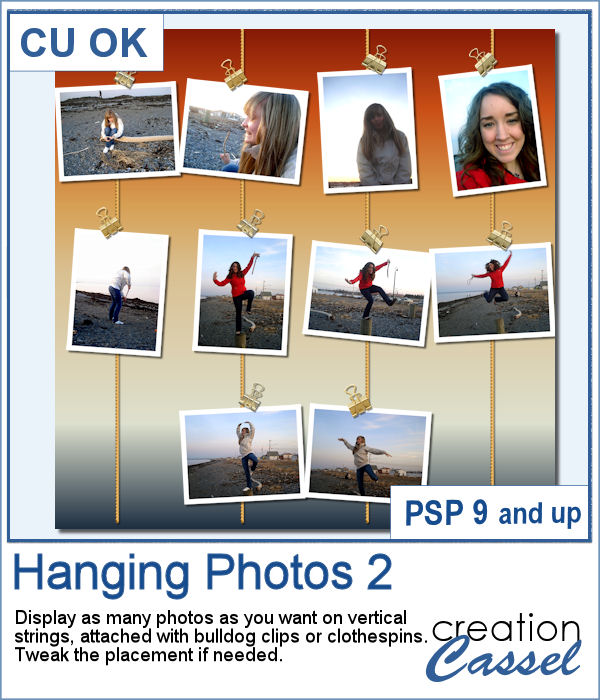
It can be fun to display photos on a string, and in digital projects, it is just as easy, although it can be tedious to resize, move, rotate and attach all the photos on one image. That is why I coded this script.
You can now display as many photos as you want on up to 6 strings. The script will take care of all the tedious and repetitive tasks for you. You will end up with unmerged layers so you can tweak the default arrangement as you wish.
Get it in the store: Hanging Photos 2
In order to win this script, add a comment on this Facebook post how you would attach photos on a string (remember, add a comment, not just a Like!) The winner will be announced in the newsletter, next week. Not a subscriber yet? Not a problem. You can register here and it is free (and you only get one email per week).
As a sampler, I created this layered template where you can display 10 photos of your choice. The template is in .pspimage format and you simply have to put the photos into the individual mask groups.
You need to be logged in to download this sample. You can either login, or register on the top of this page.

It might be easy to create a swatch palette in PaintShop Pro, but if you are starting with a large number of colors, it can be tedious. And referring to the same image whenever you are working on a project can also be annoying.
As a sampler, I used the color palettes for the next three blog trains in the DigitalScrapbook.com forum and converted them into palettes you can simply add to your PSP. Two versions of the palettes are available: one for versions 9-X6 (identified with V9 in the name) and one for versions X7 and up (identified with VX7 in the name). Unzip the ones you need for your version and save the files (or the whole folder for versions X7 and up) in the Swatches folder of your PSP. Since they are different for different versions, don't put everything in the same place, if you have earlier and older versions of PSP referring to the same content folder. If needed, simply put them in the default folders, in Documents.
As a sampler, I created a set of white shaggy digits. You can colorize them if you want to match other colors in your project. Each digit is about 500 pixels high.
You can use individual stips of "papers" in different colors to showcase quotes, phrases, or individual lines of a poem but doing that manually is time-consuming and tedious. And adding extra details means that you have to repeat the process for each strip, one by one.
For a sample, I created phrase strips on the Birthday theme, using the color palette for the May blog train at DigitalScrapbook.com. This way, you can go on this thread, and get other goodies that will match.
This script will create a double bow out of a single thin ribbon. Although you can have the same ribbon for all the loops, you can also colorize the inside loops and tails to give the impression of using different ribbons.
For a sample, I used two ribbons from Janet Kemp (you can get them
Diamond painting offers a way to turn an "ordinary" image into something magical and shimmering. It is a long and tedious process.
For a freebie, I used some cute animal cliparts and converted them into diamond paintings. Each one is fairly large so you can size them down as needed.
You can create gold and silver chains with various picture tubes available in the store, and now, you can add colored pearls to your jewelry box.
For a sampler, I created a set of digits using the red pearls. Each digit is about 550 pixels high, so you can resize them as needed.
With graphic programs, we can manipulate images in ways that the camera itself cannot do. With this script, you can add streaks from your image, to convey a sense of movement, speed, or displacement. Then, you can also manipulate those streaks to give some wave effects, to show elements through, to fade its colors, etc. So many ways this can be manipulated.
For a sample, of course, I cannot use my photos as they would likely be useless to you. So I decided to create some stitched ribbons for you using the Two-Tone Stitches from last week. I started with a basic greyscale ribbon, added the stitches on both edges, added texture, bevel, and shadows, and then, with the warp brush, I modified the stitching line so it would follow the uneven edges of the ribbon, for a more "realistic" look.
A new font has been added to the store. This time, it will allow you to use two colors of threads if you want, or simply showcase the layered effect of the stitches with the bevel and shadow.
For a sample, I created an oval frame with two sets of layered stitching for you in pink/lavender tones. The frame is in png format so it can be used in any graphic program.
Travel tags are one of those types of tags that can really mean a lot of things. Whether you actually traveled and want to showcase the various cities or airports you went to, or just want to use the tag as an element to add something more personal, this script will help you.
As a sample, I created four tags, one for each season. It is up to you to add dates or locations if you want.