Web
Analytics

New tubes – Sprinkles

Sprinkles Tubes for Paintshop ProIf you ever had cookies or cakes, you know what a little sprinkles can add to the look!

Since you were able to make cookies last week, with the Cookies script, this week, you can add some sprinkles to them.

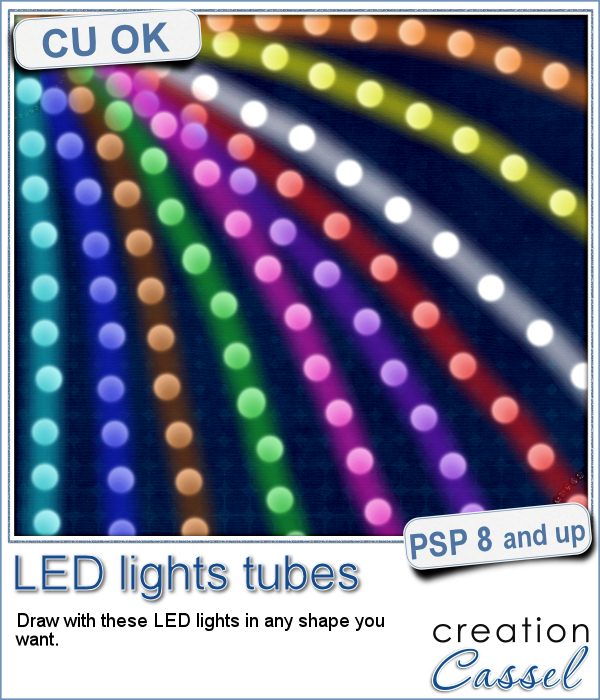
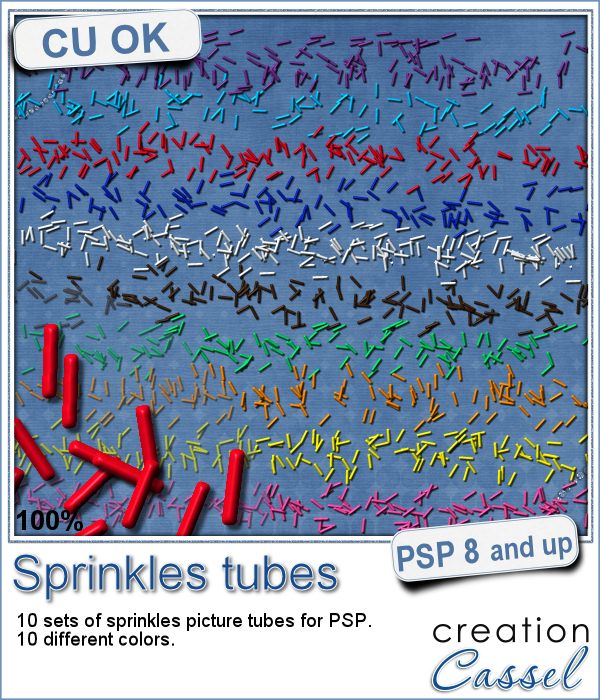
This set of picture tubes include 10 different colors of sprinkles. Simply "draw" with them as if you were coloring. The default size is the real size of a sprinkles, but if you are drawing cookies that are smaller than life, you will want to reduce the size. The step is set to allow you to place a light coat of sprinkles, but reduce the size and you will spill more sprinkles in a smaller area.

Use them to decorate cookies, cakes, donuts or cupcakes, but you can also spill some on your layout, to add a delicious effect, or incorporate some in clusters for a final touch.

Grab these (no-cal) sprinkles in the store: Sprinkles tubes.

In order to win this set of tubes, tell me what theme AND colors could you think of having. I can see that green and red would be perfect for Christmas. What other theme, and color combination can you name. I am hoping to get some themed sprinkles next week, so you can help me get your favorite themed sprinkles. I'll announce a winner in next week's newsletter. Not a subscriber yet? Not a problem. You can register here and it is free (and you only get one email per week).

Ranbow Sprinkles paper and element for scrapbookingThis week, i had fun "painting" with those sprinkles (it is addictive).

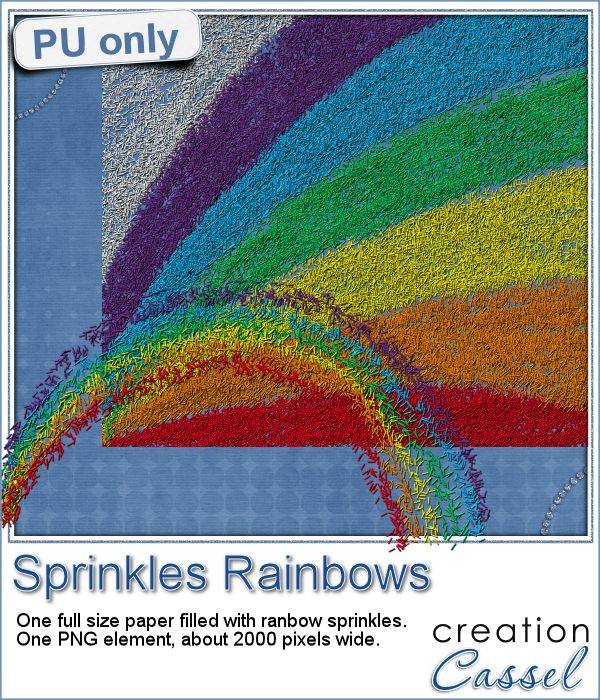
I created a simple rainbow using 6 of the 10 colors in the set. It is a PNG format, and is about 2000 pixels wide.

In addition, i created a full page (3600x3600 pixels) of sprinkles arranged in a kind of rainbow. This will be a great background for any baking, or sweet theme project. Or maybe a birthday invitation?

Grab those freebies now, and use them today.

You need to be logged in to download this sample. You can either login, or register on the top of this page.

Remember to show us how you are using them.


News from the Campus

InTheNewsDid you join the live presentation, last week?

The whole presentation was recorded and is being edited. It should be up this weekend.

Keep an eye on the Master Class section of the Campus.

Remember that it will be free to watch, as long as you are logged into the Campus.

New tubes – Twisted Strings

Twisted Strings picture tubes for Paintshop ProYou can find various strings in digital scrapbook kits, or sometimes as a set of elements, but are you struggling to find the right color, or the right length, or the right shape?

This set of picture tubes for Paintshop Pro allows you to simply draw the string with your cursor, any length you want, in any shape you want. It is like doodling a string wherever you want.

Adjust the size of the string by changing the scale of the tube: create thicker or thinner strings, depending on your project.

You get 12 different string tubes in different colors. Interestingly, the colors match those of the pipe cleaner tubes, so you can combine both sets of tubes for color coordinated projects.

Get this set of tubes in the store: Twisted String tubes.

What would you do with those tubes? Since you can create strings in any length or shape, you can surely find some creative ways to use the strings. Share your ideas in the comments below. I'll pick a winner and will announce it next week, in the newsletter. Not a subscriber yet? Not a problem. You can register here and it is free (and you only get one email per week).

cass-TwistedStrings-FlowersI created these fun flowers out of the twisted strings. They are fairly large so you can size them down to fit your project. You get two flowers, two leaves and one stem. Combine them as you wish, add them to clusters, make a border out of several flowers, etc.

The shadows were added on those.

You need to be logged in to download this sample. You can either login, or register on the top of this page.


New script – Text Confetti

Text Confetti script for Paintshop ProIf you want to scatter some confetti in the shape of a "50" or a "Mom", you can use the Picture Tubes function in Paintshop Pro, but you still have to create those custom picture tubes.

This script will let you create exactly that. You can pick the font and the text you want (numbers, or short words work best). You can pick any single or multiple papers to punch the text out from. And you can also add some brightness variation on each individual image.

In the end, you will get a set of picture tubes that will include 81 different "punched" versions of the word or number, so you can scatter them all over your page, if you want to.

Grab this fun script in the store: Text Confetti.

Do you want to win this script? Tell me, in the comments below, what would be your first word or number you would create when you get your hands on this script (and tell me why... i am curious). I'll announce the winner in next week's newsletter. Not a subscriber yet? Not a problem. You can register here and it is free (and you only get one email per week).

For free samples, i decided to offer two. One will be exclusively for Paintshop Pro users, and one will be for everyone.

The first freebie is a set of confetti picture tubes for "1st". In fact, you get TWO sets: one in black and white and grey (which you CAN colorize if you want), and one in primary colors. You just have to drop the .psptube files in the Picture Tubes folder, and you will be able to access them from your Picture tube tool. Then, it will just be up to you to scatter them over your project for a fun accent.

The second freebie is a set of two frames. They are both made from the picture tubes above, but if you can't use a picture tube because you are not a Paintshop Pro user, you can still use those frames. They are 3600x3600 in png format, so almost all graphic programs can use those.

Text Confetti picture tubes - 1st   Text Confetti frames in png format


You need to be logged in to download these samples. You can either login, or register on the top of this page.

#CorelChallenge

Firsts-300

Did you hear about the #CorelChallenge?

Every week, Corel proposes some specific topics or themes and invite viewers to submit projects, photos, or scrapbook pages on Facebook. You just have to tag your post with #CorelChallenge.

Well, last Monday, the theme was "Firsts". So it could be the first tooth, the first kiss, but since it is the start of school, it is a perfect time for the first day of school. Did you take a picture of your child on their first day of school? If so, why not take the freebie from today, and create a fun "First" layout and submit it to the #CorelChallenge? That would be a PERFECT opportunity to showcase something OTHER than photos (since we all know that Paintshop Pro can do much more than just photo editing, right?)

Last week's theme was "Letters and numbers". View my layout HERE. (comments, likes and shares are more than welcome)

Now, it is your turn: use those tubes and create a fun "First" layout for this challenge.

New tubes – Natural Ropes

Natural rope tube for Paintshop ProAre you always looking for a rope or string in the size and shape you want but can't find anything ready-made that matches your project? That is when you can REALLY take advantage of these rope tubes for Paintshop Pro.

These are picture tubes, and you can "draw" with them as you would with a brush tool. Make them long, make them short. Make them straight, make them curved, make them twisted. Create "rope doodles" if you want, draw freehand or shape them neatly with a free script (link in the description).

You get 12 different natural rope tubes that you can use to make frames, tie tags, write words, etc.

Grab this set of rope tubes in the store now: Natural Ropes.

Would you like a chance to win this set? Tell me how you would use these picture tubes in a project of yours. Post in the comment below and i'll announce the winner in the newsletter, next week. Not a subscriber yet? Not a problem. You can register here and it is free (and you only get one email per week).

Rope doodle frame in PNGTo show you how versatile these rope tubes can be, i created a doodle frame. First, i drew it with the Pen tool so i could get a vector path. That required some work and tweaking to get the smooth curves. Then, i just ran the VectorTube script to place the rope along the vector path. That was the easy part.

The biggest challenge was to add the shadow ON the rope where the pieces overlap. Since everything was on a single layer, i had to use a few steps:

  • added a shadow on a separate layer
  • selected the area where the shadow should be on top of a rope.
  • promoted that selection and moved it above the rope
  • deleted that duplicated section from the initial shadow layer
  • with the eraser tool, i removed the shadow that appeared on top of the top rope but should NOT be there
  • then, i had to feather the remaining shadow so it would look natural

It was not hard, but it was a bit time consuming. But what do you think of the result? This free download includes a shadowed version and an unshadowed one (in case you need to add your own).

You need to be logged in to download this sample. You can either login, or register on the top of this page.

Will you show me your end result with a photo in the frame? You can also post it on the pinboard HERE. Everyone would LOVE to see your project.

New tubes – Leather Braids

Leather Braid picture tubes for Paintshop ProMany elements you can get online, whether they are free or paid for, are made from photographed objects that are then extracted. This has many limitations: you can only use the element in the shape or size you have, you can rarely use a different color (although you MIGHT be able to colorize it) and you cannot customize them to fit your particular needs.

These braids are not single elements, but they are picture tubes to use with Paintshop Pro. Those tubes will create a braid as long as you want, in the shape you want; it will just follow your cursor, as if you were drawing with them.

This set includes 12 different picture tubes, perfectly set to give a continuous braid, as long as you want.

Get those braids in the store: Leather Braids.

Do you want a chance to win those Leather Braid Tubes? Tell me, in the comments below, what element you would create using those braids. I'll announce the winner in the newsletter, next week. Not a subscriber yet? Not a problem. You can register here and it is free (and you only get one email per week).

Leather Braid Frames in PNG format for free

For a sampler, this week, i created two frames: one rectangular that would fit a 5x7 photo and one round that would fit a 4x4 photo.

As you can guess, i didn't draw those shapes freehand! (you would not want to use a frame i drew freehand!) so i used the Vector Tube script from Joe Fromm to place the tube around a vector shape, which makes the placement so even.

Due to the shape of the individual images of the tube, sharp corners can give some unwanted extras. That is what happened with the rectangular frame, so i had to do a little bit of erasing of the "extra" details. If you use a smooth curve, it won't happen to you, but if you have corners or sharp curves, you might need that little extra step to make the whole element looking smooth.

You need to be logged in to download this sample. You can either login, or register on the top of this page.


News from the Campus

After months of waiting, the brand new Basic Scrap Course is now live in the Campus.

This course will walk through from the moment you open your Paintshop Pro for the first time, to the completion of 5 different layouts.

Image16-shadowed  Round-and-Round-shadowed-600 Layout3-shadowed-600 Image2-shadowed-600 Layout5

It includes lessons on

  • how to customize your PSP to suit your workflow,
  • how to add simple and not so simple shadows,
  • how to use scripts to save time,
  • how to create clusters,
  • how to do layering,
  • how to use the guides,
  • how to cut out your own paper elements,
  • how to use picture tubes to create stitching,
  • how to create titles from alpha, alpha sheets or the text tool,
  • and much more.

Perfect for beginner scrapbookers, but also perfect for someone new to Paintshop Pro. No matter your learning style, you will find this course will suit you because you get both video AND written instructions.

Interested?

Check out the more details HERE.

Do you know a friend who is considering scrapbooking with PSP? Send them over and watch them create their first digital pages.

New tubes – LED lights

cass-LEDlightsDuring the holiday season, it is a good time to see some colored lights. However, you can probably use them for any occasion, just like neon lights.

These sets of picture tubes for Paintshop Pro will allow you to simply draw with your cursor and have the  lights follow that path. Write words, make a frame around a photo, enhance the outline of a shape or even letters.

This set includes 10 different colors of lights that you can use to light up your project. Since they are lights, they will give a better result on a darker background.

You can grab this set in the store: LED lights.

Would you like to get these lights for free? Add a comment below and tell me what element or shape you would like to light with those tubes. I'll announce the winner in the newsletter next week. Not a subscriber yet? Not a problem. You can register here and it is free (and you only get one email per week).

cass-LEDlight-arrowsAs a free sample, i made 10 arrows using the 10 colors available in the set. To make them really nice and regular, i didn't draw them by hand, but i used the script called VectorTube on vector shapes.

Those will be great to add a focus onto an element or a photo on your layout. They range in size from 400 to 1000 pixels so there is plenty of room to size them down to fit your own project.

Remember that they are lights so, don't add a shadow to them! If you find them too light, you can always duplicate the layer. This might be needed if the background is not very dark.

You need to be logged in to download this sample. You can either login, or register on the top of this page.

New tubes – Wool

cass-Wool

Do you like the look and feel of soft woolly elements? Are you looking for those elements all over the net to add to your graphic projects? Although you can probably find strings, ropes and ribbons, wool is harder to find because of that fuzzy texture that is terribly hard to extract. And if you are  lucky enough to find one, it might not be in the color you want, or the shape or size or length you want. What can you do?

If you have Paintshop Pro, you can use these fun tubes. Yes they are tubes, which means you can simply draw with them and have a wool “string” in any shape, or length you want. You can use straight lines, place the wool along a vector shape (with the Vector Tube script), or just hand draw it.

This set includes 12 different colors. They are slightly different in size and texture, which will make for something more realistic, don’t you think?

You can grab this set of Wool tubes in my store. Remember they are 25% off until Tuesday.

If you want a chance to win this set, just check out the thread in the Happy Place and add your name to the thread and give me one suggestion on how these could be used. Who knows? I might just create something from your ideas!

cass-Wool2What can you do with those? See what i did. I used a heart shape and since it was a vector, i just ran the VectorTube script on it. Then, on a new layer, i simply wrote, freehand, the phrase “I LOVE YOU”. Simple enough, isn’t it?

This actually reminds me of a little pillow i sewed fr my husband, many years ago. I did some simple patchwork on one side and on the plain side, i put the words “I Love You” in wool, but just sewed the wool on the fabric. I think we still have that pillow somewhere as i seem to remember seeing it not long ago when we moved things around.

What would you do with those?

New script – Custom Directional Tube

cass-CustomDirectionalTube

Do you know about directional tubes in Paintshop Pro? They are such convenient tools that can work for you in creating unique elements. Unlike “ordinary” tubes, the directional ones will allow you to place a simple tube either following the cursor move, like a line of footsteps, arrows, etc., or in a regular sequence where each individual image would be selected and placed one after the other in the same exact order, to make a repeatable pattern or picked randomly among the numerous images created.

Although it is easy to create your own directional tube, it can be time consuming, especially when you create over 100 images.

This script will do all the tedious work for you, while allowing you much flexibility in the creation of your tube. You can have a series of as few as 9 individual images or as many as 400.

Start with any small image (it would take a lot of resources if you are using a large image to start with, especially if you want a lot of rotated images), answer a few prompts and watch it. You can add an overall bevel or shadow to all the images after they are rotated so it would be all consistent when applied.

You can get this time saving script in my store: Custom Directional Tube.

Do you want to create your own tubes too? Check out the Happy Place thread where you can add your name for a chance to win this script.

cass-CustomDirectionalTube-sample-cardsAs a sampler, i created some simple journaling cards. I simply used the little footsteps directional tube that i created for the preview above and drew a straight line with it. I could have made a curved line that would have shown the rotated steps, but i really felt it was taking too much space on the cards.

You can use those cards for baby milestones, but also for any new step you might be taking in your life, for documenting personal journeys, places you visited, and more.

Each card is 3x4 inch so they would fit in regular pocket page projects if you want.

They are also large enough for you to cut them into tags if you prefer.

You get 5 basic colors.


You need to be logged in to download this sample. You can either login, or register on the top of this page.

New tubes — Seed Beads 2

cass-SeedBeads-Opaque

This week, i am bringing you some more beads, but this time, they are opaque, and in a softer palette.

You get those bead spills at your fingertip as you can just draw with your mouse and the beads will be spilled along that path. No need to click dozens or hundreds of times to have that many beads on your project.

You get 5 colors: ivory, rose, plum, emerald and aqua. And you get two sets for each: one to spray the beads all around and one to have regular strings of beads. And you also get one set of multicolored bead spray.

Do you want more colors? Keep an eye on the store as more are coming.

You can grab this set of Opaque Seed Beads picture tubes in my store. Sorry PS users, but this is unique to PSP!

cass-SeedBeads2-SampleAs a free sample, this week, i decided to use these tubes in a different way than last week.

I opted to create a locket. How did i do it? Simple:

- i created a vector heart shape and used a gold tile as an outline and no fill. That outline was then converted to a raster and added a bevel.

- with a copy of the same vector shape, i set it for a solid fill and no outline. Once i converted it to a raster, i ran the Colored Acrylic script to give that particular “glass” look (even if i used only the plain one without any color).

- on separate layers, i sprayed pink and read seed beads. I reduced the step value so the beads would be closers, and i used several layers of beads so i could add a drop shadow on each layer.

- i deleted any extra bead that ended up outside the locket.

- finally, i added a chain with the Gold Chains directional tube.


You need to be logged in to download this sample. You can either login, or register on the top of this page.

New Picture Tubes – Seed Beads 1

cass-SeedBeads1-SilverLined

Seed beads are a common supplies in many craft projects. Scrapbooking is one of those crafts where you can see those beads, but you can now do the same thing with digital scrapbooking: you can add strings of seed beads or a random spray of those tiny decorative elements.

With Paintshop Pro, you can place those picture tubes easily with the draw of a mouse. Use the directional tubes to create strings of beads in any of the 5 colors, any length you want, in any shape you want. You can place them in straight lines, curved lines or totally freehand shapes.

You also have 6 sets of tubes that will randomly place one of the 100 slightly different beads more or less along the path you will draw with the cursor. Five sets are monochrome (green, red, blue, gold and crystal) and one set includes all the colors for a truly random effect.

You can get this set of 11 picture tubes of silver lined seed beads in my store: Creation Cassel.

Do you want all those tubes too? You can enter the draw to get this set for free, by adding your name to the RAK thread here. What would you do with those randomly placed beads?

cass-SeedBeads1-SampleFor a free sample, i created a couple of simple decorations. I placed the beads along a vector path using the VectorTube script for the flowers, and added a single “bead” in the center which was part of the Chain Beads tubes set. A little touch of colorization to match them a bit better. Then, the stems were just freehand drawn using also the string version of the green seed beads.

Finally, a little bit of multicolored beads were spilled around each element.

You get two decorative flower stems and 3 individual flowers that you can use separately.


You need to be logged in to download this sample. You can either login, or register on the top of this page.

Did you notice that it says Seed Beads 1 for this product? This means i have plans for several more types of beads tubes. Do you have any suggestion for other beads you would like to see in a picture tube format like this one? Tell me by either commenting below or by sending me an email  with a specific bead name or even an image.


News in the Campus

Tomorrow is a big day for many American and Canadian football fans (and their families). Tomorrow is also the day for our next live presentation, on Photo-Graphics with PSP – Part 3.

Join us for this presentation BEFORE the Superbowl (if you are a fan of football) or just for this ordinary Groundhog day.

RegisterNow-01-200


In the mean time, remember that the video of last month’s presentation is still available to watch (free if you are logged in).


CreateMagicWithPSP