You can create so many elements using leftover pieces of ribbons in traditional scrapbooking, but what about digital scrapbooking?
Sure you can and although it would be VERY long and tedious to do manually, this PaintShop Pro script will do the work with little effort.
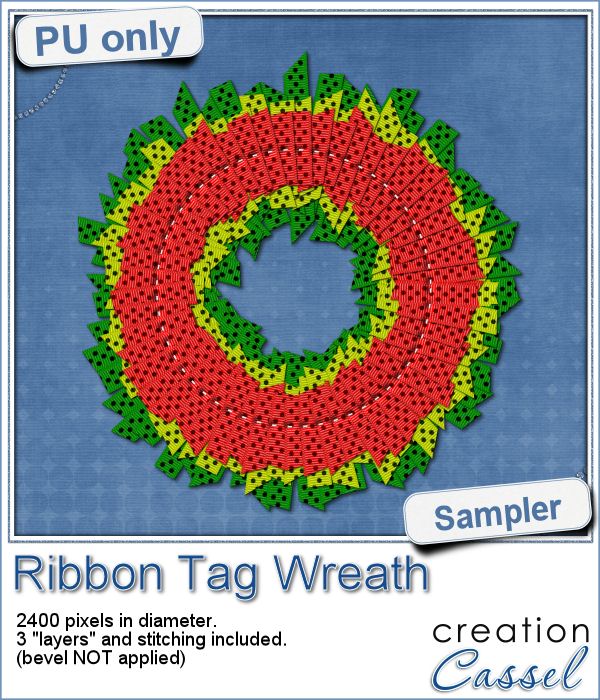
You can create a wreath using one or two or three or however many ribbons you want. They will be picked at random, cut at random (but based on the average you will choose), and placed correctly along the wreath shape.
Each individual piece will be left unmerged and will have a shadow if you want to.
You can add more than one “layer” to the wreath for a totally different look.
Since all the individual layers are left unmerged, you can always tweak them, insert decorative elements between then, etc.
Since each wreath could easily end up with over 100 pieces, just imagine the time you will be saving!
Grab this time-saving script in the store: Ribbon Tag Wreath script.
What would you do with such a script? It might be obvious to use it to create a holiday wreath, but i am sure you could think of more ideas, don’t you think? Add your suggestions in the comments below, and i will pick one person to receive this script for free. The winner will be announced in the newsletter. Not a subscriber yet? Not a problem. You can register here and it is free (and you only get one email per week).
 What about a little free sample and a quick tutorial for this week?
For this wreath, I used a single ribbon that I colorized 3 times. Here are the steps:
- before running the second part of the script, I colorized the ribbon in green and adjusted the brightness to get a rich color
- run the script to complete the first “layer”
- choose a blurred shadow
- for the second layer, re-open the same ribbon, but colorize it yellow; adjust the brightness to get the color you want
- run the script to complete the second “layer”
- for the third layer, re-open the same ribbon, but colorize it red; adjust the brightness to get the color you want
- run the script to complete the third “layer”
- merge each group
- select the Ellipse tool and draw a circle the size of the wreath; adjust the Line Style to use the Dashed, and a size of 10 pixels
- convert to a raster layer
- select outside the “stitch” layer with the Magic wand
- activate the top “layer” and apply a large inner bevel; deselect
- activate the stitch layer
- add some noise and a small bevel
The sample you have has not had the bevel applied because it would require merging the groups and removing the option to customize it on your end.
Because the sample has 163 layers (yes, that many), the files are quite large. I have them available in two formats: one PSP format, where all the pieces are grouped by “layer” and one in PSD format, where the individual pieces are linked based on their “layer” (since the PSD format would not keep the groups). So it is up to you to download the file you need.
You need to be logged in to download this sample. You can either login, or register on the top of this page.