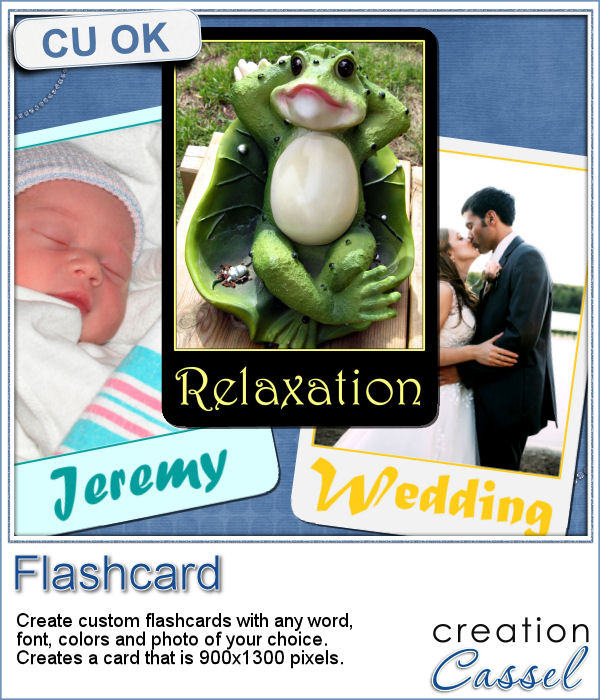
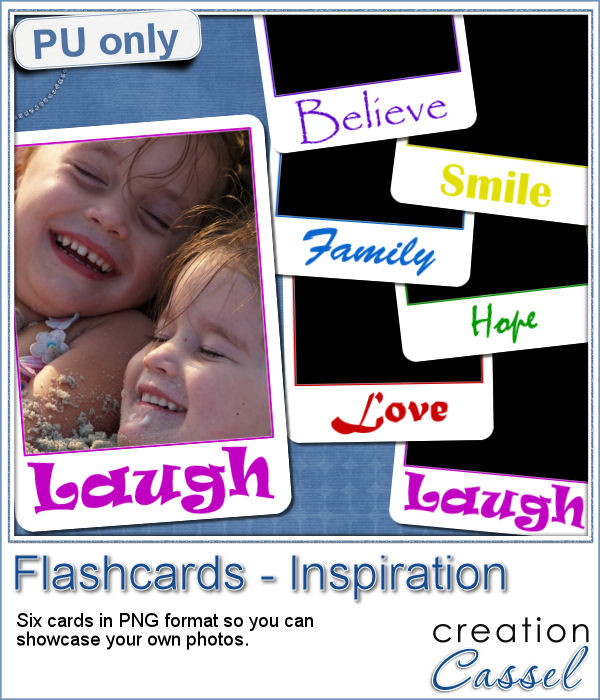
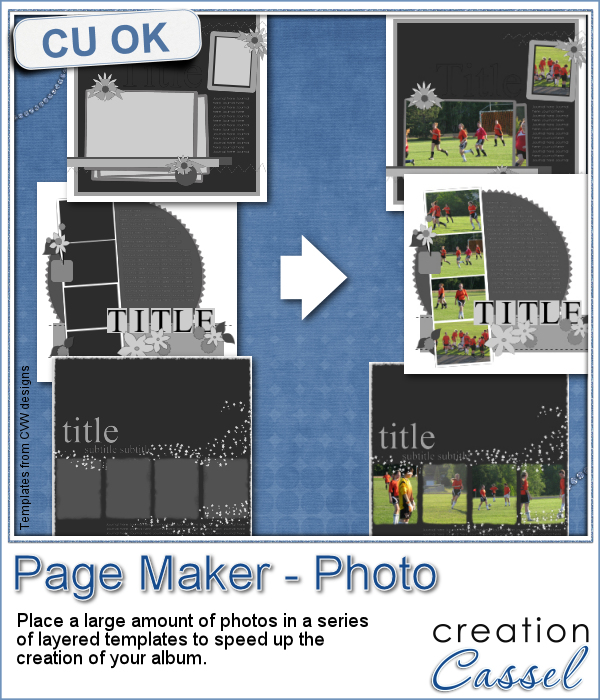
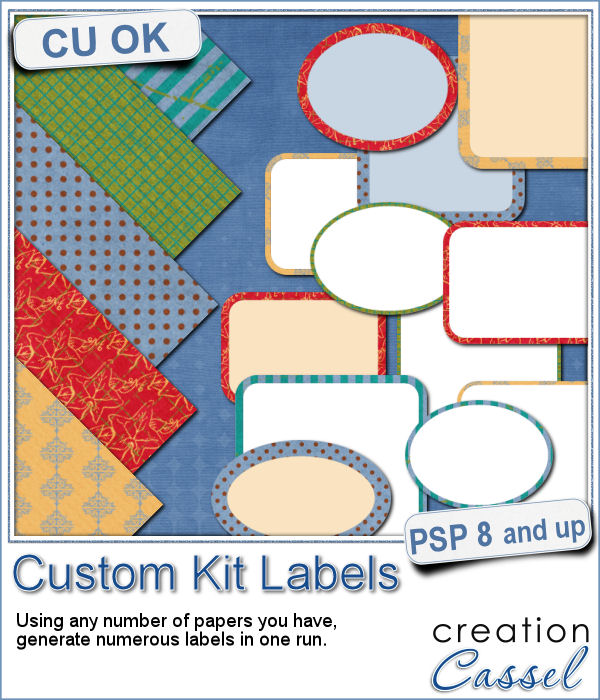
Web
Analytics

New script – Pocket Scrap

cass-PocketScrap

Pocket scrapping has become popular with tangible paper scrapping as a way to quickly set up a page with pre-cut cards where you could add notes, journaling, titles, and pockets where you could simply insert photos.

Digital scrapping can already be quick (although it could also be slower depending on your style) but the pocket look could be an interesting one for you. If you like that look, you still have to find those digital plastic pockets and overall, the number of different pages is fairly limited, but with this script, you can create a wide variety of pages, with many different number of pockets and also different shape, format and arrangement.

Furthermore, the script will also create card template for each of those pockets, no matter the size or format. How is that for a help to create your own pocket scrapping?

But that is not all. If you like the idea to have nice cards (instead of the basic grey ones), you can open your favorite papers and let the script create cards using random papers of the perfect size and place them in the correct pockets too. And since everything is left on unmerged, you can change any card for a photo, or remove it completely to place your concert ticket instead.

You can get this Pocket Scrap script in the store.

You don’t necessarily have to stick with plastic pocket; use the script to do some color blocking (and tweaking any block to your liking) to add various text and journaling, or replacing any card by photos.

cass-PocketScrap-01 cass-PocketScrap-02

What will you create with this script?

New script – Photo-Masks

cass-PhotoMasks

A while ago, as i was looking through galleries, i noticed that some scrappers are using masks to add a fun edge around their photos. That gave me the idea to try making a mask for my own photo, but i had a hard time figuring something “different” and i wished i had a way to randomize my effects.

Randomization is a great function that can be coded into scripts, so i thought a script was going to help me. And it did.

This script will use several regular effects in Paintshop Pro and combine them to create unique edges around photo AND has the additional function to create the mask in a black and white image so that the exact same effect could be obtained with another photo if needed.

Initially, this script was only working on a regular full size image, but i know that some interesting masks are not rectangular, but round, elliptic or in any other shape. In addition, the focus is not always in the center so this script allows you to make a selection where you want the focus to be, if it is not in the center.

See other examples of photo edges and matching masks can be generated with this script.

cass-PhotoMasks-01  cass-PhotoMasks-02

Isn’t that interesting that you will get the mask based on the photo edge instead of the other way around?

Go grab this unique script in the store: Photo-Masks. It will be on sale until Tuesday, June 17th.

Do you want a chance to win this script? Check out this thread in the DST forum and add your name to the thread, while answering the question in the opening post. I’ll be back next week with the name of a winner.

New Script – Alpha-Tokens

cass-Alpha-Tokens

Wooden or plastic tokens are a fun variation on tags to place letters or numbers. Having them cut out of the token is another fun change.

Although one can probably easily create a cutout from any shape or material token, it quickly becomes tedious to create several for a whole alphabet or a date with 8 digits.

This PSP Script will let you create a whole alpha, with any font you want, on any type of token you want, round or square, with or without a decorative edge.

You can also create blanks (if you want to add a painted effect) or others with designs on them, like preset shapes or hand drawn ones.

Although you can, in theory, use any font, some of them might not give a great result. This is the case if you have a font that is excessively tall or wide. The script will try to resize the height or the width, but if the other measurement is a lot more important, the resizing will not yield a suitable result.

You can grab this fun script in the store: Alpha-Tokens script.

New script – Twisted Text

cass-TwistedText

Although we often like to have regularly placed and perfectly aligned text, on some occasions we really want something funky and irregular. Do you know how to place each letter individually to create a funky text?

One method will require you to type one letter at the time, and rotate it and move it. Then repeat for the second letter, and the third. It is not hard, but it is definitely time consuming especially if you have more than just a handful of letters.

The other method is to type your text, normally, and then go with Objects > Convert Text to Curves > As Character Shapes. This will separate individual characters and convert them to shapes. Although they would remain as vector objects, they lose their Text properties: you can no longer change the font.

Finally, the third method is using this PSP script. In fact, the script will use the first method for you but much much faster. You can choose any text (any length), any font, any color (or even a gradient or a pattern), you choose how much rotation and displacement you want, and if you want to have the colors (in case you picked more than one) to appear in sequence (like in the alphabet in the preview) or in random order (like in the “Suzanne” of the preview).

Each letter is left, at the end, as individual vector objects, and still as text so you can, if you want, change the font for one or some letters/characters. You can also change the colors if you want or rearrange the letters. In fact, you can just use the randomly rotated letters and place them all around your layout if you prefer; no need to keep them in line either!

Grab this time saving script and have fun with Twisted Text.

If you want to learn how to create that kind of effect, manually (hopefully for only a handful of letters) and other fun text tricks, check out the Texting Again Master Class in the Scrapbook Campus.

New script – Multi-Photo Frame

cass-MultiPhotoFrame

In many situations, one would like to have multiple photos in a single frame. Maybe you want to have all 12 school pictures of your child, or one photo for each of your 3 kids, or a calendar of 30 photos for a month. Whatever the purpose of a multi-photo frame, it is fairly easy to do, BUT it is  tedious.

To get a perfectly aligned set of photos, you need to use guides, many guides, especially if you also want to have the spacing even.

This PSP script will take the aligning, and measuring task off your hands. Simply start with a single image in the size you want the photo placeholders to be, choose how many rows and how many photos per row, the spacing and the size of the mat and watch it do all the work for you. Go grab a coffee and it will be done when you come back.

The script will create everything on separate layers, including the shadows. And if you don’t want the photos to be on top of the white section, no problem. That white section is actually a mat with matching holes so if you remove the photo placeholders, you will still get a multi-photo frame, where you can slip a photo or many photos underneath (and that mat also has a drop shadow!).

One additional detail you MIGHT have noticed: this is CU4CU, meaning you CAN create templates for CU purpose.

Grab this time saving script: Multi-photo frame script.

You can change the spacing and the size of the outer mat to get completely different frames, even if you are using the same placeholder size. And since everything is on a separate layer, you can always tweak the result, remove some placeholders, replace others for a completely new look.

cass-MultiPhotoFrame-1 cass-MultiPhotoFrame-2

What would you use such a frame for? Tell me in this thread, and you will get a chance to win this script.

New script – Worn overlay

cass-WornOverlay

I have looked through my stash of overlays and although i have a pretty good number of them, i always feel like i don’t have the one i want. I have lots of standard size and shape ones, but they are a bit awkward to use on a different shape element, especially if the edges are worn too.

So this script for Paintshop Pro was created. It will use any shape you have, any size. This means that you can have a photo in an odd format, you can have a frame, you can even have individual letters for an alpha and the script will create something exactly for that shape.

And with the random feature, every run will give you something different, even for the same starting element. Isn’t that fun? That means that if the script gives you a particular overlay and you don’t like it, simply undo it, and run it again, and you will get something else. Repeat until you have something you like. It is so fast, that you can run the script 10 times in the time it would take you to create a single overlay, manually.

Grab this script in my store: Worn Overlay script.

See a couple of examples of other results, one with a photo and one with a simple arrow to be use in a project.

cass-WornOverlay2 cass-WornOverlay3

cass-WornOverlay-tagLet’s have a closer look at what this script can create. I started with a simple tag shape, in grey. I left it in vector format as the script knows what to do with it (meaning, if it is a vector, it converts it to a raster to continue). I ran the script 4 times on the same image. Since the image was less than 1000x1000 pixels, it worked on a resized version of the image (because the effect, done on a smaller image is not as good). However, the script is smart enough to resize the overlay once it is created so it will match the starting element.

On 3 runs, i asked to have an obviously worn border, so you can see the white edge. On the last run, i chose not to have an obvious border. It still adds a faint edge in some spots, but it is definitely not as obvious as the other three!

All four overlays AND the base tags are included in the zip file, so you can use the tag shape as a template and just layer the overlay. Then, it is up to you how you want to “merge” them. Depending on the color or pattern of the tag, you can darken the overlays and make them black, or you can use a blend mode. Also, since they all fit on the same shape, you can even layer more than one overlay for an even more tattered look!

You need to be logged in to download this sample. You can either login, or register on the top of this page.

(if the link is not active, just login or register on the top of the page).

The download link will only be available for a limited time.

New script – Quick Scallops

cass-QuickScallops

Scallops can be a delicate addition to the edges of elements. Although it is not too hard to make, we always love the idea of achieving that effect quickly and mostly, accurately.

This PSP script will do that for you much faster than you could do it by hand. In addition, it will always match the size of your element perfectly. You will not end up with a half scallop on the end of the ribbon or on the edge of the tag. The script will do the measuring perfectly. Furthermore, this will be extremely important if you want to add scallops on all four sides of an element, a photo or a mat.

What can you use this script on? Anything that has a straight, horizontal and vertical edge. It could be the bottom of a tag, a photo mat, a journaling card, a long ribbon, a frame, or more.

You can grab this time saving script in my store: Quick Scallops script.

What will YOU do with scallops?

If you want a chance to win this script, post your response in the RAK thread in the DST forum.

New script – Wrapped Frame–Round

cass-WrappedFrame-Round

A few years ago, i wrote a tutorial on how to create a wrapped frame effect with Paintshop Pro. It is a fairly simple tutorial, but it is a long process, and requires precision.

Although you can surely do that yourself, using a tutorial in the Creative Scrap Course, you might also want the convenience and speed of using a script instead.

This is what i came up, when i was looking at that tutorial. You can use ANY ribbon you have, whether it is wide or thin, opaque or translucent, plain or patterned, or even if you are using a directional design on it (like that measuring tape in the preview).

But you are not limited to only one-size-fits-all type of frame. You can choose a frame from 400 pixels in diameter for a tiny photo to a 3000 pixels frame for a whole page. Furthermore, you can have a thin frame or a thick one. But you think that is all? Think again. You can also have the ribbons overlapping, to wrap the frame almost completely, or leave some obvious space between the ribbons for a totally different effect. Do you want the ribbons to look like they are around a thick base? Add a bevel. The script will also add a drop shadow to all the pieces if you want. Most of the time, that will be your choice, but in case you want to manipulate the end result more, maybe have some flipped ends, or something like that, you can skip the shadow step and add them yourself afterward.

And yes, since all the layers are left unmerged, you still have a lot of options to manipulate and tweak them to create something really custom.

The base frame is even left in there also for you to possibly use it as a template to create something else.

See what i did with the same frame:

cass-WrappedFrame-Round-2  cass-WrappedFrame-Round-3

What else could be done? Your imagination can go wild with this!

Grab this fun time saving script: the Wrapped Frame – Round script.

Did you ever wrap a frame with a ribbon like this? Tell me in this thread in the Happy Place for a chance to win it. I’ll be back next week with the name of a winner.

This week, i wanted to give you a little challenge.

cass-WrappedFrame-Round-ChallengeIn the newsletter, i will include this layered ribbon wrapped frame, in grey scale. It will be up to you to turn this “ordinary” looking frame into a piece of art.

It is fairly big (2000 pixels wide) so you will have plenty of room to do something cool. I saved it in PSD format, so all the non-PSP users can also get into the fun of it.

What can you do with it? Here are some ideas:

- colorize the layers (all or some)

- remove some layers to make room for something else

- use the base template to create a prettier base

- add decorative elements to the whole project, like a cluster

- resize copies of the frame to layer them

What else will you do? Make sure you check the newsletter tomorrow morning so you can work on this challenge and show us your result. You can post it on our Facebook page, in a comment below, or just send it to me by email and i can post it either in the store or the newsletter.

Time to have fun!

New tubes – Wool

cass-Wool

Do you like the look and feel of soft woolly elements? Are you looking for those elements all over the net to add to your graphic projects? Although you can probably find strings, ropes and ribbons, wool is harder to find because of that fuzzy texture that is terribly hard to extract. And if you are  lucky enough to find one, it might not be in the color you want, or the shape or size or length you want. What can you do?

If you have Paintshop Pro, you can use these fun tubes. Yes they are tubes, which means you can simply draw with them and have a wool “string” in any shape, or length you want. You can use straight lines, place the wool along a vector shape (with the Vector Tube script), or just hand draw it.

This set includes 12 different colors. They are slightly different in size and texture, which will make for something more realistic, don’t you think?

You can grab this set of Wool tubes in my store. Remember they are 25% off until Tuesday.

If you want a chance to win this set, just check out the thread in the Happy Place and add your name to the thread and give me one suggestion on how these could be used. Who knows? I might just create something from your ideas!

cass-Wool2What can you do with those? See what i did. I used a heart shape and since it was a vector, i just ran the VectorTube script on it. Then, on a new layer, i simply wrote, freehand, the phrase “I LOVE YOU”. Simple enough, isn’t it?

This actually reminds me of a little pillow i sewed fr my husband, many years ago. I did some simple patchwork on one side and on the plain side, i put the words “I Love You” in wool, but just sewed the wool on the fabric. I think we still have that pillow somewhere as i seem to remember seeing it not long ago when we moved things around.

What would you do with those?

New script – Engraved Rocks

cass-EngravedRocks

Whether you want to add a date, a name, an event or simply an inspirational quote, this script will help you create these elements in just a few seconds.

You can start with any single word, phrase, number or even a design and the script will create a rock based on the size of that text (or design). You can use any size you want and the end result will be about one an a half time the width of the text. Beware that very large image will be slower to create.

Since the script will create a DIFFERENT rock every time, maybe you have some preferences for lighter rocks or darker ones, or specific shapes might look better. Ask the script to create more than one (you can ask for as many as 20) and you can pick and choose which one you want to keep.

As a bonus, for each engraved rock the script creates, it will also generate a blank version of it. This will allow you to possibly “paint” something else on the rock or just have a blank one for another project.

Grab this inspirational script of Engraved Rocks in the store.

Do you want a chance to win this script? Head over to the Happy Place and tell me of one word you would like to see in a rock that you would use. Next week, i will draw for a winner, but not only that, EVERYONE who will post with their one word, will get an inspirational rock made with that word. So, you don’t even have to be a Paintshop Pro user to get a rock!

cass-EngravedRocks-LiveLoveLaughThis week, i thought i could do something traditional, yet a little different. I created a series of 3 rocks with some common words “Live”, “Love” and “Laugh”, but i thought of adding a little twist by also creating a “Scrap” rock!

Each rock is around 500-600 pixels wide.

What do you think? This set of rocks will be sent out in the newsletter this weekend. Are you subscribed yet?

If not, subscribe now.