For a chance to win this script, what element or shape would you like to design using it? Tell me in the comments below and i'll announce a winner in the newsletter, next week. Not a subscriber yet? Not a problem. You can register here and it is free (and you only get one email per week).
As a sampler, this week, I created a few elements on the Halloween theme. I just found some shapes, and chose to create a simple outline.
Each element is a lit neon, and is about 1000 pixels wide.
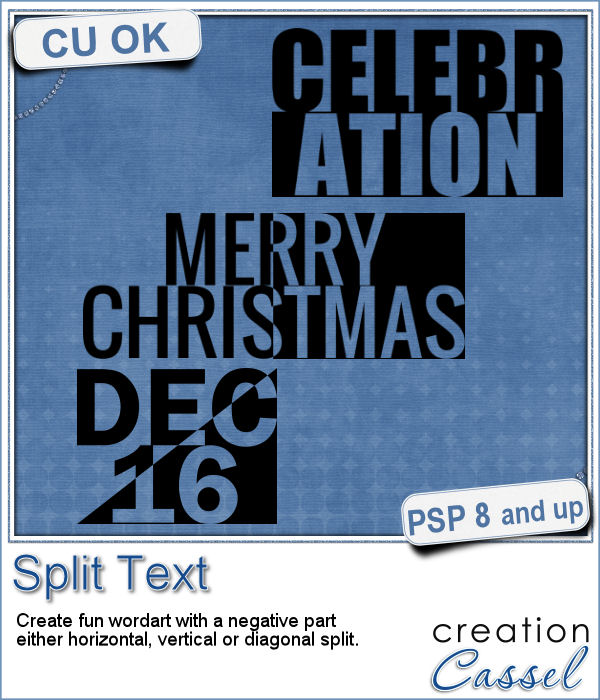
Have you ever wanted to create a wordart with half of the text in negative from the rest? It is not too hard to do manually, but it requires accuracy. And then, if you want to create a series, it is longer.
This script will make this process very fast and easy.
The script will let you choose any text, and any font. You can separate the text any way you want in two lines. Then, the magic will happen and the script will split the text either horizontally, vertically or diagonally to create the cutout effect.
Once done, everything will be merged. If you want to colorize the end result, add a bevel, add a texture, etc. it will be up to you.
What word or phrase would you want to use to create a split text wordart with this script? Tell me in the comments below. I will pick a winner that will be announced in the newsletter, next week. Not a subscriber yet? Not a problem. You can register here and it is free (and you only get one email per week).
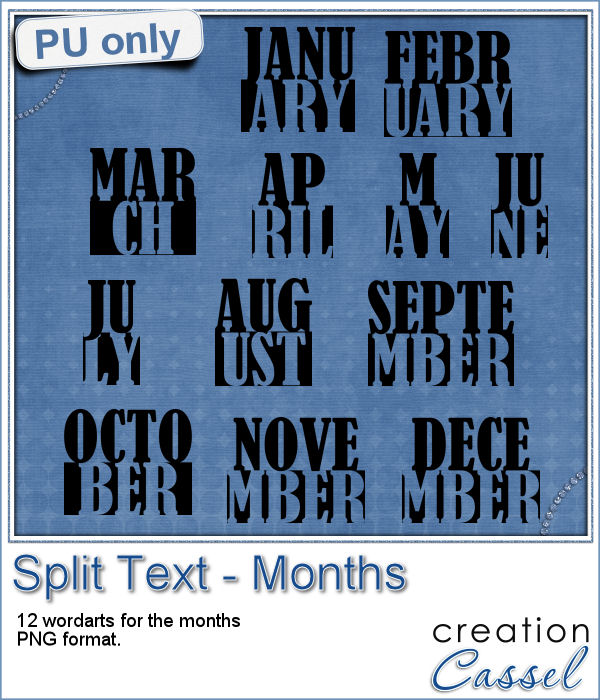
How about a way to date your layouts? Whether you are making a Project Life album, or you just want a fun way to identify when those pictures were taken, here are some split months. Each one is about 420 pixels in height, and the width will depend on the text.
If you want to colorize then, you can do so to match your project. Add a texture if you want. Add a grungy look with some brushwork, etc.
You need to be logged in to download this sample. You can either login, or register on the top of this page.
Who has too many doilies? In the last few weeks, you got scripts to help you create circular and square doilies, but with a bit of math, I managed to code a script to allow for doilies that have different sizes in height and length. That is really adding another level of flexibility for your projects.
You can create doilies a wide as 7200 pixels, which would span the width of a double page layout.
It works just like the script to create square doilies but will duplicate the segments unevenly to match the size you want.
Would you want to win this script? Tell me what is the largest size you can think you could use for your doilies (and what you would use them for, in that size). I'll announce a winner in the newsletter, next week. Not a subscriber yet? Not a problem. You can register here and it is free (and you only get one email per week).
This week, i made three rectangular doilies, and i am offering them to you. They are all in png format so you can use them with other programs than Paintshop Pro. You can also colorize them if you want. The shadows are only for the preview. There is a slight bevel only.
You need to be logged in to download this sample. You can either login, or register on the top of this page.
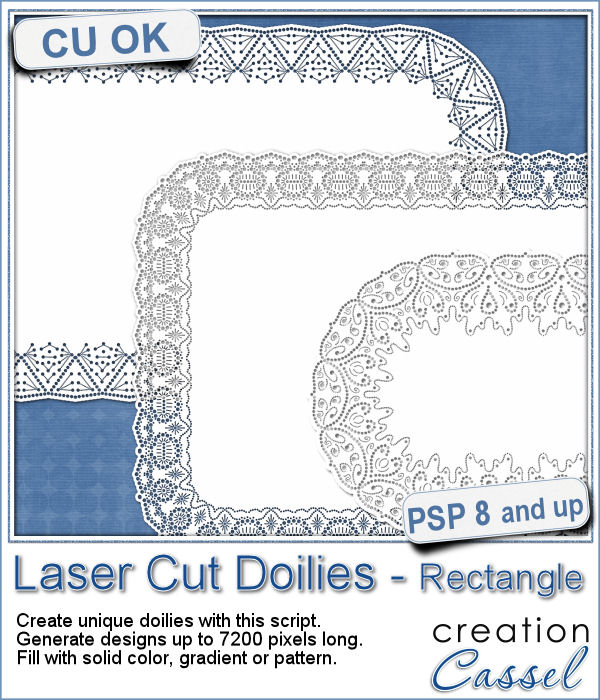
The last script that was made available to you was to help you create round laser cut doilies, but what if you want them square? With a bit of coding, I am bringing this to you. It will use a similar process to create the rounded corners, but you will also have the option to modify the design for the straight edges, either by adding more cutouts or removing some. This will allow you to have some unique designs along the straight edges, if you want.
You can create simple and basic designs or make them very intricate and detailed. It is all up to you.
What color do you feel you would like to try to create those doilies? Would you prefer to stay with white, or would you try a different color? Tell me in the comments below and i'll draw a winner that will be announced in the newsletter, next week. Not a subscriber yet? Not a problem. You can register here and it is free (and you only get one email per week).
Just like last week, i had fun creating those samples. I experimented with various designs and although a few didn't turn out too great, most of them were really pretty. That is why i am offering them to you.
Each one is about 2000 pixels wide, in png format.
You need to be logged in to download this sample. You can either login, or register on the top of this page.
Laser cut doilies are delicate paper products that offer a great variety of designs and patterns. However, in the digital world, the number of such designs is limited.
Using this script, you can create your own, unique at each run of the script.
Draw series of dots to create fun designs. Add some fine lines. Use a solid color or a gradient.
The script will turn a tiny design of yours into a full size element that you can use in various projects.
Would you like to get this script for free? Tell me what type of projects you can think of using laser cut doilies for. Tell me in the comments below and i'll pick a winner to be announced in the newsletter next week. Not a subscriber yet? Not a problem. You can register here and it is free (and you only get one email per week).
As a sample of what this script can do, I am offering you a set of 6 doilies that i created while testing this script. I have to say that this IS addictive.
I even include a colored version of one design that uses a blue gradient. I think it is pretty neat!
They are in png format, so they can be used in most graphic programs. They are all about 2000 pixels in diameter.
You need to be logged in to download this sample. You can either login, or register on the top of this page.
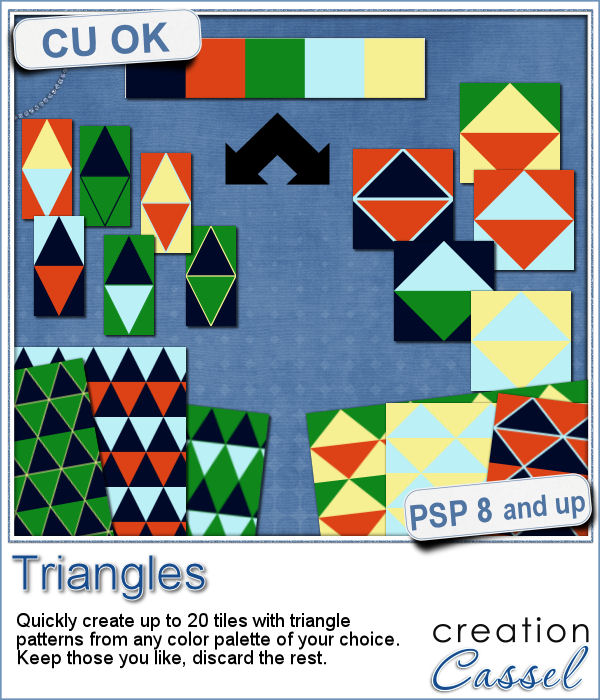
Triangle patterns are basic designs that are timeless. Change the size and the colors, add outlines or not and you can get a wide array of different seamless patterns.
Using those seamless tiles, fill any size paper to create matching background for your various projects.
Pick from up to 6 different colors and generate up to 20 tiles in a single run. You can choose to have square tiles or rectangular ones for yet, a different look. Since the outline of the triangles can be hidden, emphasized, changed color, thickness or even linestyle, the possibilities are endless.
What kind of colors would you like to see in a set of seamless triangle pattern tiles? Tell me in the comments below for a chance to win this script (or a coupon for the same value purchase). A winner will be announced in the newsletter, next week. Not a subscriber yet? Not a problem. You can register here and it is free (and you only get one email per week).
As a way for you to have fun with the end result of this script, i generated a set of 15 tiles with fall colors from a palette of 5 colors. Use those tiles as is as flood fill pattern, or you can also change the proportion of the tiles to get different types of designs.
Each tile is 600 pixels in size so you have ample opportunity to resize the tiles to your need.
You need to be logged in to download this sample. You can either login, or register on the top of this page.
What will you do with those tiles??
You can also show us by linking in the comments below.
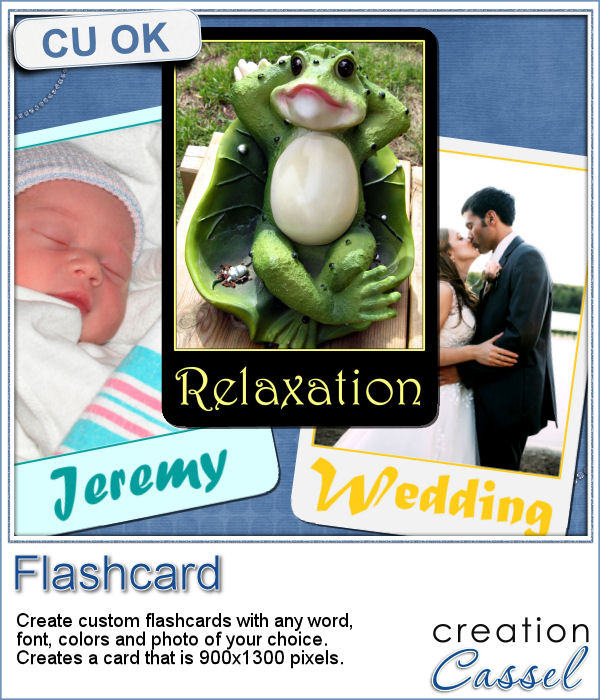
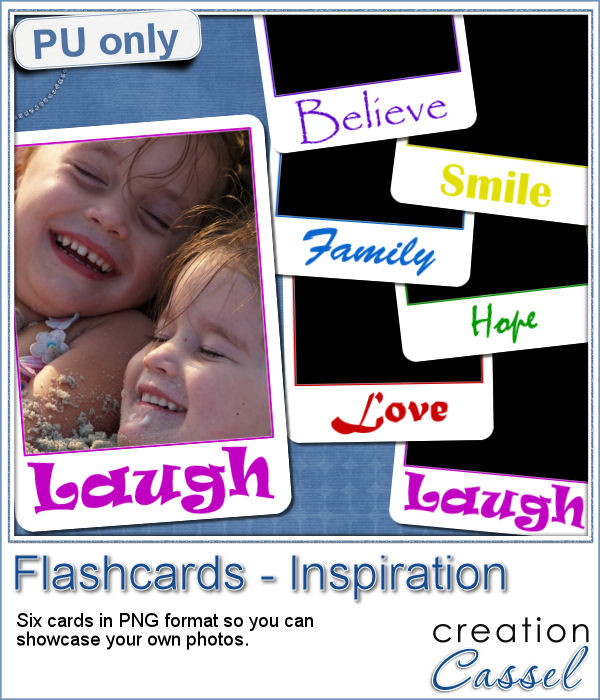
It is the time of the year when just about every school age kid is finally back to school. How about displaying your favorite photos as flashcards, as if you were teaching the viewers? Although it could be used in a school themed project, it can also just serve as a fun frame for any picture.
You have the options for the color of the card, the color of the text, the font for the text and of course, the text itself too.
Then, using whatever photo you want to display, the script will adjust its size to fit, but will leave it unmerged so you can tweak it if needed.
Would you like to get this script for free? In the comments below, tell me what would be other INSPIRATIONAL words you could think for those cards. I'll pick a winner and announce it in the newsletter, next week.Not a subscriber yet? Not a problem. You can register here and it is free (and you only get one email per week).
As a sample, i created 6 inspirational cards for you. Each card has an empty area for the photo (what is showing in black on the preview) so you can add your own image.
Each card is 900x1300 pixels.
How about printing your finished cards and distributing them, like postcards, to your loved ones?
You need to be logged in to download this sample. You can either login, or register on the top of this page.
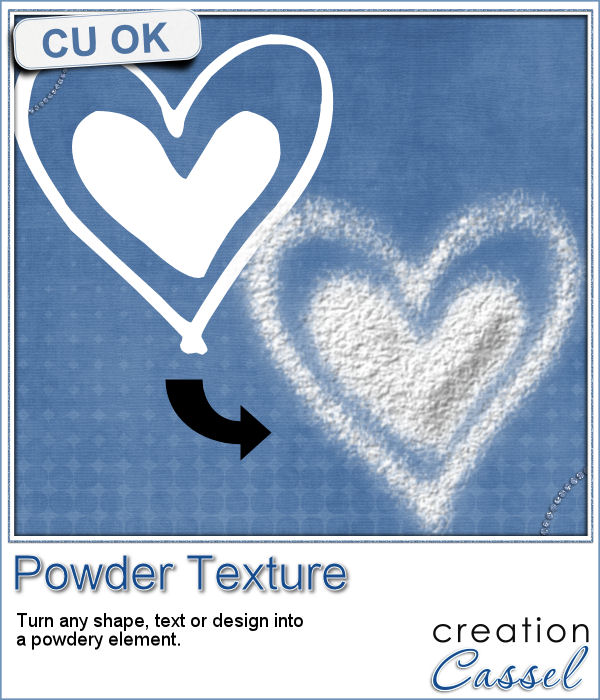
This script will be fun for anyone who has a cooking theme project: now you can write and draw with flour. Well, not real flour but you can turn your design into flower looking elements.
If you are using different colors, it could become spices: yellow for turmeric, red for paprika, grey for black pepper, etc.
Write a name, draw a shape, have fun with any design. Make it uneven with the Brush variance for an even more realistic look.
You can have flour (or baby powder) on your scrapbook pages, without making a mess!
For a chance to win this script, tell me what element you would most likely create with it (flour, baby powder, spice, paint, etc.) in the comments below. Not a subscriber yet? Not a problem. You can register here and it is free (and you only get one email per week).
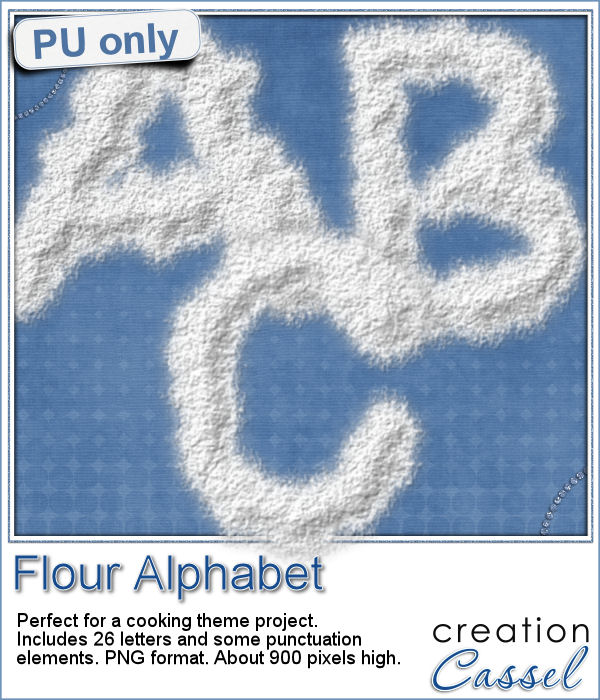
As a sampler, this week, I created a complete alphabet for you. It includes all the 26 letters, and some punctuation elements.
Each letter is about 900 pixels high so you have ample opportunity to resize them to suit your project.
Will you use them as flour or baby powder?
You need to be logged in to download this sample. You can either login, or register on the top of this page.
News from the Campus
Are you joining us this Sunday for our monthly live online class?
We'll have a different perspective on angles... and Paintshop Pro.
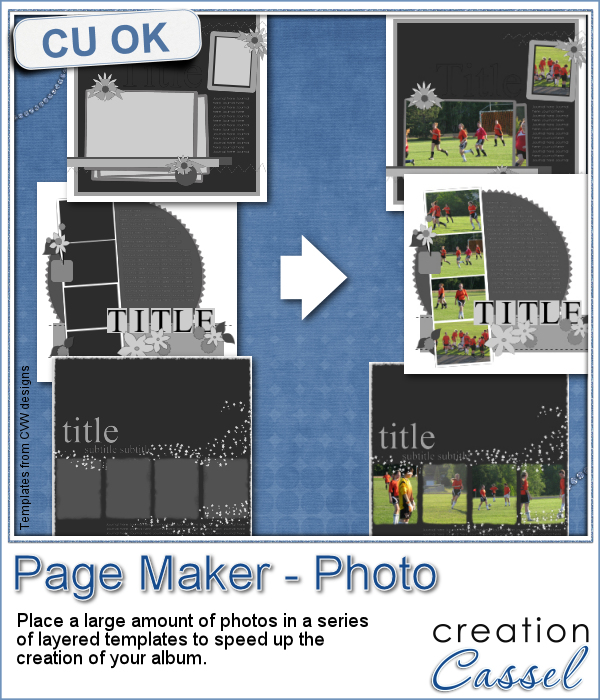
When you have a whole album, how many photos would you need? If you want to use layered templates to complete your project faster, you still might have to add dozens of photos. How long would it take you to open each of those photos, copy them, paste them on the template, in the correct layer, resize them, center them in the correct location, crop or trim them and save the layout when all the images are added? Just listing those steps in here, i am out of breath!
Now, imagine that you have 200 vacation photos that you want to place into 25 pages from layered templates. How long will it take you? Would you like it if most of the tedious tasks were done for you, leaving you only the tweaking to do?
This script will do just that. Layered templates are meant to save you time as they are great starting points, but this script will make it even more of a time saver by placing those photos FOR YOU, while you can do something else. You don't even need to be beside the computer once you completed the first few steps.
Michele tested this script and let the script work for almost 3 hours on its own. Yes, totally on its own (unsupervised) and it placed over 1400 photos in 49 templates she had. No stopping and starting and stopping again. Even if she took ONE minute per photo (which would be quite fast), it would have taken her 20 hours!!!
Do you want a chance to win this script? In the comments below, tell me how many photos you would average in a full scrapbook album. I'll pick a winner at random and announce it in the newsletter, next week. Not a subscriber yet? Not a problem. You can register here and it is free (and you only get one email per week).
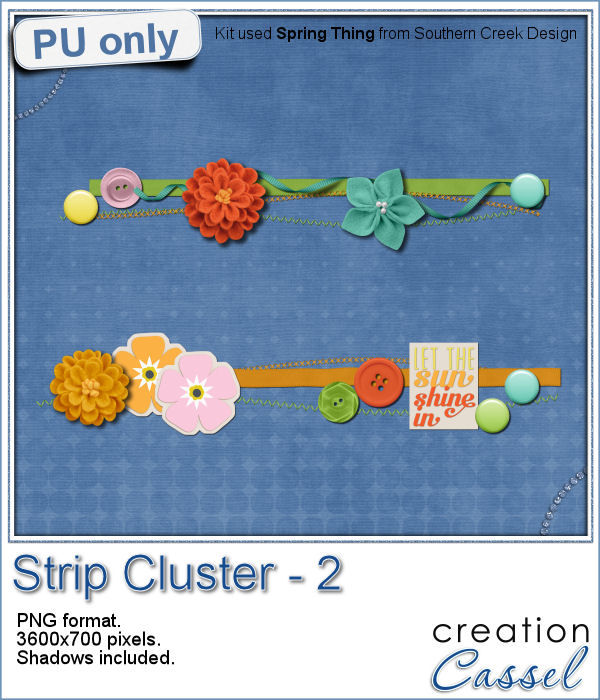
As a little sampler today, I created a couple of strip clusters using the Strip Cluster script. I used Southern Creek Design's kit, Spring Thing for that.
When running the script, I created 5 or 6 clusters and picked my two favorite. I tweaked them a little, added shadows (including one for the curled ribbon).
I think it has some really fresh colors. What do you think?
You need to be logged in to download this sample. You can either login, or register on the top of this page.
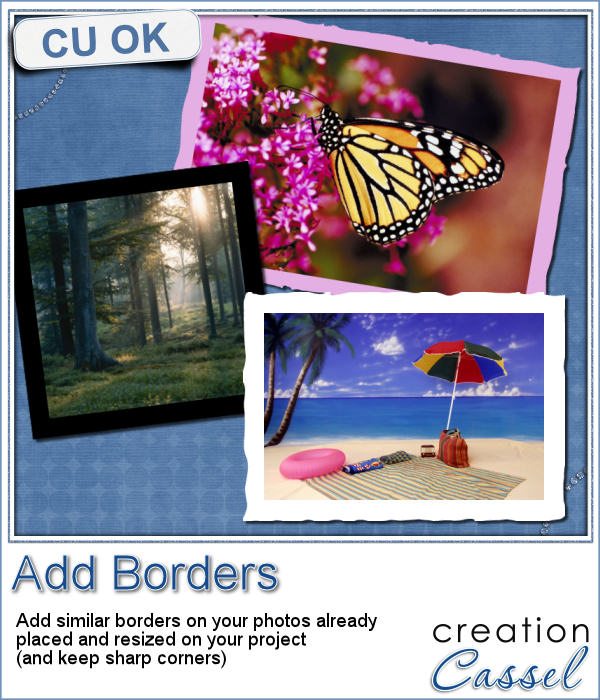
Sometimes, you might want to add identical borders to the photos on your layout, but since you want the photos to be of different sizes. How do you do that? Adding the borders before placing the photos on the montage is not the solution since you will resize the photos, and therefore, the border will also be resized.
Do you think you can select the photo and expand the selection? Unfortunately, that will create rounded corners. If that is what you want, go for it. But if you intend to have square corners on your photos, you need this script.
You can choose any color for the border, any size (up to 100 pixels) and you can also have the edges straight or irregular.
When you add a border on a photo, what would likely be the color? Tell me in the comments below for a chance to win this script. I'll pick a winner next week to be announced in the newsletter. Not a subscriber yet? Not a problem. You can register here and it is free (and you only get one email per week).
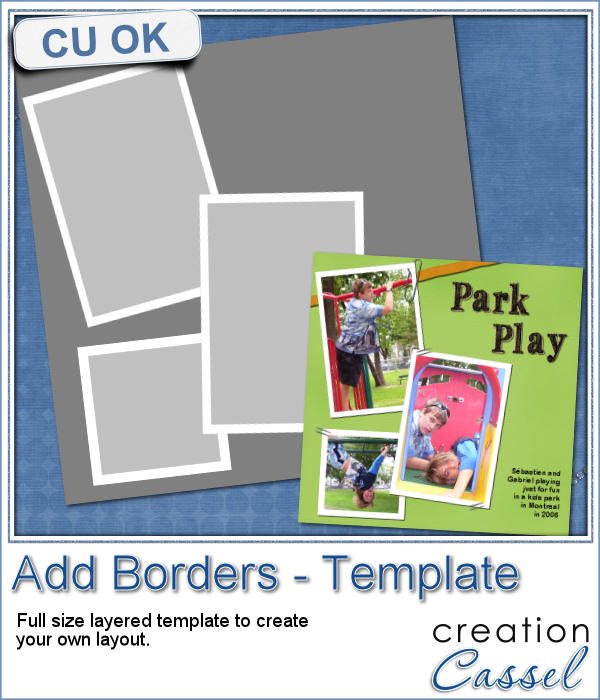
As a way to show you how this script can create identical borders even on photos of different sizes, I created this layered template for you. I had to tweak the end result since the script would merge the edge to the photo.
This is a full size layered template in PSD format.
You need to be logged in to download this sample. You can either login, or register on the top of this page.
And here is the simple layout i made using this template:
What will you make?
News from the Campus
. Did you attend the live presentation last week but felt you needed to see it again?
Did you try to attend but came in late?
Did you want to attend but had other things preventing you from joining?
Well, you are in luck. This live presentation will be repeated. Not a recording! It will be another LIVE presentation.
It will be showing the same techniques, but using a different template, different photos, and a different kit.
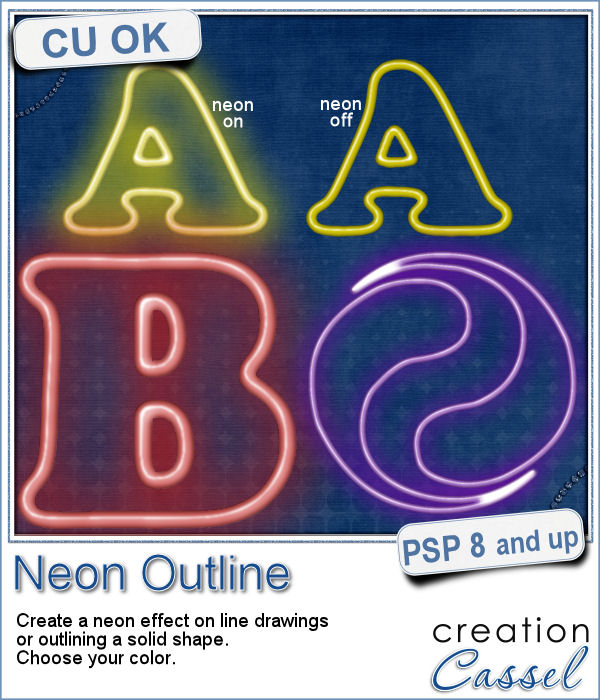 Have you ever wished to see your name in big neon letters on a marquis? Now, you can get exactly what you wished for.