Web
Analytics

New script – Group

PSP script to group layersWhenever you work on a particular project, and create many layers, it is a real pain to copy and paste each individual layer onto the new project. Of course, you can group them, but if you have 20, 30 or 100 layers, it can be very time consuming.

This is why I created this script. It will group ALL the layers in an image into ONE group in seconds saving you time that you can use for other projects. Once all the layers are grouped, you can copy and paste it onto your new project. If you need to tweak the individual elements, it is as simple as ungrouping the layers and continue your work.

A simple yet time saving tool for anyone working with many layers on their projects.

Grab this script in the store: Group.

P.S. you might want to bind this script and add it to your layer palette. Check out the video here.

I guess, since this script is free, there is no point in drawing for a winner to get it for ... free. But, i would still love to hear what you think of this script or maybe your ideas for other quick and time saving command combinations that could be turned into a script.

cass-Cookies-Letters-SymbolsAs a sampler, i obviously can't sample this script as it would just need to be applied to your own projects. But since i had a very good response to the Cookie Digits, a few weeks ago, i thought it might be time to get the matching alphabet for you.

So i created a matching alphabet with uppercase, and a set of symbols that you might use. I love this font called Fatty, as it has a shape that is uneven, just like cookies might be (at least mine).

You need to be logged in to download this sample. You can either login, or register on the top of this page.

Can i challenge you to use those cookies in a project and show it to me? And it would be great if Alex (at the Corel office) could see how creative you can be using PSP. Post your project on their FB page, and tag it with #FanFriday.


News from the Campus

Shortcuts-for-PSP-1Are you using keyboard shortcuts when working with PSP? Check out which are my top 10 shortcuts in this blog post in the Campus.

And while you are at it, download my printable shortcuts cheat sheets.

New script – Stack’m all

cass-Stack-m-allDid you ever use a script that created many elements left on your workspace? What do you do with them? If you want to save them, you might have 20 images to save, each with a different name.

Now, you can save a lot of time using the Stack'm all script. It will stack up all the images from your workspace into individual layers on ONE file. So you you would have only ONE file to save.

You have various options too: you can rename all the images that were not previously saved (like those generated by a script) with a generic name; you can also group all the layers from a multi-layered image before stacking them into the new image. A great time saver.

Get this script in the store: Stack'm all

Do you want a chance to win this script? We'll make a little game this time around. Name one script that creates a lot of elements left on your workspace. I will announce the winner in the newsletter, next week. Not a subscriber yet? Not a problem. You can register here and it is free (and you only get one email per week).
cass-WoodFrame-LayeredAs a sample for this week, i am actually giving you a little challenge. I created a wooden window and i left it in separate layers for you to customize. You can remove some vertical or horizontal pieces to create a different disposition of the window panes. You can remove some of them, cut others, end up with a variety of pane arrangements, even if they are... uneven.

Once you have customized your window panes, merge the center pieces and add a bevel to your liking. Finally, it is time to add images or photos. Will you use a single image to show outside the window? Will you add separate images on different panes so the window will act like a frame? Or will you do use it as a curious cabinet front? Use your creativity.

You need to be logged in to download this sample. You can either login, or register on the top of this page.

Now that you have created a new masterpiece that is totally unique, the REAL challenge is to post it on the Corel Paintshop Pro FB page with the tag #FanFriday. I would love one of your creations to be showcased on their gallery, just like they posted mine.

New script – Cluster Template Maker 2

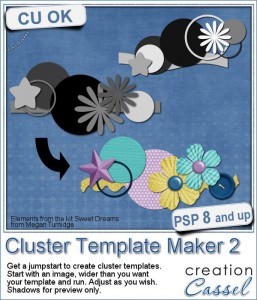
Cluster Template Maker script for Paintshop ProAdding clusters to a project can really make it stand out. But it seems that creating clusters often starts with staring at a blank page, or a bunch of elements, while being unable to decide where to start.

This script will just give you the boost you need by creating a starting point with a cluster of shapes on various layers. The shapes will vary between rectangles, circles, stars and flowers. They are just meant to help you and give you a guide to create your own cluster with papers and elements.

Run the script on a blank image (or a project) and it will determine the size of the elements based on the width of the canvas. You can always size down later.

Once it is done, you will have individual layers that you can adjust, tweak, reorder to your liking. If you don't like the result, just undo it (Ctrl-z) and run the script again. You will NEVER get the same result twice so enjoy the process!

Get this script in the store: Cluster Template Maker 2.


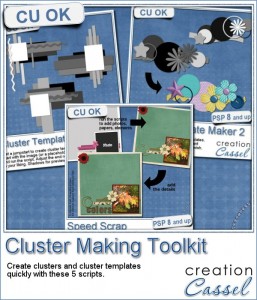
Cluster Making Toolkit scripts for Paintshop ProIf you are in love with clusters, there is also a Cluster Maker Toolkit in the store, which includes this script (Cluster Template Maker 2) but also the previous one (Cluster Template Maker) and the Speed Scrap Bundle of scripts to turn those templates into "real" clusters.

Get this Cluster Maker Toolkit in the store too.

Do you want a chance to win this script?  Tell me, in the comments below, how you usually manage to create clusters (if you create them). Do you use pre-made clusters? Do you use cluster templates? Do you work a long time to place the elements manually? I'll announce a winner in the newsletter, next week. Not a subscriber yet? Not a problem. You can register here and it is free (and you only get one email per week).


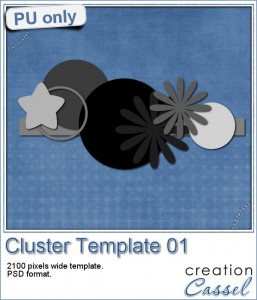
Cluster Template in PSD formatAs a way for you to sample the result of this tool script, i am offering you the cluster that is part of the preview. It is over 2000 pixels wide so you have plenty of room to resize it.

You can use it on a photo, but you can also use that to add a name for a signature tag, or just a decorative element on a flower.

Since it is saved as a PSD format, you can open it and use it in various graphic programs.

You need to be logged in to download this sample. You can either login, or register on the top of this page.

Remember that you can always tweak the template, add elements, move some, rearrange the order of the layers, etc.

Will you show us what you do with this template? Don't be shy. We want to see.

New Script – Bokeh Maker Script

cass-BokehMaker

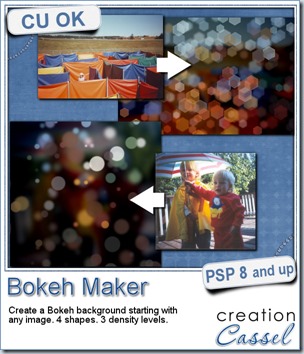
Did you ever see those fancy photography shots with lights shining out of the darkened and blurred background? Can you do that with your camera? If you can, good for you, but my little point and shoot camera cannot do that, at all. But i still like that look and wanted to see how to do it with Paintshop Pro.

In fact, creating that effect is very easy with PSP, but it is very tedious as each spot has to be done manually, one by one, each time by picking the color from the image. Imagine how many spots one has to create? Well, scripts are just meant to do faster what we COULD do, very slowly, right?

This script will do just that for you. Starting with ANY photo, of ANY size, you will be able to choose between 3 densities of the spots and 4 shapes, and then, let it work on its own. It will create 3 layers with the Bokeh effects, in different blurriness, and one background layer with a copy of your image, very blurred and darkened. All those layers will be left on separate layers so you can tweak them more. You can vary the blurriness more, change the opacity, or even remove one layer if you prefer.

You can really use ANY photo, including the bad ones, since it will be all blurred anyways!

You can grab this fun and creative Bokeh Making script in my store.

And for a chance to win this script, just add your name tothis thread in the DST forum. I’ll be back next week with the name of a winner.

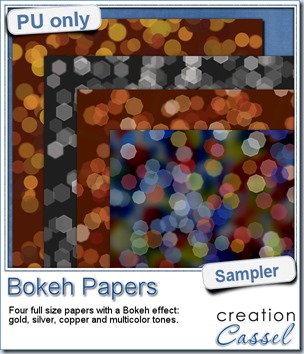
cass-BokehMaker-sample-paperFor this week’s free sampler, i created four full size papers for you. Since i dont really know what type of photos you have to use in a layout, i decided to create three of those papers using just gradients i had in my stash: one for silver, one for gold and one for copper. Once i had a paper made out of those gradients, i just ran the script on it.
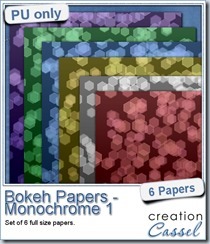

For the fourth paper, i created a base paper using the Airbrush Paper script with 3 primary colors plus white (for good measure), and then ran the Bokeh script on it. Those two scripts work very well if you want to create a Bokeh background paper to match a specific color palette instead of a photo.

Those are full size (3600x3600) and have no texture so you can add your own to match your particular project.

You need to be logged in to download this sample. You can either login, or register on the top of this page.

cass-BokehPapers-monochrome1


And there is another little freebie for you, but this time, it is only for FB fans. Check out the FB fan page and you can grab this set of 6 monochrome Bokeh papers.

Go LIKE thefan page and it will be under the FREEBIE tab.

If you don’t have a FB account, join the newsletter HERE and you will get it too.

Send your friends over and when the page reaches 400 fans, i will add another set of Bokeh papers for all.


News from the Campus

ScrappersDozen-300x300


Did you hear about the most yummy event for digital scrappers?

The recipe will include tutorials, goodies, and of course, scrapbooking!

Do you want to learn more about this event taking place this fall?

Click on HERE to get the updates for this delicious event!

New script – Distressed Edge

cass-DistressedEdge

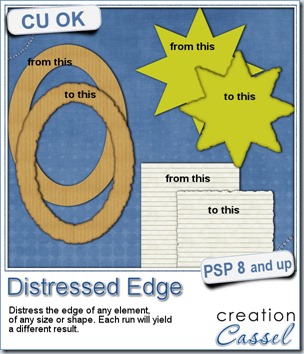
Do you like the look of distressed edges? Maybe for a worn or vintage look? It might be easy to select pieces to remove all around the edges, but it can be tedious, and making the unevenness regular is a chores. This script will do the work in just a few seconds. You can apply this script to elements, shapes, frames, alphas, tags or photos of any size.

You have the choice of three degrees of distressing and the option to add a darkened edge around too.

Best of all, you will NEVER get the exact same result twice. This means that if you want to grunge up your papers, you will be able to have different borders for every paper you run the script on. It will really look like you spent a whole lot of time grunging those papers one by one! (but we know your secret!).

You can get this Distressed Edge script in my store.

As usual, you have a chance to win this script by adding a post to the RAK thread HERE in the DST forum. I’ll be back next week with a winner. Mendy won the Gemstone script from last week. Congratulations.

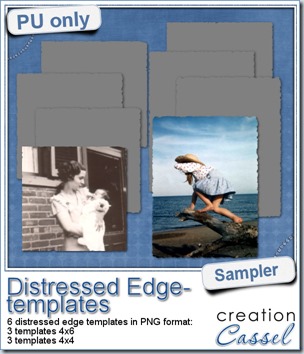
cass-DistressedEdge-sample-templatesOne neat use for the distressed edge is that although you can use it directly on the element you want to have irregular edges, you can also create your own templates for shapes you might want to use in the future. In fact, that is what i did for you. Since i could not show you a sample on YOUR elements, i made some grey templates. They are for 4x4 and 4x6 photos. If you are into pocket scrapbooking, or Project life or using Instagram, you will surely find some use for those. Use them for photos or journaling cards.
As you can see, i use them on photos, but you can use them to cut pieces of papers for a mat too.

Available for FREE when you register to our mailing list HERE.

Will you show me what you do with them?


Are you an Adobe user?

If you have CS4 or CS5, and you want to get Paintshop Pro to add to your arsenal of tools (for a very reasonable price), you can do so as Corel is offering you a great deal: you can get a full version of PSP for the upgrade price only.

Not only you can apply this offer to Paintshop Pro, but to AfterShot, CorelDraw and more Corel products.

Are you unhappy with the Creative Cloud option being the only one offered to you by Adobe? That is one additional reason you can want to switch to Corel.

Are you on a Mac? Yes, i know: Paintshop Pro does not have a native Mac version, but do you know that the Product Manager for Paintshop Pro at Corel works on a Mac? Yes, he uses a Parallels software (you might have it too?) and has had no problem with it. Do you have it? Download PSP trial version and have a look!

But you better hurry. This offer ends on August 31st.

Read more about it here.

New Script – Alpha Sheet Separator

cass-AlphaSheetSeparator

Last week, Kim emailed me about the Element Separator script. She was using it to separate the individual letters of her alpha sheet and usually ended up having the letters saved in the wrong order, because of the way the script was working. That meant that for the renaming part (which the script could not do), she had to do it manually since a renamer utility would not work in the order the files were saved, so she asked if there was a way to separate the characters in a different way, so they could at least be saved in the correct (or mostly correct) order.

Such a request is always a fun challenge for me so i looked at different ways a script could work in order to select the characters in order. I really think it paid off because this script will separate your alpha sheet in no time. Not only it will separate the letters, digits or symbols in order, but if they are simple alpha-numerical characters, the script will ALSO name them correctly, while saving them directly in the same folder the alpha sheet is saved. That means:

- no editing of the script each time you run it to indicate the folder to save the files to

- no renaming needed after the script is done

- no grid to work with

- no lengthy preparation needed in order to use a “time-saving” tool

How long do you think it could take to split, save and name all the characters of an alpha sheet? Check out this video to see for yourself (maybe take a guess before watching it?). Could you work that fast?


After Kim got to play with this script, she posted this review in the store: “I wrote to Cassel to ask if there was a way to modify the element separator script so that it could be used to separate alpha's on a sheet from left to right, as the element separator took elements in the row from the highest point. She not only came up with a modification for the script to work on alpha's, she also coded it to NAME them!!! Talk about a HUGE timesaver! Thank you Cassel, and I HIGHLY recommend this fantastic script!!” What will YOU say?

Now it is your time to grab this fantastic time saver script in my store:Creation Cassel

And if you want a chance to get this script for free, just go add your name to the thread in the Happy Place HERE and tell me what you will do with the time you save using this tool! I’ll be back next week with the name of a winner.

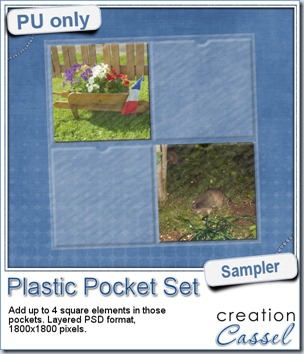
cass-PlasticPocketPage-small-2x2

Are you taking pictures with your phone? Are you often using square photos in your layouts? I created this small set of plastic pockets to display up to 4 square elements, whether they are photos,  cards or other elements. It is a layered file in PSD format, so you can actually insert your elements between the layers, and even have elements stick out of one pocket and show up on top of the pocket above it. It is just that easy to make it look as real as possible.

This set of pockets is 1800x1800 so it will not take over the whole page, and you will still have room to add other elements, photos, journaling, etc.

You need to be logged in to download this sample. You can either login, or register on the top of this page.

(if the link is not active, just login or register on the top of the page)


News from the Campus

Are you wasting time looking through your digital stash to find the perfect kit with the perfect color to match your photo? You don’t need to.

Check out the Creative Scrap Course in the Campus.

The course will give you the means to create your own elements in the perfectly matching colors, size, shape, etc. You will never find, in a ready-made kit, the papers, designs and elements you could create yourself.

Yes, you CAN do it.

Check it out and invite your friends too!

New Script – Vector Separator

cass-VectorSeparator

Did you attend the live presentation on Texting Again with PSP? We looked at how easy it was to split a word into individual letters to manipulate them separately. Someone asked a great question about adding shadows to those individual letters, and at the time, i didn’t know how to do it easily. I knew there was a way to split them but it was tedious and not convenient.

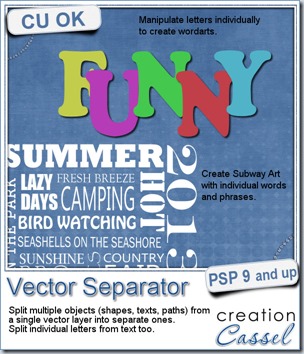
In order to accomplish what was asked, i coded this script. Not only will this script convert each letter into a shape, but it will also split them into individual vector layers that can then be manipulated at will and even converted to raster to add more effects, like shadows, textures, distortion, etc.

And if you have several vector objects (text, shape, path), and want to move them, rotate them, or otherwise manipulate them, the script can also split them into individual vector layers. This is perfect to create wordart.

You can get this time saving tool in my store atCreation Cassel.

There is also a thread HERE, where you can add your name and ANSWER the question to enter into a random draw. I will be back on Monday night with the name of a winner.

cass-SubwayArt-DAD


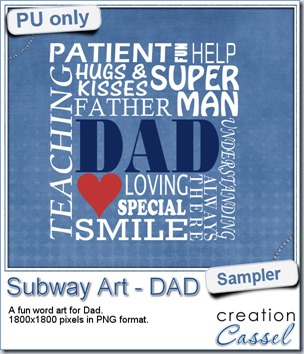
For this week’s freebie, with Father’s Day just around the corner, I thought of making a wordart for DAD. Using the Vector Separator, i was able to add all the words and phrases to one vector layer and then split them for easier manipulation.

You can use this wordart to make a frame, to overlay on a photo, or just print it and frame it.

The whole design is about 1800 x 1800 pixels and in png format so it can be used with just about any graphic program.

You need to be logged in to download this sample. You can either login, or register on the top of this page.

New script – Distribute Rasters

cass-DistributeRasters

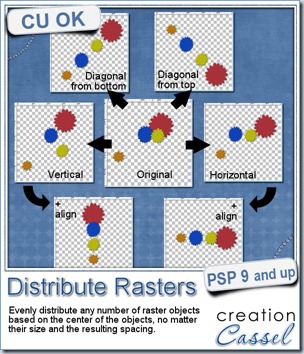
Do you sometimes have various elements, like flowers, beads, or even frames that you would like to have evenly distributed? In PSPX4 and X5, there is a function like that but if you are using an older version, the only way you can do it is using the guidelines and measuring the spacing yourself and then finding the center of each object to move them accurately.

That is a bit of work that you can avoid with this script. In fact it will take it just a few seconds to accomplish what might take you a few minutes.

In addition, this script can also distribute elements evenly on a diagonal line, based on the width and the height of the image. Even PSPX4 and X5 don’t do that!

If your elements are the same size, the spacing will probably be pretty even, but if the elements are of different size, don’t count on the spacing as the script measures by the center of each element.

Unfortunately, it is only compatible with PSP9 and up (sorry for the PSP8 users out there).

You can get this script in my store: Creation Cassel.

I also have a giveaway in the DST forum. Simply tell me, in this thread, what PSP version you are using and your name will be entered in the random draw for Monday night.

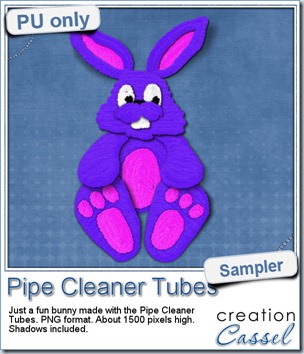
cass-PipeCleaner-sample-bunnyJust like last week, it is kind of hard to give you a sample of a tool script, so i opted for giving you a spring element (or Easter theme, if you prefer). I made this bunny out of the pipe cleaner picture tubes from the store. This is a PNG format element about 1500 pixels high. I added some fun shadows to give it some volume and the shadows are part of the element.

Those pipe cleaners are so much fun to play with. Just like the real 3D ones you can bend and twist, you can do just the same thing with your mouse. You even have the advantage of being able to make them much longer than the real ones!

They were Mendy’s idea and here is what she said about them:

“This one [product] is so much fun. Makes you feel like you are a kid again. They are so real looking that you just want to reach out and touch them. Love it!”

You need to be logged in to download this sample. You can either login, or register on the top of this page.


April is near

Yes, yes, i told you that last week, didn’t i? And i am sure you know it is only a couple of days away. But did you figure out what it will be about? Did you guess from the hints? Let’s add a bit to the list:

Hint #1: get your wishlist ready (i really mean it!)

Hint #2: check the Master Classes in the Campus (watch the video for the free one or any other you might have purchased)

Hint #3: get ready to scrap

Hint #4: FF often stands for Firefox, but for something else too!

Hint #5: something will happen on “school ground” too

See you soon! I think there might be something more in the Newsletter, Sunday morning.

Subscribe now

New script–Scattered tubes

cass-ScatteredTubes

I am sure you have used the picture tubes in Paintshop Pro and loved how easy it is to add 10, 20, 50 flowers just by clicking on your project. Click, one flower, click, one flower, and so on. However, did you ever clicked happily for dozens of times only to realize that a few flowers are too close to the edge, or you ended up with too many pink flowers grouped together and find yourself having to restart from the beginning since all the flowers were on a single layer and you could not move one separately? I have! I always wished the tubes were on individual layers, but to do that, it would become cumbersome and not as quick anymore.

That is where this script comes in. You choose the tube you want to use, and the script will scatter multiple instances of the tube (or from a series of tubes) and add them on individual layers. And to avoid having to work further with 50 layers, they are also grouped so you can collapse the group and have a manageable layer palette where all those 50 layers only look like one, while still letting you move individual tubes, remove some, resize others, rotate a few, and more.

You can grab this time saving script in my store at Creation Cassel.

And as usual, you have a chance to get this script free if you win the RAK in this thread. What kind of tube would you like to scatter yet still have the option to move them around individually or edit them one by one? The winner will be announced on Monday night.

cass-WordAlbum-2012


As the new year is here, do you want to make a great conversation starter at home? Gather your 2012 photos and use this word album to place them. Add only photos or some anecdotes too. Use the same pages and flip them so you can get a reverse too. Print them. Collate them. Bind them. It can also be a great gift.


You need to be logged in to download this sample. You can either login, or register on the top of this page.


cass-DoubleToSingle-PS

Photoshop and Photoshop Element user, i didn’t forget you. I had a script for PSP a while ago that would automatically split double pages into single pages. Well, after popular demand, i got this script for you too.

This is a SCRIPT but for PS and PSE. It will either split perfectly in the center, OR it will cut the page with an extra 3/8 of an inch. This gives a total of 3/4 inch that you can play with when you print your page in a book so that the center will not eat up some of your page. This amount of overlap is not necessarily a standard “bleed” but a space for you to manoeuvre depending on the printer’s specs.

The fun part about this script is that it cuts the pages but also saves them without you having to type in anything! That is called automation!

You can grab this time-saving script in my store : Creation Cassel.

New script–Merge Group

cass-MergeGroupRename

You probably want to complete your scrapbook project as fast as possible. You probably have more than one page to finish and are running a bit out of time. This new script is just a wonderful time-saving tool to help you achieve your goal of finishing faster and more efficiently.

By default, when you merge a group of layers, it will keep the name of the top “layer” but that name is most often, not very meaningful. This script will remember the name of the active layer when you run the script and will rename the merged layer to that name. No fuss. No typing. No copying and pasting.

Without this script, you would require a total of 11 clicks to get the same thing (assuming you are copying and pasting instead of retyping), but with this script, if you bind it and place it in a convenient place, it will require ONE SINGLE click. Talk about saving time! that means that the process will be TEN TIMES faster than the old manual way.

This script can be purchased in my store: Creation Cassel.

This script is a perfect companion to a few others to speed up the scrapping process for any user. You can start by using the free script, Open As Layer – Rename, which will allow you to open one or more papers or elements just the way you would normally do, but it will take care of copying them and pasting them onto your current project in addition to renaming each layer based on the filename of those papers or elements. This allows you to remember what kit this element was from (assuming the initial file is named properly).

Once you have your papers or photos onto your work, if you are using a template, you will want the flexibility of adjusting their placement, rotation, and size without fuss. That is when the Clip To It script becomes another time saver in addition to making the process simpler and non destructive as it will “convert” the template shape into a mask from which you can see how the photo or the paper will look like before “cutting” anything.

Then, once you have your mask group, created by the Clip To It script, and you have adjusted the paper or the photo to your liking, it is time to merge it all in a single layer (if you want) using the Merge Group – Rename script.

cass-QuickScrapBundleSince those three scripts are so useful in your toolbox to complete your scrapbook project faster, we also have the combo available for you. It is called Quick Scrap Bundle as it will do just that: make you scrap quickly.

This combo will include:

Open as Layer Rename

Clip To It

Merge Group Rename


Do you have plans to finish more projects in the coming year?

Are you rushed to finish those layouts before the end of the year?

Do you have a complete album project in mind and feel overwhelmed by all the work that will take?

These tools will save you a LOT of time, and make the process simpler.

You can also add your name to this thread in the Happy Place so you might win this combo of 3 scripts.


News from the Campus


Did you want more tips on scrapbooking faster? We had a presentation a couple of weeks ago called Scrapbooking on a Deadline where we looked at many tips, tricks and tools to achieve it.

ScrapbookingOnADeadline

The edited recording is currently available for online viewing for FREE.

Check it out here.