Web
Analytics

New script – Duotone Photos

Duotone script for Paintshop Pro
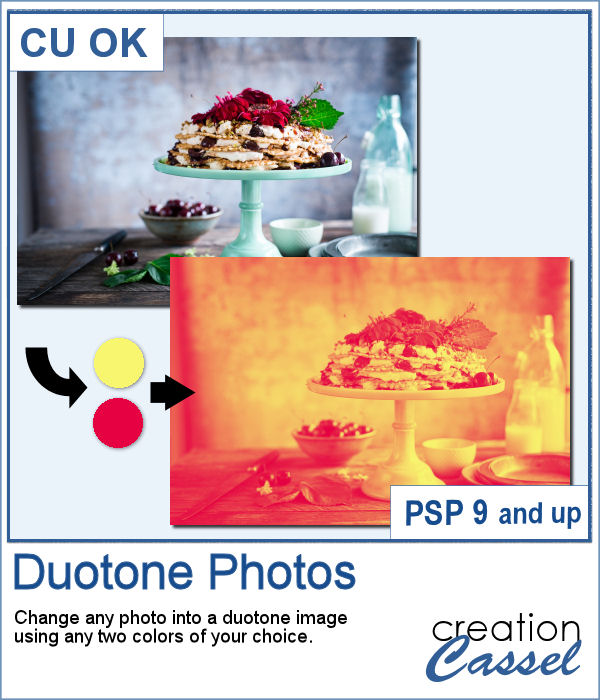
It might be simple to create a black and white photo with Paintshop Pro, and it is also easy to colorize that photo with one color, but how about using TWO colors? So, instead of light red and dark red, you would want yellow and red, or blue and purple, or blue and brown, or whatever color combinations you want to make a unique image?

This script allows you to choose ANY two colors and will transform any photo into a creative image. Choose colors to match a background or another image, or just make a collage with different variations.

Get this script in the store: Duotone Photos

In order to win these tubes, add a comment on this Facebook post telling us what color combinations you would like to try on your photos (remember, add a comment, not just a Like!) The winner will be announced in the newsletter, next week. Not a subscriber yet? Not a problem. You can register here and it is free (and you only get one email per week).

Holiday Wooden Frame in PNG formatAs a freebie, this week, I obviously could not give you a sample of the script since it is applicable only on your photos, so I thought you might want to showcase some photos in a holiday frame so I created one wooden frame using the Wood Frame script, and added some embellishments (branches, poinsetta, pine cones, ornaments and present). I also used the Christmas light tubes to finish off the decoration.

You need to be logged in to download this sample. You can either login, or register on the top of this page.

New script – Custom Slats

Custom slats script for Paintshop ProUsing slats to showcase a photo makes for a fun and unique effect. However, creating slats manually is tedious, especially if you want them even or following a particular outline.

Using ready-made templates might work, but it might not suit your project, or your photo. Maybe half of the cat would be cut off, or the sun from the sunset, etc.

This script will allow you to create the outline, with the brush tool, or use a preset shape if you want. You also have several other options to customize your slats.

Get this script in the store: Custom Slats

In order to win this script, add a comment on this Facebook post (remember, add a comment, not just a Like!) The winner will be announced in the newsletter, next week. Not a subscriber yet? Not a problem. You can register here and it is free (and you only get one email per week).

Slats templateAs a way for you to play around with slats (in case you never tried before), I made a large template (about 3000 pixels wide). It is in png format so you can probably use it in most graphic programs.

You need to be logged in to download this sample. You can either login, or register on the top of this page.

New script – Word Insert

Word insert script for Paintshop ProIf you have used the Word Cutout script, you know that it would only use the edge of the photo. However, sometimes, the edge holds some meaningful parts of the image and you would like to cut the words out of another location.

This is what this script will do. Just like the Word Cutout script, you can choose the text and the font, but this time, you can also select the location INSIDE the image.

That will give you more flexibility and several additional options. now you can pick any area of the photo that would be suitable for a cutout text, even if it is right in the middle!

Get this script in the store: Word Insert

For a chance to win this script, i decided to change things around a bit. You need to comment on THIS FACEBOOK POST instead of here. The winner will be announced NEXT week in the newsletter. Not a subscriber yet? Not a problem. You can register here and it is free (and you only get one email per week).

Word templates in PNG formatUsing a black image, 4000x3000 pixels, i ran the script 3 times to add the individual words of "Live", "Love" and "Laugh". To make them even, i used guides before running the script, so my selections were always the same height. Neat trick!

I repeated the same process for both templates.

So you are getting 2 PNG templates that you can use with your favorite photo.

You need to be logged in to download this sample. You can either login, or register on the top of this page.

New script – Flashcards

Flashcard script for Paintshop ProIt is the time of the year when just about every school age kid is finally back to school. How about displaying your favorite photos as flashcards, as if you were teaching the viewers? Although it could be used in a school themed project, it can also just serve as a fun frame for any picture.

You have the options for the color of the card, the color of the text, the font for the text and of course, the text itself too.

Then, using whatever photo you want to display, the script will adjust its size to fit, but will leave it unmerged so you can tweak it if needed.

Get this script: Flashcards

Would you like to get this script for free? In the comments below, tell me what would be other INSPIRATIONAL words you could think for those cards. I'll pick a winner and announce it in the newsletter, next week.Not a subscriber yet? Not a problem. You can register here and it is free (and you only get one email per week).

Inspiration flashcards in PNG formatAs a sample, i created 6 inspirational cards for you. Each card has an empty area for the photo (what is showing in black on the preview) so you can add your own image.

Each card is 900x1300 pixels.

How about printing your finished cards and distributing them, like postcards, to your loved ones?

You need to be logged in to download this sample. You can either login, or register on the top of this page.


New script – PhotoBooth

Photo booth script for Paintshop ProAlthough they might be getting less and less popular in real life, photobooth are still often associated with fairs, and fun places. Back in the days, you could get a set of 4 black and white photos in those booth. Over time, they became more modern and started offering color photos. Those strips of photos still bring back memories to many people.

This script will create such a strip of photos very quickly. You choose the number of photos you want, their orientation, and once you open the photos you picked, the script will place them all with the correct size and placement.

You still have many options because the photos, although they are resized, are not cropped so you can tweak them a bit, you can center the subject (of move it off-center), you can rotate the photos, you can apply various effects to them. So many ways to customize the end result.

You can get this script in the store: PhotoBooth.

Considering that you can apply any kind of effect to the individual photos once the script is finished, what kind of effect could you consider applying? Tell me in a comment below and I will pick a winner to be announced in the newsletter, next week. Not a subscriber yet? Not a problem. You can register here and it is free (and you only get one email per week).

Photo booth frame in png formatAs a free sample, I am offering you the frame that was created when I ran the script for the four pictures of my daughter and her friend. It is 660x1950 pixels, which is about the size of a real photobooth strip of photos. Add your own photos to it and place the result in your next scrapbook project.

You need to be logged in to download this sample. You can either login, or register on the top of this page.

New script – Blurred Fill

cass-BlurredFillYou probably have seen those images where a video has been shot vertically, but it has to fit in a horizontal space, then the extra on each side is a copy of the main image, but blurred and darkened to keep the focus on the main image.

This script will achieve the same effect. You can start with any kind of photo, whether it is square or rectangular, and then, you can "fit it" inside an image that is rectangular or square.

This is a great way to fit your photo into a space that is of different proportions without having to crop the photo.

Use this strategy to fill in a carousel or a slide show. Or use it as a header, or to fill a PowerPoint presentation of some kind. Or just fill part of your scrapbook page.

Get this script in the store: Blurred Fill

What would YOU use this for? Can you see yourself using this in a scrapbook project? what would it be? Tell me in the comments below and i'll pick a winner next week. Not a subscriber yet? Not a problem. You can register here and it is free (and you only get one email per week).

cass-WoodenWindow-Sample1Since this script is about creating a special effect on your own photo, i can't really create a sampler from any photo of mine. Well, I could, but i doubt you would find it very useful, so instead, i created a different sampler based on one that was VERY popular recently: the Wooden Window.

I created two windows in png format: one is using a fine wood while the other is more rustic, with visible nail heads holding the pieces of wood.

Both windows are 3000 pixels wide so you can use them for a scrapbook project, or even size it down too.

Place your favorite photo behind it for a wonderful display.

You need to be logged in to download this sample. You can either login, or register on the top of this page.


News from the Campus

RibbonsAndBowsJoin us for our live presentation on Ribbons and Bows, where we will take a look at how to create knots and bows from straight ribbons, using PSP.

It is free, as usual, so join us and tell a friend.

Register

New script – Mosaic Photo

Mosaic Photo script for Paintshop ProYou might have seen tutorials on how to turn a regular large photo into a mosaic using smaller photos. It might not be too hard, but you can create that exact effect in less than a minute with this script for Paintshop Pro.

Start with a large image, and run the script. Follow the prompts and you will see your image turned into a mosaic using 1, 2, 3 or 4 different images of your choice.

Make sure you read the README file as you will have to edit the script to match the configuration of your own Paintshop Pro and your own computer (I can't guess that part for you).

Get this script in the store: Mosaic Photo.

For a chance to win this script, tell me if you ever tried to achieve that effect, and if you did, how you did it. Post your answer in the comments below. I'll pick a winner and announce it in the newsletter, next week. Not a subscriber yet? Not a problem. You can register here and it is free (and you only get one email per week).

Cluster Templates in PSD format for scrapbookingSince it is impossible for me to give you a sample using a photo that would be of any interest for you, I decided to see what other sampler you seemed to have liked, and I found out that the Cluster Templates were a big hit, so I created three more for your own use.

They are in PSD format, so they can be used by non-PSP users.

Each one is about 3500 pixels in width, so they could be used on a full size scrapbook project, or you can size them down to fit your project.

You need to be logged in to download this sample. You can either login, or register on the top of this page.

New script – Photo Blinds

Photo blinds script for Paintshop ProHave you ever seen those wonderful images that are transposed into various slats to create vertical or horizontal blinds?

This script can recreate that effect with Paintshop Pro. Use any image to start and run the script. You will have various options to choose to create your own custom blinds.

You can even have the blinds partially open (one third, one half or two thirds), so you can still see the initial photo, yet have the option to show a window and a scenery behind it.

This is just a plain fun way to display your image.

You can use the top valence if you want, but you can remove it completely and just use the individual slats that the script created.

Get this fun script: Photo Blinds

Would you like to win this script? Tell me, in the comments below, how you would use these blinds. As usual, i expect some very creative uses! I'll pick and announce a winner in the newsletter, next week. Not a subscriber yet? Not a problem. You can register here and it is free (and you only get one email per week).

cass-PhotoBlinds-SunsetThis week, i was really struggling to figure out what to create as a freebie that you might actually use. Since there was a big snow storm in the US this weekend, i thought that maybe, someone would want to have a nice, warm photo to cover the sight of all that snow. Of course, you could use this even if you don't have snow around!

It is a png format element and it is full size so you could use it to cover half of a full size layout. Add a frame and a window scene behind for an interesting effect.

You need to be logged in to download this sample. You can either login, or register on the top of this page.

What will you hide behind that warm sunset blind?


News from the Campus

InTheNewsOur next live presentation will take place on February 7th (yes that is 2 weeks from now; for a change, we are quite ahead!).

Come and join us for a fun live class on ways we can be inspired by newspapers and magazines formats do display our photos and stories.

It is free so why not join in?

Register now

(and share with your PSP friends too)

New script – Film Strip

Film Strip script for Paintshop ProFilm strips are common ways to display photos, whether they are a series of photos taken in a rapid sequence, or completely different photos.

It is fairly easy to use a template and insert your photos manually into each slot, but with this Paintshop Pro script, the process will be much faster and you will have more options available than with ready-made film strip templates.

This script will always create a strip that is 3600 pixels long, which will fit traditionally sized scrapbook layouts. It is also big enough for you to size it down to any other size you need.

You can have between 4 and 12 photos on that strip, and the script will adjust each individual slot to still have a 3600 pixels long strip.

In the end, you will still have the option to tweak the exact placement of the photos (in case you don't want to cut Aunt Lucy's face on the edge). You can also apply various effects to the individual photos, like turning them into black and white, adjusting the brightness, adding various effects.

You can get this script in the store: Film Strip

I am sure you would love to use this script and you are already thinking of some photos to use in them. What kind of photos are you thinking of using with this script? Tell me in the comments below and i will announce a winner in the newsletter next week. Not a subscriber yet? Not a problem. You can register here and it is free (and you only get one email per week).

Film Strip template in PNG formatOf course, i cannot give you a sample of this with my own photos (even the wedding photos) since they won't mean anything to you. So, for that reason, i will just give you a sample of a blank template. I used the same strip as the one with the wedding pictures, and just saved the film strip layer in a png format.

As for all those strips, it is 3600 pixels long and this one has 12 square spaces for adding photos.

You need to be logged in to download this sample. You can either login, or register on the top of this page.

New script – Photo Mosaic

cass-PhotoMosaicIf you have photos and you want to display them in a new and original way, have you tried to make a mosaic?

This can also be a great way to hide the errors on a not-perfect photo, whether it is a color issue, a blurriness issue, etc.

This script will help you turn any photo, of any size, into a mosaic. You can choose the size of each tile. You can choose to have lines between the tiles, how thick and what color. You can also choose whether you want a lot of variations between the tiles or just a little.

And best of all, you can override the script by removing any area that you find are changed too much from the original; the script will place guides, and activate the Selection tool for you and a copy of the original image will be left underneath, so it will be very easy to remove one segment from the "mosaic" layer and just display the image below. That is one way to make sure that the important details are easy to see (like your baby's face, or the birthday cake).

You can get this fun photo script in the store: PhotoMosaic.

Would you like to get this script for free? Just post a comment below about how you think you could use this script and i'll will announce a winner in the newsletter next week. Not a subscriber yet? Not a problem. You can register here and it is free (and you only get one email per week).

cass-PhotoMosaic_Overlay4x6Since this script is run on a photo, and sending you one of my photo probably wont help you, i decided to play around a little. I used a grey based, the size of a 4x6 inch photo. I ran the script on that base, and got a series of tiles in different shades of grey. You can use that as an overlay on top of any of your photos, and adjust the blend mode. Depending on the starting photo you have, different blend modes might work, and others, not.

The file is a psd format as there is a "tile" layer and also a "line" layer in case you want to add some lines (which you can also colorize if you want).

You need to be logged in to download this sample. You can either login, or register on the top of this page.

So, which photo will deserve a mosaic treatment? Don't hesitate to show them. Pin them on Pinterest, on our own board HERE (ask for an invite and you will get it!)