Although you can create uneven lines manually, it can be tedious to repeat the process for many lines on a page.
This script will generate a full-size page of lines in the color of your choice (and up to 6 different colors) with additional options for the line thickness, the line spacing, and amount of distortion for the lines. With the random function integrated in the script, no two lines will be identical and you will get a different result every time you run the script.
The end result will be on a transparent background so you can duplicate that layer, mirror it, rotate it, or modify it however you want for many more creative results.
Get it in the store: Uneven Lines
In order to win this script, add a comment on this Facebook post telling us if you have ever created/used uneven lines as a background (remember, add a comment, not just a Like!) The winner will be announced in the newsletter, next week. Not a subscriber yet? Not a problem. You can register here and it is free (and you only get one email per week).
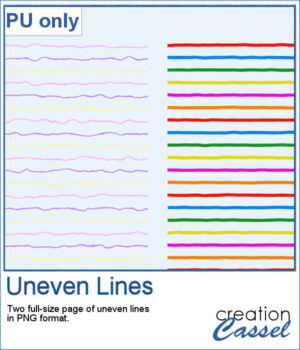
For a sample, I created two full-size pages of uneven lines. One will be using pastel colors, perfect for spring or Easter, and one has bold colors, perfect for a crafty of kid theme. They are in PNG format, so you can duplicate them and create different variations.
You need to be logged in to download this sample. You can either login, or register on the top of this page.

Stylized trees are a perfect addition to your scrapbook pages, cards, and posters, and now you can create them effortlessly with this script! Every run generates a unique tree design, using the papers you’ve opened in your workspace. No two trees will ever be the same!
For a sample, I created one tree using a single paper (notice that there are some variations if lightness in different sections). All the sections are left unmerged so you can tweak them, replace them with other papers, or even with photos.
You can easily create some simple polkadot patterns with PaintShop Pro, but as soon as the pattern is not as simple, it can become a headache to create.
For a sample, I greated two matching papers with the same 7 colors, one in straight lines, and one in zigzag. They are full-size so you can either size them down or trim them to suit your project.
Now, with this script, you can create your own papers using the brush you want, with the colors you need. And all that will only take a second for you to get either a full-size paper or a seamless tile to use for other projects.
For a sampler, I created two summertime papers, one with flip-flops and one with cameras that will be perfect for any activity you take pictures of. Each one is full-size in jpg format.
You can now create unique chevrons papers without having to rely on a template or reusing something over and over. The script can use up to 6 colors for a unique palette, and will pick the colors randomly to draw the chevrons.
For a sample, I simply created some greyscale papers that you can colorize the way you want. Use the Colorize command or the Hue/Saturation/Lightness command. One page has more subtle variations and the other has bolder contrast.
You can use individual stips of "papers" in different colors to showcase quotes, phrases, or individual lines of a poem but doing that manually is time-consuming and tedious. And adding extra details means that you have to repeat the process for each strip, one by one.
For a sample, I created phrase strips on the Birthday theme, using the color palette for the May blog train at DigitalScrapbook.com. This way, you can go on this thread, and get other goodies that will match.
Creating a seamless background design is fairly easy when using PaintShop Pro, but covering a whole surface in random design is much more challenging. In addition, trying to avoid overlaps is an added difficulty.
For a sample of this script, I am sharing two full-size papers: one for your winter projects and one for summer. For the winter paper, I manually added the white pompoms while I locked the transparency on the layer. It is a little tedious but the result is worth it. For the summer paper, I used a dolphin brush in blues and added a few starfish afterward. Both papers are available with a background (in jpg format) and without (in png format).
In order to create a paper fringe with PaintShop Pro, you will need to cut your element multiple times, and then, warp each piece one by one. But there is a problem: how do you warp one piece of paper without warping the next one? Well, there is a way to do it, but it is tedious, which is why this script will be a time saver.
As a sample, I created this square frame from four strips of paper that were run through the script, one by one, and then put together to make the frame. I added a little contrasting border to add some interest. Now, you can showcase your favorite photo.
Sometimes, it can look interesting to have a series of paper strips of different colors or patterns to serve as a background for a project. However, that can be tedious and time-consuming.
As a sample, I chose to create a series of strips, aligned to the bottom, and turned them into a template so you can use it with your favorite papers. These strips are grouped so you can copy and paste them onto your project in one step (instead of copying them one by one!).
Creating a pinwheel out of paper might sound simple using a template, but would NOT respect the correct orientation when the paper is flipped.
As a sampler, I used papers from a kit called Summer Fun from Janet Kemp and created four simple pinwheels. You can get all the matching papers from this kit