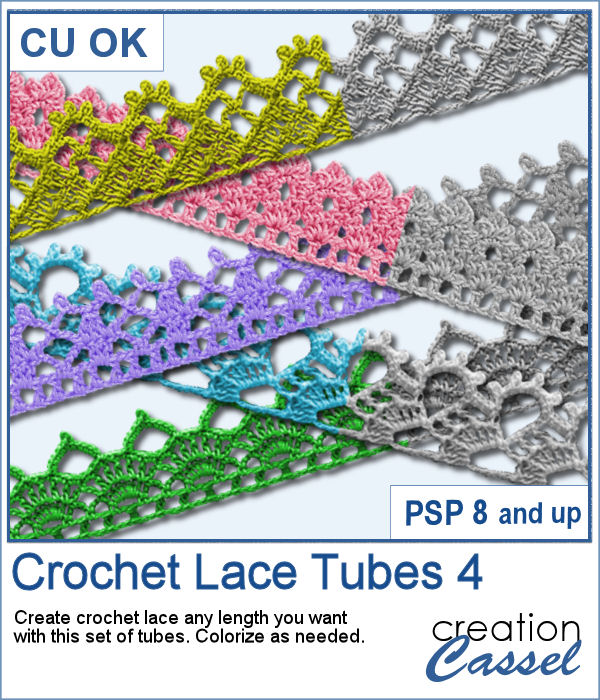
These crochet lace tubes will allow you to create edges of any length you want, and even add some wave to it (not too much as it would distort the design). Once you have your straight (or almost straight) lace, you can turn it into a frame, or just add it to a cluster along with other decorative elements.
If you want some tips on how to colorize those grey laces, check out this tutorial.
In order to win this script, add a comment on this Facebook post telling us what you would use these tubes for (remember, add a comment, not just a Like!) The winner will be announced in the newsletter, next week. Not a subscriber yet? Not a problem. You can register here and it is free (and you only get one email per week).
As a sample, I created two frames using two of the tubes included in the set. One frame is square, about 2000x2000 pixels and the other is rectangular, at 2000x1600 pixels. They are in PNG format, and you don't have to import them anywhere into your PaintShop Pro; just open it on your workspace and add it on your project. Easy!? You need to be logged in to download this sample. You can either login, or register on the top of this page.
Here is another way to display some text or a date on your photo. You can create a variety of frames with a lot of options to pick from. Add any text in any font in any color, and place it on any corner.
The script will create the frame based on the size of the photo you are using or even a blank image if you prefer as the frame will be unmerged and can be used separately.
What would you write with this script? Then, add a comment on this Facebook post telling us what kind of sandwich you would do with this script (remember, add a comment, not just a Like!) The winner will be announced in the newsletter, next week. Not a subscriber yet? Not a problem. You can register here and it is free (and you only get one email per week).
As a sample, I created a series of four frames for the various seasons in the color of those seasons. Use them to create a year in review or just to showcase your favorite photos.
You need to be logged in to download this sample. You can either login, or register on the top of this page.
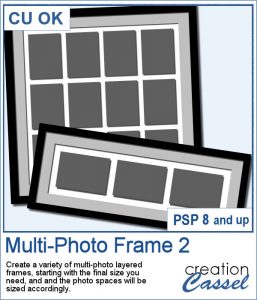
Instead of starting with a fixed photo shape and ending up with an odd sized frame, how about starting with the final frame size and working your way back to the size of the individual images.
With this script, there is no calculating, no aligning. Everything is done for you, in a very short time. And everything is perfectly aligned and ready for you to add your photos.
You can create a frame up to 24 x 24 inches with up to 100 photos. And if you want to, you can even tweak the photo spots and remove some to allow you for a title or quote on top, on the bottom, on the side or even in the center. A very versatile layered frame for you to customize to your liking.
In order to win this script, add a comment on this Facebook post telling us what size you would likely print a frame (remember, add a comment, not just a Like!) The winner will be announced in the newsletter, next week. Not a subscriber yet? Not a problem. You can register here and it is free (and you only get one email per week).
Since everyone loves to display their own photos, I am offering you the layered template in .pspimage version of the frame showcased in the preview. Each photo spot is part of a mask group so that you just have to copy and paste your photo inside that group for it to show through. No need to select, or delete anything.
You need to be logged in to download this sample. You can either login, or register on the top of this page.
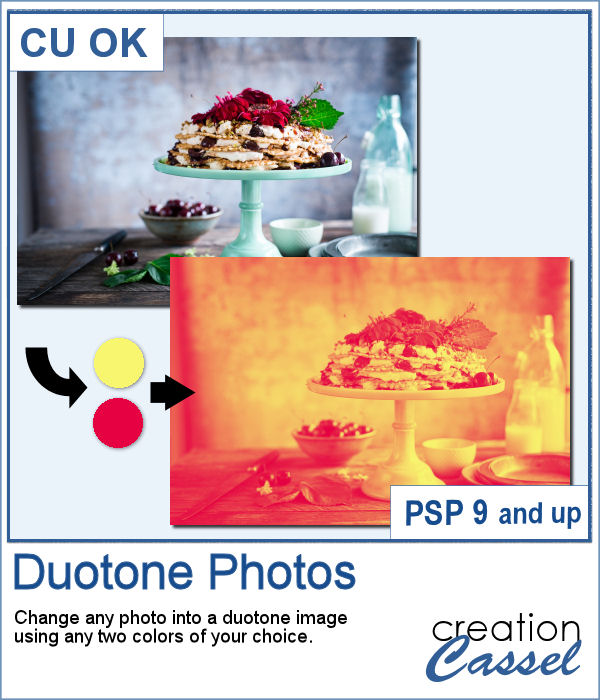
It might be simple to create a black and white photo with Paintshop Pro, and it is also easy to colorize that photo with one color, but how about using TWO colors? So, instead of light red and dark red, you would want yellow and red, or blue and purple, or blue and brown, or whatever color combinations you want to make a unique image?
This script allows you to choose ANY two colors and will transform any photo into a creative image. Choose colors to match a background or another image, or just make a collage with different variations.
In order to win these tubes, add a comment on this Facebook post telling us what color combinations you would like to try on your photos (remember, add a comment, not just a Like!) The winner will be announced in the newsletter, next week. Not a subscriber yet? Not a problem. You can register here and it is free (and you only get one email per week).
As a freebie, this week, I obviously could not give you a sample of the script since it is applicable only on your photos, so I thought you might want to showcase some photos in a holiday frame so I created one wooden frame using the Wood Frame script, and added some embellishments (branches, poinsetta, pine cones, ornaments and present). I also used the Christmas light tubes to finish off the decoration.
You need to be logged in to download this sample. You can either login, or register on the top of this page.
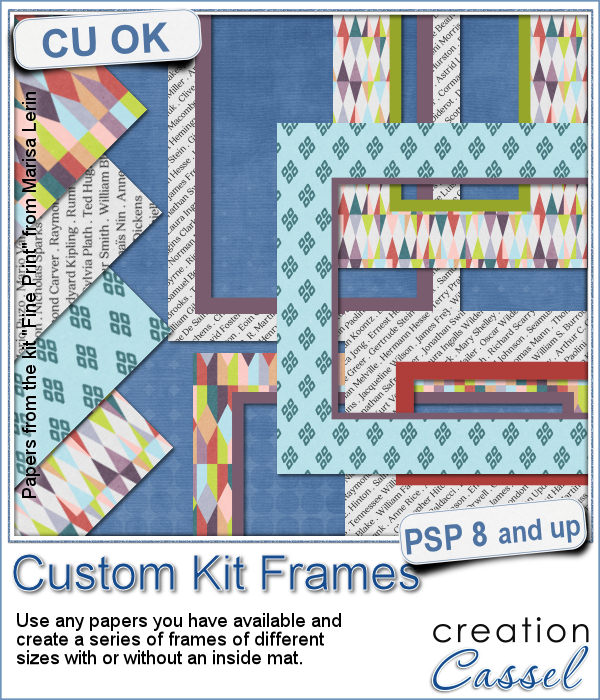
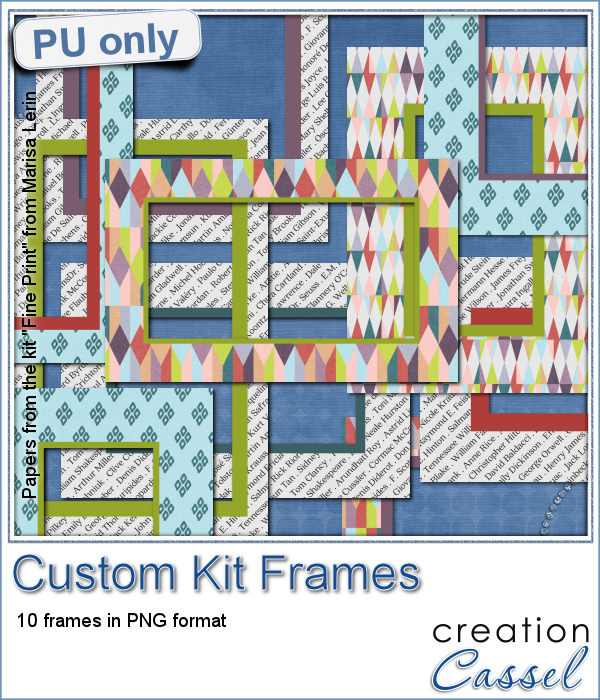
Now, you can create a series of frames of different sizes using several papers you have on hand. This is perfect if you want to create frames to go along with your kit, but it can also be an interesting tool to give you some frames that you can use on your own layout using the colors of your project.
You can generate plain frames or add an inner mat of the color you want (hopefully to match the papers you selected).
Keep the frames you like and discard the others. Create up to 15 frames in a single execution.
In order to win this script, add a comment on this Facebook posttelling us if you prefer frames with or without an inner mat (remember, add a comment, not just a Like!) The winner will be announced in the newsletter, next week. Not a subscriber yet? Not a problem. You can register here and it is free (and you only get one email per week).
This week, I am offering you 10 frames I made for the preview. It uses papers from the kit Fine Print from Marisa Lerin. This kit is free to download, so if you want some matching frames, papers and elements, check it out here.
You need to be logged in to download this sample. You can either login, or register on the top of this page.
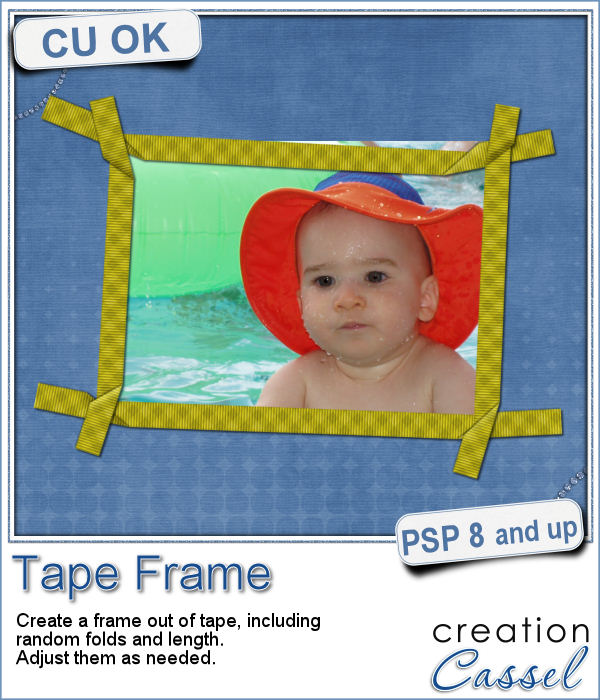
Although you might like to have an even frame make of straight ribbons, sometimes, you might want something a little less "clean", and if you worked with sticky tape, scotch tape, washi tape and such, you know that you MIGHT, occasionally have some unevenness to them.
This script will use with any straight "tape" and will create an uneven frame based on the dimension of the photo you want to frame.
Each length of tape will be randomly measured, and the folds will also be random. This allows you to run the same script and generate completely different frames every time. Furthermore, you end up with unmerged pieces so you can easily reuse them later.
In order to win this script, add a comment on this Facebook post (remember, add a comment, not just a Like!) The winner will be announced in the newsletter, next week. Not a subscriber yet? Not a problem. You can register here and it is free (and you only get one email per week).
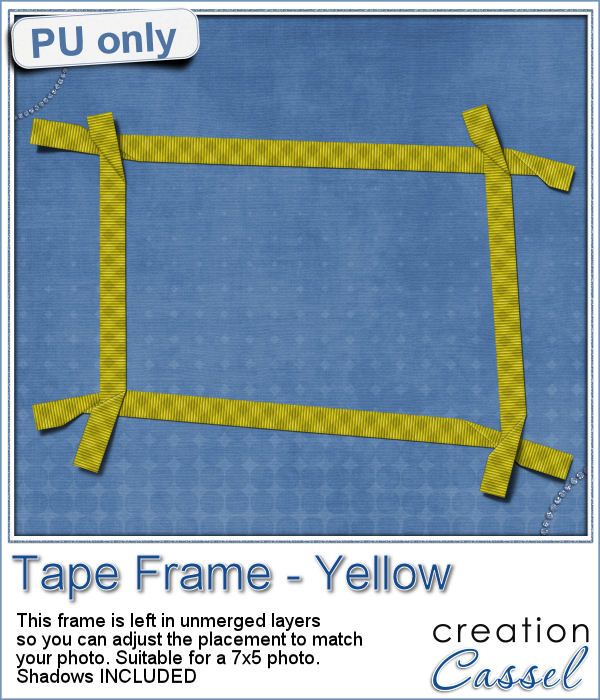
To let you "play" with this frame, i created another one using the same tape as in the initial preview. I tweaked the shadows on the ends and included those shadows in the download. Each piece of tape is left on a separate layer (with its own shadow) so you can adjust the size of the frame. It has been made for a 7x5 photo, but if you want to use it on a smaller picture, you can just move the pieces inward.
You need to be logged in to download this sample. You can either login, or register on the top of this page.
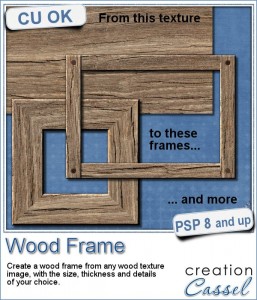
I know, you can probably create a wood frame very easily, right? Using Paintshop Pro, some tasks are quite easy and creating a wood frame is one of those. However, it still takes a bit of time, and if you want to create a series of frames, for a kit or a collage, it can quickly add up.
This script will create the frame in less than 30 seconds. Yes! You will start with a texture image of wood (you can choose fine wood or old wood), and the script will literally cut pieces to create your frame. No two pieces will be identical (in real life, they never are, right?). The script will also calculate the size of frame you can do based on the starting image dimensions. Also, once you have chosen the inside size of the frame, it will calculate how thick you CAN create the rest of the frame.
As an added detail, there is the option to add rusted nails to the corners, if you chose the overlapped type of corners. Those are picture tubes that you can also use in other projects if you want.
Would you like to get this script for free? Tell me if you tend to prefer the overlapped type of corner or the mitered type. Tell me in the comments below and i'll pick a winner next week to be announced in the newsletter. Not a subscriber yet? Not a problem. You can register here and it is free (and you only get one email per week).
How about a few frames to play with? I created 10 frames for you: 5 have mitered corners and 5 have overlapped corners. Their sizes range from 1000 to 2000 pixels, but you can easily resize them if you need.
They are all in png format so they can be used in just about any program you have.
Most of those frames are pretty rustic as i used worn, old or painted wood images to start. I also adjusted the color of the nails when they were used so they would match the rest of the frame a little better (that is something you can do with the script since everything is left unmerged for you to tweak the individual pieces).
You need to be logged in to download this sample. You can either login, or register on the top of this page.
Corel Challenge
Do you have photos of your clock or watch? Maybe a photo from New Year's Eve? How about an in-review project where the time is illustrated with a clock or a watch or other time ticking device? Post it on the Corel page HERE.
Remember that they don't need to be only PHOTOS, but you can post scrapbook projects too!
I would love to see one of your projects posted on the Corel page.
What would you do with a multi-photo frame? Here is one such frame created with the Multi-Photo Frame PSP script. Each photo placeholder is 600x800 pixels, which would match a 3x4 inch photo (just resized).
All the layers are left unmerged (including the shadows), so if you prefer to combine two adjacent photos into a larger one, you can do it on another layer, and remove the initial two.
How about removing the middle placeholder and have the photo under the white mat? Yes, you can do it as there is a hole hidden under that placeholder, complete with its shadow too!
This frame is in PSD format, so even non-PSP users can play with it.
You need to be logged in to download this sample. You can either login, or register on the top of this page.
(if the link is not active, just login or register on the top of the page).
What will you do with this? Show us. You can either post in the comments below, or on the FB page HERE, or pin on our Pinterest PSP Scrapbook Pages board.
(if you don’t have “permission” to pin on that board, just ask for an invite)
A few years ago, i wrote a tutorial on how to create a wrapped frame effect with Paintshop Pro. It is a fairly simple tutorial, but it is a long process, and requires precision.
Although you can surely do that yourself, using a tutorial in the Creative Scrap Course, you might also want the convenience and speed of using a script instead.
This is what i came up, when i was looking at that tutorial. You can use ANY ribbon you have, whether it is wide or thin, opaque or translucent, plain or patterned, or even if you are using a directional design on it (like that measuring tape in the preview).
But you are not limited to only one-size-fits-all type of frame. You can choose a frame from 400 pixels in diameter for a tiny photo to a 3000 pixels frame for a whole page. Furthermore, you can have a thin frame or a thick one. But you think that is all? Think again. You can also have the ribbons overlapping, to wrap the frame almost completely, or leave some obvious space between the ribbons for a totally different effect. Do you want the ribbons to look like they are around a thick base? Add a bevel. The script will also add a drop shadow to all the pieces if you want. Most of the time, that will be your choice, but in case you want to manipulate the end result more, maybe have some flipped ends, or something like that, you can skip the shadow step and add them yourself afterward.
And yes, since all the layers are left unmerged, you still have a lot of options to manipulate and tweak them to create something really custom.
The base frame is even left in there also for you to possibly use it as a template to create something else.
See what i did with the same frame:
What else could be done? Your imagination can go wild with this!
Did you ever wrap a frame with a ribbon like this? Tell me in this thread in the Happy Place for a chance to win it. I’ll be back next week with the name of a winner.
This week, i wanted to give you a little challenge.
In the newsletter, i will include this layered ribbon wrapped frame, in grey scale. It will be up to you to turn this “ordinary” looking frame into a piece of art.
It is fairly big (2000 pixels wide) so you will have plenty of room to do something cool. I saved it in PSD format, so all the non-PSP users can also get into the fun of it.
What can you do with it? Here are some ideas:
- colorize the layers (all or some)
- remove some layers to make room for something else
- use the base template to create a prettier base
- add decorative elements to the whole project, like a cluster
- resize copies of the frame to layer them
What else will you do? Make sure you check the newsletter tomorrow morning so you can work on this challenge and show us your result. You can post it on our Facebook page, in a comment below, or just send it to me by email and i can post it either in the store or the newsletter.
Journaling cards are very popular lately and scrappers are often looking for some original ways to display theirs. Also, sometimes, a single word would be a fantastic caption for a photo, so why not put that caption as part of the frame?
This script will let you create a frame of various thickness around any image (even a blank one) with the text of your choice, the font of your choice and the color of your choice. You also decide on which side of the frame the word will appear, if you want it aligned left, right or center. If the text is too long, the script will even resize it to fit the available space. You can also have the text butt up to the frame or inside a cut section.
In the end, you will have two separate layers, one for the word and one for the frame, so you can add various textures, change colors, or add effects to one or the other (or both).
Would you like to get this script for free? This is easy. Simply post your name in this thread, and tell me what would be the word(s) you would use in using this script to create a frame.
This script is the third one of the series. The Word Frame 1 script would give a discrete line frame inside the image with a multitude of options. The Word Frame 2 script would give a frame where the word would be part of a thicker area. They are both create tools to add a caption to a photo or create a journaling card.
As a free sample, i created a set of SPECIAL frames that will match a 4x6 inch journaling card. Of course, you can resize them for 2x3 cards too.
They are in png format, so they can be used by most programs.
Each frame is in greyscale, so you can either colorize them, or flood fill them using the Locked Transparency option (you know about that option, right?).
You need to be logged in to download this sample. You can either login, or register on the top of this page.
So, who will be the special person, or what will be the special event you will focus on, with these frames?
 These crochet lace tubes will allow you to create edges of any length you want, and even add some wave to it (not too much as it would distort the design). Once you have your straight (or almost straight) lace, you can turn it into a frame, or just add it to a cluster along with other decorative elements.