testing something.
New script – Bow #9
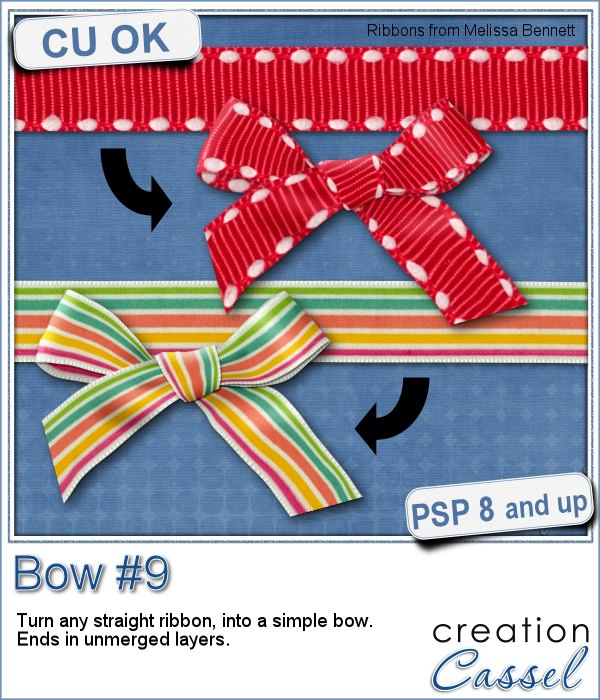 Do you want to have a bow from your favorite ribbon but that ribbon is only straight? You can do it manually, but it is long and tedious.
This script will work in any version of Paintshop Pro, and will turn any straight ribbon into a layered bow that you can then use in any project, whether it is digital scrapbooking, card-making, or others.
The end result is a layered bow so you can tweak the layers or insert a decorative element in the knot if you want.
And it will not damage the original straight ribbon either so you can still use both in your project.
You can get this script in the store: Bow #9.
If you are to use that script, can you think of something you could insert in the knot? Since it will be left unmerged, that is one great way you can customize the bow. Share your idea in the comments below and i will announce the winner in the newsletter, next week. Not registered yet? Not a problem: register here.
 As a sample of this, i created a bow from a simple straight ribbon. It was colorized for fall colors, which is the time of the year in the northern hemisphere.
Not only you get a bow in psd format with the knot on a separate layer, but you also get the straight ribbon so you can create a matching detail. You can attach the bow to the ribbon, in the middle (which shrinking the ribbon), to pretend the bow is part of it.
You need to be logged in to download this sample. You can either login, or register on the top of this page.
New script – Photo-Stamps
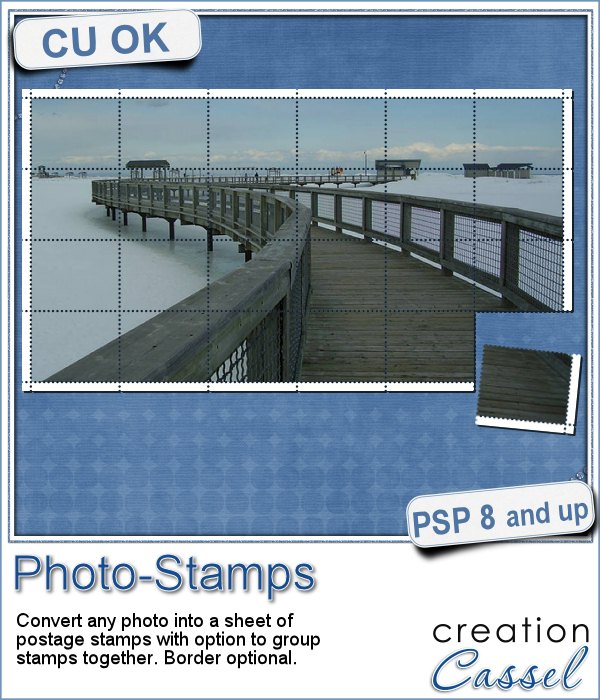
In the old days, stamps were made of a single image that was only repeated throughout the sheet. Over time, we have seen some stamps that were created from larger images that made up 2, 4 or more stamps.
This script will allow you to turn your favorite photo into a full sheet of stamps. All the perforations will line up perfectly, no matter what the size of the image is. The script will resize and crop the image slightly, to make sure of that.
Once you have your image turned into a stamp sheet, you can easily re-connect adjacent stamps by UNERASING the holes, for a unique effect.
Cut off a stamp or two if you want.
This script is available in the store: Photo-Stamps.
Do you want a chance to win this script? Tell me what photo you could see turned into a stamp sheet. Add a comment below. I’ll announce the winner in the newsletter, next week.
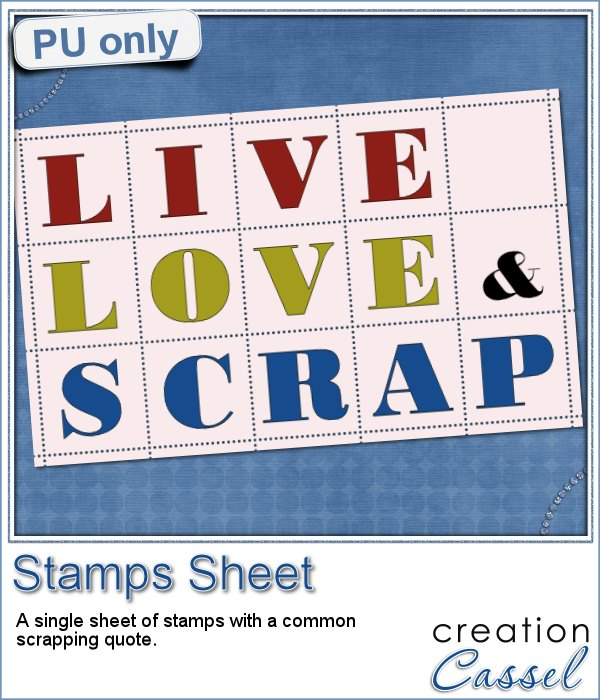 As for a sample, since it is a script that is applied to a photo, i obviously didn’t think you would want to use any of MY photos, would you? However, this script can also be used on a paper or a solid color image. That is what i did, and then, i added the letters to individual stamps. You can use this technique to add a fun and unique title with one letter per stamps.
Of course, although the sheet is intact, you CAN remove or cut off some of the stamps. You have a blank one that you can either add a design to, or cut from the sheet. Even the letters that you want to keep, you can separate them from the whole sheet, while still leaving them close enough to have the words legible.
You need to be logged in to download this sample. You can either login, or register on the top of this page.
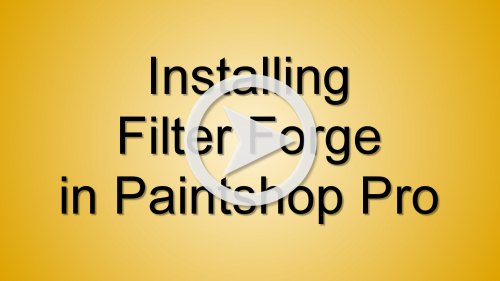
Although there are great scripts in the store to create various effects, did you hear about the Filter Forge plugin? They say it is for Photoshop, but it works just as well with Paintshop Pro. Check out the little video that shows how to install it.
Then, once you have it installed (even if only the trial version), you will want to add more filters. They have over 10,000 of them. And they are all free to download once you have Filter Forge installed.
New script – Multi-Fold

The main way people will add folds to their paper or paper element is by using overlays. This is a fairly simple method, and once the overlay is blended into the paper, it gives a nice result. However, this is limited by the number of good overlays you have.
Creating folds manually can be easy but time consuming. So here is a script for Paintshop Pro that will help you add folds quickly.
The script can add between 2 and 6 folds, regularly spaced, or irregularly arranged, vertically or horizontally. The folds will be the size of your image but it will be on a separate layer so the image will stay intact.
Run the script repeatedly, and you will always get something at least slightly different even if you are using the same options.
No more recognizable folds on your paper pack!
Get this script in the store: Multi-Fold script.
Do you want a chance to get this script for free? To say goodbye to the same old overlays? Add a comment below about what you think of this script idea. I’ll announce the winner in next week’s newsletter. Register here if you are not already receiving our weekly news.
 Do you want to see one such overlay? I ran the script on a plain red image, 3600x3600 pixels, choosing 5 folds, irregular and horizontal. I got a single overlay including all 5 folds, and since it was left on a separate layer, i saved that layer as a png file for you to use (especially if you are not a Paintshop Pro user).
Although the script will create the folds over the full surface of the image, you can also use it for elements that are not full size, like frames or tags. In that case, the script will delete all the folds that are not overlapping the element in question. This is also great if you want to add different folds on alphas!
You need to be logged in to download this sample. You can either login, or register on the top of this page.
New Font – Satin Stitch Font

If you want to use a stitched font, you might be quite limited in finding some ready made alpha, that has one style, one color, and you can maybe colorize it.
Another option is to find a font that has those stitches, but it will not give you the overlapping effect that real stitching would have.
Yet, another option is to do it yourself; NOT convenient, and quite tedious.
Finally, this font is what you were looking for. In fact, you get TWO fonts, and each one will be a layer of stitching, so you can have that exact overlap that you are looking for.
Since it is a font, it can work in most graphic programs, like Paintshop Pro, Photoshop, Photoshop Element, GIMP and more.
And as a font, you can choose the color, the size, the kerning, and if your program allows it, you can even put the text along a path! That would not be easy if you had just a regular ready-made alpha, would it?
You can grab this font in the store as Satin Stitch Font.
Do you want a chance to win this font? Add a comment below, telling me what program you would likely use this font with. I’ll be announcing the winner in next week’s newsletter. Not subscribed to the newsletter yet? Not a problem, you can register here.
 As a sample, i figured i could do a little combination of the font and something else. I used the font for the letters in this one, but for the heart, i used a regular preset shape and ran the VectorPaint script on it, using a narrow rectangular brush tip.
It is really simple to do, and you can do the same thing. It would be fun to use in creating wordart too.
You need to be logged in to download this sample. You can either login, or register on the top of this page.
News from the Campus
 Did you have a look at the new version of Paintshop Pro? Did you see the Magic Fill feature that was added? That is much better than the Smart Carver and the Clone tool.
New script – Plaid 3

Whether you are doing digital scrapbooking, or card making or any other graphic project, you can probably create your own plaid pattern but sometimes, you want something more delicate than a full color pattern.
With the Paintshop Pro script, you will be able to generate up to 25 tiles that will only be made of a few lines, without any background, so you can add your own. This will make the seamless plaid pattern less overwhelming. Adjust the opacity and the design can make for a softer paper.
Get this script in the store: Plaid 3 script.
If you prefer to create plaids from an image, you can use the Plaid script, while the Plaid 2 script will use all (or most) of the colors to fill in the pattern. It is your choice.
Do you want a chance to win this script? Add a comment below telling me the type of color palette you could imagine in a plaid pattern or what kind of project you can think of to use this script. I will announce the winner in the newsletter NEXT week.
 For a sample, i created 8 plaid patterns based on the basic colors of the rainbow. For a back to school time of year, it might fit those theme projects. It also matches the curled ribbons that were available 2 weeks ago.
Those tiles are actually png files, with the colored lines but NO background color (the white on the preview is just to help display the patterns). You can use your own background color, or even use some lined papers as a background. Why not?
You need to be logged in to download this sample. You can either login, or register on the top of this page.
New script – Curled Ribbon
 Curled ribbons add some dynamism to a project, but finding the right ribbon, with the right curl is not easy.
There is always the option to use a filter that can curl a ribbon for you, but the end result will be on a single layer, making it really hard to interlace an element inside the spiral, or to have the ribbon curl around an element.
This script will take ANY flat ribbon, and curl it in separate pieces. There will be no overlap of design if you have a pattern or a directional ribbon. There will be no gap, no guessing. Every pixel of the ribbon length will be used in perfect alignment.
Each piece will be placed on a separate layer, so you CAN easily place an element between the layers without any need for erasing, or extracting.
You can also choose the width and the tightness of the curl, giving you a lot of options.
You can get this script in the store: Curled Ribbon.
Do you want a chance to win this script? Add a comment below, telling me how you can use curled ribbons in a project. The winner will be announced in the newsletter, next week.
As a sampler for this week, i had fun creating 2 basic ribbons: one with digits  and one with the alphabet. I made a translucent white ribbon, with edges and the text was added in rainbow colors. Once merged, i ran the script.
The sampler includes both the flat version and the curled version.
The curled ribbon is in psd format (so it is NOT grouped since this would get flattened when saving).
The flat ribbons are 4000 pixels wide and you can use them in many ways. You can even use them to run other ribbon scripts, like bows or knots.
You need to be logged in to download this sample. You can either login, or register on the top of this page.
 This week, there will also be an additional set of curled ribbons, exclusively in the newsletter (which should be available on Sunday morning). You still have time to REGISTER to get these fun date ribbons (it also includes the flat ribbons and the curled ones).
You still have time!
New script – Edge Stripes

Now and then, i would find some layouts where scrappers had a fun series of stripes on the side of their page. Some have used those stripes to add words, some added a whole text of journaling, others only had those stripes as decorative elements for their project.
Doing that manually, surely takes time for a scrapper to do, or, if the scrapper used a template, then the template designer must have worked a while to get all those stripes.
This script is designed to be used either by the scrappers or the designers.
As a scrapper, one can have a series of rectangular or triangular stripes, in the colors of their choice, based on the kit they are working with or the photo they want to use.
As a designer, you can create those series in greyscale, and since each stripe is on a separate layer, it is perfect for layered templates.
You can get this script in the store: Edge Stripes.
For a chance to win this script, add a comment below, telling me of how you can think of using this script and the resulting stripes. I’ll announce the winner in the newsletter next week.
 As a sample, i am offering you a layered set of stripes. Each of them is on a separate layer so you can use the whole series together as is or you can play with the individual stripes and move them around, rotate them, etc. You can colorize them, or use them with the Clip to it script to replace them by various papers you might want to use.
On the preview, i am showing an example of colorizing all the stripes and adding words on the lighter pieces. Maybe this could be for a layout about my mom? or another significant female in my life?
What would you do with these stripes? Remember to show us your finished project!
You need to be logged in to download this sample. You can either login, or register on the top of this page.New script – Granite

Granite can be used in many ways, and although the first thing might be tombstones, it is still a material that has other associations. Imagine making a path with irregular shape stones. Or maybe you have a stone wall and would like to simulate a date engraved in it.
Whatever the theme you are working on, you can use one of those three granite texture to turn any shape into a permanent, and solid element!
You can have a light grey, a dark grey or a pink granite. Use any shape you want. Add an outline, or another detail to engrave or keep it plain.
Perfect to turn letters and shapes into granite element, but you can also use a simple shape and then engrave the letters or designs in it.
You can get this script in the store: Granite script.
As for a giveaway, as usual, leave a comment below, and tell me what element would you create using this script? I will be back next week with the name of a winner.
 To give you a taste of what this script can do, i created a set of digits on a simple ellipse shape. I chose the option to add design/text on it, to engrave the digits. And i left you a blank one, just in case you wanted to do something else with it. With those digits, you should be able to put a date, or a year, or a birthday number.
You need to be logged in to download this sample. You can either login, or register on the top of this page.
New script – Smooth Overlay

Sometimes, you might want to add a little texture to a paper without making it too bold. In those cases, you might want just something to give a slightly variegated look but you don’t want to use the same overlays over and over again.
This script will actually create a brand new overlay for you, in seconds, and it will always be different, from one run to the other. The script will adjust to the size of your paper, so you can work with a small, tagger-size paper, or a full size 3600x3600 pixels paper.
The overlay will be left on a separate layer so you can adjust the opacity or the blend mode (or both) depending on the color of the paper and its pattern, and the overall effect you want to achieve.
You can grab this script FOR FREE, in the store as Smooth Overlay.
This week, there is obviously no need to do a giveaway since the script is already free anyways. Don’t you think?
 For a free sample (and this is mostly for our non-PSP-using friends), i made one overlay in PNG format that can be used the way you want: adjust the blend mode, or the opacity. Apply it to a paper, or use part of it to add variations on a ribbon, a tag, a frame, etc.
What else could you use it for?
You need to be logged in to download this sample. You can either login, or register on the top of this page.
