Web
Analytics

New script – Photo Mosaic

cass-PhotoMosaicIf you have photos and you want to display them in a new and original way, have you tried to make a mosaic?

This can also be a great way to hide the errors on a not-perfect photo, whether it is a color issue, a blurriness issue, etc.

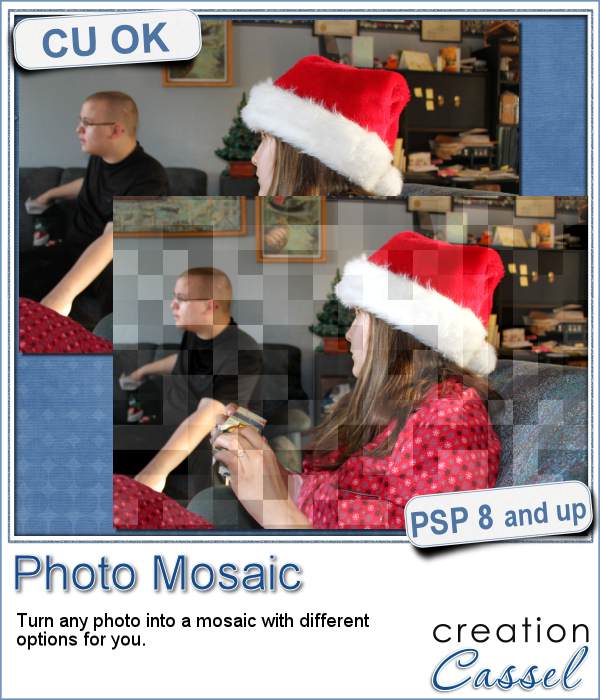
This script will help you turn any photo, of any size, into a mosaic. You can choose the size of each tile. You can choose to have lines between the tiles, how thick and what color. You can also choose whether you want a lot of variations between the tiles or just a little.

And best of all, you can override the script by removing any area that you find are changed too much from the original; the script will place guides, and activate the Selection tool for you and a copy of the original image will be left underneath, so it will be very easy to remove one segment from the "mosaic" layer and just display the image below. That is one way to make sure that the important details are easy to see (like your baby's face, or the birthday cake).

You can get this fun photo script in the store: PhotoMosaic.

Would you like to get this script for free? Just post a comment below about how you think you could use this script and i'll will announce a winner in the newsletter next week. Not a subscriber yet? Not a problem. You can register here and it is free (and you only get one email per week).

cass-PhotoMosaic_Overlay4x6
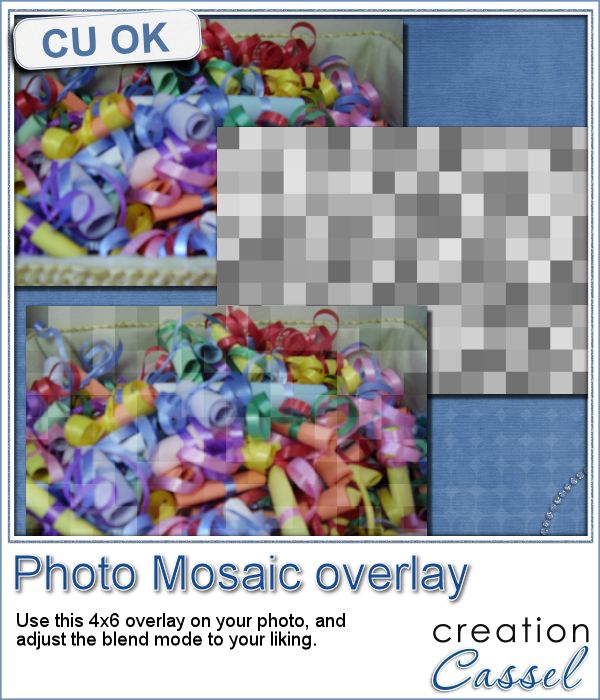
Since this script is run on a photo, and sending you one of my photo probably wont help you, i decided to play around a little. I used a grey based, the size of a 4x6 inch photo. I ran the script on that base, and got a series of tiles in different shades of grey. You can use that as an overlay on top of any of your photos, and adjust the blend mode. Depending on the starting photo you have, different blend modes might work, and others, not.

The file is a psd format as there is a "tile" layer and also a "line" layer in case you want to add some lines (which you can also colorize if you want).

You need to be logged in to download this sample. You can either login, or register on the top of this page.

So, which photo will deserve a mosaic treatment? Don't hesitate to show them. Pin them on Pinterest, on our own board HERE (ask for an invite and you will get it!)

New script – Groovy

cass-GroovyA little detail that can make an element look well finished can be an even groove all around it. Whether you are using a plastic object or a wooden one or even a metal piece, that fine groove can be a great detail to add.

This script for Paintshop Pro will do that for you. It will also measure your element to suggest a specific width based on the element you want to use.

In addition, since a groove can look so good on a wooden piece, the script offers six wood textures you can use to convert your shape.

You can get this script in the store: Groovy.

For a chance to win this script, add something in the comments below as in what element you can imagine adding a groove to or turn to wood. I'll announce a winner in the newsletter, next week. Not a subscriber yet? Not a problem. You can register here and it is free (and you only get one email per week).

cass-Groovy-HolidayAs a little sample,  i created some wooden holiday elements.

For fun, i added some interesting details to the candy cane element. How did i get those stripes? Simple: once i had selected the area for the stripes, i played with the brightness and contrast to get a different coloring. I could also have used a hue change instead.

Use those elements as a base to decorate them even more. Add glitters to the star, or lights to the tree. Add a string, a ribbon or a bow to attach them to your layout. Change the color too if you prefer. What will you do?

You need to be logged in to download this sample. You can either login, or register on the top of this page.

New tubes – LED lights

cass-LEDlightsDuring the holiday season, it is a good time to see some colored lights. However, you can probably use them for any occasion, just like neon lights.

These sets of picture tubes for Paintshop Pro will allow you to simply draw with your cursor and have the  lights follow that path. Write words, make a frame around a photo, enhance the outline of a shape or even letters.

This set includes 10 different colors of lights that you can use to light up your project. Since they are lights, they will give a better result on a darker background.

You can grab this set in the store: LED lights.

Would you like to get these lights for free? Add a comment below and tell me what element or shape you would like to light with those tubes. I'll announce the winner in the newsletter next week. Not a subscriber yet? Not a problem. You can register here and it is free (and you only get one email per week).

cass-LEDlight-arrowsAs a free sample, i made 10 arrows using the 10 colors available in the set. To make them really nice and regular, i didn't draw them by hand, but i used the script called VectorTube on vector shapes.

Those will be great to add a focus onto an element or a photo on your layout. They range in size from 400 to 1000 pixels so there is plenty of room to size them down to fit your own project.

Remember that they are lights so, don't add a shadow to them! If you find them too light, you can always duplicate the layer. This might be needed if the background is not very dark.

You need to be logged in to download this sample. You can either login, or register on the top of this page.

New script – Scallop Pattern 2

cass-ScallopPattern2 You thought that the Scallop Pattern script from last week was a great tool to speed up the process of creating a scallop pattern that used the same "tile" over and over again.

This time, imagine trying to create a scallop pattern but using different colors for the tiles or for the individual rows. This is an even more tedious tasks, since you have more work to do. Now, imagine using using a different color for each individual tile. This is just about impossible to do manually.

Thanks to this new script, Scallop Pattern 2, you have many more options available to you to create totally unique papers.

You can have the tiles alternating in colors, on a single row or alternating by rows. But even more, you can use a gradient and the script will pick the colors from the gradient, and create the tile just at that place, with that color. Now THAT is original!

Grab this script now: Scallop Pattern 2

Do you want a chance to win this script? Add a comment at the bottom, telling me how you would like to experiment with this script. I'll announce the winner on the newsletter, next week. Not a subscriber yet? Not a problem. You can register here and it is free (and you only get one email per week).

cass-ScallopPattern2-TreeFor a little sample, i have this fun Christmas tree paper made out of scallops. In fact, i have to admit that i cheated a bit but i'll show you how to do it.

  • open an image 3600x3600
  • draw a green triangle with a brown rectangle at the base; flatten it
  • run the script and choose the Gradient option
  • when you are asked to choose the gradient, use the Pattern tab instead and pick the tree image you drew; it will appear as one of the patterns, as long as it is open on your workspace
  • the script will use it as if it were a gradient!

Yup, that means that you can use any picture with this script, not only gradients! It might not always yield a fantastic result, but you can surely try and experiment!

You need to be logged in to download this sample. You can either login, or register on the top of this page.


News from the Campus

12DaysJust in case you haven't heard about the 12 Days of Christmas, you still have time to register.

This will send you a daily email with a layered template and a sketch for a card and matching envelope, and a tutorial from a different designer each day, with inspiration to create your own.

New script – Scallop Pattern 1

cass-ScallopPattern1You can probably create scallop patterns the loooooooong way and add individual circles, one by one, using a guide to align them perfectly, but that is so tedious.

This Paintshop Pro script will do all the calculations needed to align all the circles and create a seamless tile.

You can choose a solid color with an outline (obviously, without an outline, a solid color scallop won't show much!), or use a gradient. And furthermore, you can use linear, radial or sunburst gradients for very unique effects.

You can get this time saving script in the store: Scallop Pattern 1 script.

Do you want a chance to win this script? Tell me, in the comments below, how you would have made a scallop pattern before using this script (template? manually? other?) I'll pick a winner next week and it will be announced in the newsletter. Not a subscriber yet? Not a problem. You can register here and it is free (and you only get one email per week).

cass-ScallopPattern1-TilesFor a sample, this week, i made 3 different tiles using the script.

For the first tile, i simply used a solid white and a black outline. The script did the rest.

For the second tile, i just used a linear gradient, going from black to white and no outline.

For the third tile, i used the exact same gradient as for the second tile, but i inverted the colors (so it went from black to white instead of white to black)

Isn't that simple?


You need to be logged in to download this sample. You can either login, or register on the top of this page.


News from the Campus

63430_10152743902521281_3068966621549669937_n-400Remember to have a peek at the Creative Christmas Bundle. It is full of supplies, classes and ideas to create something unique this holiday season. It is still on sale for just a couple of days. You get to enjoy all those goodies at 90% off the individual price. That is worth a Black Friday or a Cyber Monday special, isn’t it?

Check out who are the 15 designers who contributed and what they can offer you.

Get help  and Get more help

*******************


12DaysFinally, here is a FREE event you can register into.

The 12 Days of Christmas is a series of daily email giving you 12 different templates for cards and matching envelope, along with inspiration and tutorials from various designers. And yes, it is 100% FREE.

Check it out and register HERE.

Scroll to the bottom and the registration form will popup for you (make sure you don’t have any popup blocker on!)

New script – Ghost Date

cass-GhostDateYou always need to find something different and original to add a date to a project. This is one of those unusual options.

The Paitnshop Pro script will help you create a date where the actual number will be the focus while the month and the year will overlap and cutout from the number. Even better, you can choose ANY font for each of the elements.

The year, at the bottom, is only optional.

The end result is a single raster layer so you can use it as is, colorize it, use it as a mask and more. It is a great idea to create journaling cards for a “Project Life” or to date photos in a “Project 365”.

In fact, you can also use other words than months. For example, you can use the word MONTH, or WEEK, or GRADE to associate with other kinds of numbers.

Grab this script in the store: Ghost Date.

Do you want to have a chance at getting this script for free? Just add a comment below giving me ideas of how you would use such a script. Who knows? I might just create it for all to share? The winner will be announced in the newsletter, next week. Not a subscriber yet? Not a problem. You can register here and it is free (and you only get one email per week).
cass-GhostDate-2014inReviewFor a sample, this week, i went a bit outside of the box with the script: i didn’t create an actual date.

Instead of a date, i put the year, and instead of the month, i used the word “in review”.

This is a great time to create a layout (even a double size layout) with the highlights of the year, things you want to remember, people you met, places you visited. Then, you can use this element as a title on top, or why not in the middle?

You need to be logged in to download this sample. You can either login, or register on the top of this page.

If you create such a year in review project, remember to show us!

New script – Ribbon Tag Wreath

cass-RibbonTagWreathYou can create so many elements using leftover pieces of ribbons in traditional scrapbooking, but what about digital scrapbooking?

Sure you can and although it would be VERY long and tedious to do manually, this PaintShop Pro script will do the work with little effort.

You can create a wreath using one or two or three or however many ribbons you want. They will be picked at random, cut at random (but based on the average you will choose), and placed correctly along the wreath shape.

Each individual piece will be left unmerged and will have a shadow if you want to.

You can add more than one “layer” to the wreath for a totally different look.

Since all the individual layers are left unmerged, you can always tweak them, insert decorative elements between then, etc.

Since each wreath could easily end up with over 100 pieces, just imagine the time you will be saving!

Grab this time-saving script in the store: Ribbon Tag Wreath script.

What would you do with such a script? It might be obvious to use it to create a holiday wreath, but i am sure you could think of more ideas, don’t you think? Add your suggestions in the comments below, and i will pick one person to receive this script for free. The winner will be announced in the newsletter. Not a subscriber yet? Not a problem. You can register here and it is free (and you only get one email per week).

cass-RibbonTagWreath-Holiday-previewWhat about a little free sample and a quick tutorial for this week?

For this wreath, I used a single ribbon that I colorized 3 times. Here are the steps:

  • before running the second part of the script, I colorized the ribbon in green and adjusted the brightness to get a rich color
  • run the script to complete the first “layer”
  • choose a blurred shadow
  • for the second layer, re-open the same ribbon, but colorize it yellow; adjust the brightness to get the color you want
  • run the script to complete the second “layer”
  • for the third layer, re-open the same ribbon, but colorize it red; adjust the brightness to get the color you want
  • run the script to complete the third “layer”
  • merge each group
  • select the Ellipse tool and draw a circle the size of the wreath; adjust the Line Style to use the Dashed, and a size of 10 pixels
  • convert to a raster layer
  • select outside the “stitch” layer with the Magic wand
  • activate the top “layer” and apply a large inner bevel; deselect
  • activate the stitch layer
  • add some noise and a small bevel

The sample you have has not had the bevel applied because it would require merging the groups and removing the option to customize it on your end.

Because the sample has 163 layers (yes, that many), the files are quite large. I have them available in two formats: one PSP format, where all the pieces are grouped by “layer” and one in PSD format, where the individual pieces are linked based on their “layer” (since the PSD format would not keep the groups). So it is up to you to download the file you need.

You need to be logged in to download this sample. You can either login, or register on the top of this page.

New script – Decorative studs

cass-DecorativeStuds
Decorative studs with Paintshop Pro script

Several years ago, it was fashionable to have multiple studs placed on a piece of garment, jeans, t-shirts, etc. It was a lot of work to create those, especially to have all those studs evenly placed.

In scrapbooking, it could seem easy to fill a shape with studs but the problem is that some of the elements would get cut off on the edges. How do you get only full studs and none of the cut ones?

This is what this script does. Using your Paintshop Pro, the script will actually measure the size of the studs you choose and the shape you want and will do the correct calculations to eliminate all the “part-studs”.

You can start with any shape of any size (obviously, if your shape is too small, the result might not be as good), and pick one of the two shapes for the studs: round or diamonds.

Then, the script will offer 4 possible metallic finish: gold, silver, bronze and copper, but if you want to use something totally different to match your photo or your kit, you can also do so. Use the sculpture effect or simply color and add a bevel.

You can grab this script in the store: Decorative Studs.

How about a chance to get it for free? Tell me what shape you would like to use to create a series of decorative studs? I’ll announce the winner in the newsletter, next week. Not a subscriber yet? Not a problem. You can register here and it is free (and you only get one email per week).

cass-DecorativeStuds-holiday
Free Decorative studs with a Paintshop Pro script

As a sampler for this script, i created some holiday decorations for you. To do them, i simply used a large shape and ran the script.

I used the gold finish for the star, but for the other elements, i chose the option 5, to add my own finish. In my stash, i had various color tiles from the Felt Presets, so i used those tiles as a base color for the other shapes.

For the tree, i selected the center area, promoted the selection to a layer and deleted them from the base shape. Then, i applied a different color to that layer.

I did the same with the mitten.

For the candy cane, i applied the red tile, then i used the point to point selection tool to select sections that would be white. Since the selection was cutting off some of the studs, i went through a few more steps:

  • edit selection
  • using the Eraser tool, with a round brush tip, i erased the sections over the studs that were mostly outside the selection
  • using the RIGHT click with the Eraser tool, i added selections for the studs that were mostly inside the selection
  • edit selection again
  • promote selection to a layer
  • delete from the original layer
  • deselect
  • increase the brightness of the promoted layer so everything turned white
  • inner bevel on those white studs
  • merge visible

And now you have it! That is the trick to have full studs in different colors without having to select them one by one.

You need to be logged in to download this sample. You can either login, or register on the top of this page.

New script – Admission Tickets

cass-AdmissionTickets

You can probably find a few tickets in your stash, maybe from game night theme kits, but what if you don’t want to create a game night theme project? What if you want to use those tickets for a completely different purpose?

This Paintshop Pro script will create a series of admission tickets (or you can create a single one if you prefer) with sequential numbers on each ticket. Or you can add custom text instead, like a date, a name or an event.

Use the center area to include a design, a message, or an image. You get to choose so many options.

No more game night theme for you. Have a series of tickets in Christmas colors for your holiday layout. Or create some pink ones with various heart brushes or design. Or maybe add a single letter on each ticket to spell out the name of a grandchild?

You can get this script in the store: Admission Tickets.

How about a chance to win this script? Add a comment below and tell me how you would use admission tickets in a digital project. I’ll announce the winner in the newsletter next week. Not a subscriber yet? Not a problem. You can register here and it is free (and you only get one email per week).

cass-AdmissionTicket-HalloweenSeries


This week, being close to Halloween, i created a set of 6 tickets attached together. They each have a number, but in a sequence. Unlike traditional tickets, the lines are white on black paper. After all, in digital, we can do things that are not seen in real life!

Each ticket has a little Halloween design on it. It is easy to add a vector shape or a brush stamp on those tickets. Of course, you can use all the tickets together, or you can cut them off.

I am also including a “blank” set of tickets, without the designs in the middle so you can add your own.

You need to be logged in to download this sample. You can either login, or register on the top of this page.


Remember to show us how you use those tickets!

New script – Knot #8

cass-Knot8

Although having a tight knot might be expected, it happens that some times, they are not completed, or maybe you want to attach something that is larger.

This Paintshop Pro script will take any straight ribbon and will tie it loosely. The ribbon needs to be pretty long (at least 3600 pixels for a 150 pixels thickness). Longer is fine, but shorter won’t work.

You can use a solid color ribbon, a directional one, a translucent one or even a lacy one. The script will cut the pieces accurately so that any continuous design (or text) will display correctly.

You can create the ribbons yourself, or use an extracted one. Just make sure it is really straight. If it is at an angle, the script will want it even longer to compensate. Also, if it is at an angle, you might need to tweak the end result manually (but it might be worth it if you are in love with a particular ribbon).

You can get this script in the store: Knot #8.

If you want a chance to win this script, add something in the comments below. Tell me what you would insert in a loose knot like this one, as opposed to a tight one like the Knot #7. I’ll announce the winner in the newsletter, next week.
cass-Knot8-HolidayAs a sample of what you can create with this PSP script, i created a ribbon using a greyscale one, added a layer and flood filled with a holiday color gradient. I adjusted the blend mode to Multiply to show the texture through while keeping the rich dark colors of the gradient. After merging the layers, i ran the script. I used the same steps for both ribbons but in one case the angle of the gradient was 0 and for the other it was 90, which gives you the two different ribbons that are perfectly matching in colors.

The ribbons are really long and the knots are in layered format (PSD) for all to use.

You need to be logged in to download this sample. You can either login, or register on the top of this page.