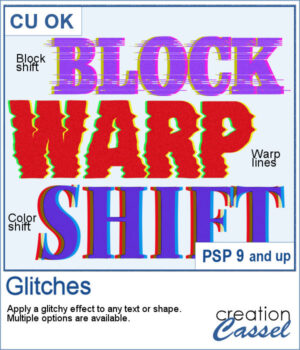
Looking to add a modern, tech-inspired twist to your text or shapes in PaintShop Pro? The new Glitches script offers a fun and creative way to simulate digital distortion effects. Whether you're going for a retro screen error or an edgy design element, this script gives you multiple options to customize the look.
You can choose from three distinct glitch styles—color shift, warp lines, or block shifts—each simulating a different kind of digital interference. On top of that, you decide whether to add colored edges or keep the original image intact. With adjustable intensity and support for both text and vector shapes, this script lets you quickly achieve a unique, glitched aesthetic without complex editing.
Get it in the store: Glitches
In order to win this script, add a comment on this Facebook post telling us which type of glitch you would use first (remember, add a comment, not just a Like!) The winner will be announced in the newsletter, next week. Not a subscriber yet? Not a problem. You can register here and it is free (and you only get one email per week).
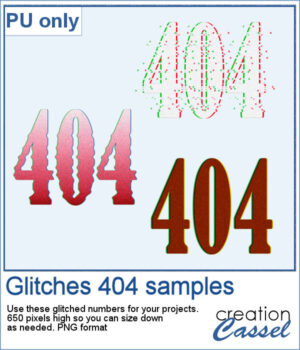
For a sample, I created a 404 message using all of those types of glitches. They are in png format so you can use them in any project, and you can resize them as they are fairly large to start with.
You need to be logged in to download this sample. Please log in or register using the links at the top of this page.

The first Gimp trims were released 13 years ago! But these are slightly different.
For samplers, I created two frames for you. Each one is made from running the VectorTube script twice on a simple shape. One trim is full size while the inside trim is half-size for an interesting effect.
You can turn any vector shape into a fun and colorful flower-filled element with this script. Whether it’s a number, a letter, or a custom shape, you’ll get a unique result with one of five different floral textures.
For a sampler, I created a full alphabet using a nice script font and the pink flowers. Each letter is about 900 pixels high so you would have the opportunity to resize them to fit your project.
You can use admission tickets to add a name, a date, a location, and you can even have a single one or a whole strip of them. These can be included as part of a cluster, sneaking out of a photo, or a full strip can be used as a divider.
For a sample, I created two sets of 6 tickets for you to use in your project. You can use the whole strip or cut them apart to use them separately.
If you want some variety in tags but you want them to match the kit you are creating or using, this script will give you plenty of them. You can create up to 25 tags to choose from. Each tag will be created based on any papers you open.
For a sample, I generated 12 different tags using papers from the mini-kit Countryside from Jessica Dunn. Each tag is 500x700 pixels in PNG format so you can use them with any program. Each tag also has a hole that you can use to thread a string, a chain, or a ribbon.
By popular demand, another set of punches has been created, this time with an Easter theme! This collection includes 12 designs, featuring corner punches, edge punches, and individual elements like eggs, chicks, and flowers.
For samples, I created three bookmarks for you. I used those punches as brush imprints instead of cutout. Add a word or a quote in the center to suit your project.
Although you can create uneven lines manually, it can be tedious to repeat the process for many lines on a page.
For a sample, I created two full-size pages of uneven lines. One will be using pastel colors, perfect for spring or Easter, and one has bold colors, perfect for a crafty of kid theme. They are in PNG format, so you can duplicate them and create different variations.
You can create a whole alphabet from any paper you have. You can choose any basic paper and the script will randomly select a different area of the paper so each tag will be different, even though they will all match.
For a sample, I created a complete alphabet (with a blank and a hyphen). Each tag is 500 pixels high so you can resize them if needed. Add a string, a rope, or a ribbon to attach them together if you want.
For a sample, since this script relies heavily on your own photo, I decided to create a set of sprinkles picture tubes for your Valentine photos, or any other project you want to create. One set is using shades of pink, the other uses shades of red.
Creating a radial design might be fairly easy using the kaleidoscope command, but that does not give you all the flexibility of ajusting the colors, using asymmetrical shapes, or getting perfectly sized rings. This can only be done with careful and tedious calculations.
For a sample, I created a basic design with hearts (perfect for Valentine Day). It is black but with the Locked Transparency, you can change its color and you can use gradients too. If you want to use it as a mask, you can do that too.