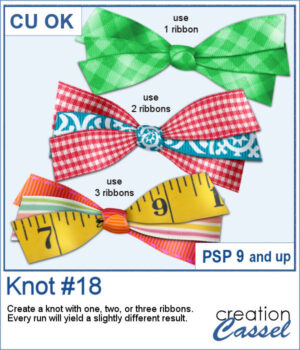
Do you ever struggle to make ribbons look natural when tying them digitally? This new script will take care of that for you! Whether you choose one, two, or three ribbons, the script will automatically prepare them and tie them into a lovely triple knot.
Each time you run the script, you’ll get a slightly different result — the tails will angle differently, the ribbon segments will vary, and the knot itself will be randomly picked from your chosen ribbons. You can create endless unique bows without having to manually crop, resize, or align anything!
Get this script: Knot #18
Want a chance to win this script? Add a comment on this Facebook post telling us just something about this triple knot (Remember, comments count — not Likes!). A winner will be announced in next week’s newsletter. Not subscribed yet? Sign up here — it’s free, and we only send one email per week.
For a sampler, I ran the script with one, two, and three greyscale ribbons. The result is left in unmerged layers so you can colorize them separately as needed for your project.
You need to be logged in to download this sample. Please log in or register using the links at the top of this page.

After several years, I just released another set of two-tone chain picture tubes. As usual, you can use those tubes and place them freely with your cursor or place them evenly with the VectorTube script.
For a sampler, I created 3 different shape frames using three different picture tubes. Each frame is about 2000 pixels high. They are all in PNG format so you can use them in most program.
Give your titles and captions a fresh, playful look with tab-style labels made in just a few clicks. Pick a base color for the whole set, add one or more accent colors (texture optional), choose any font and text color, then select a side detail—lines, dots, or arrows. The script keeps everything tidy by auto-sizing wide or tall characters, and you can decide whether the letters stay perfectly aligned or get a subtle hand-placed wobble.
For a sampler, I created a full alphabet in warm fall colors. This is perfect for either autumn or Halloween-related projects, whether they are scrapbook pages, cards, or others.
Although you can add a serged edge on any shape (with the Stitched Edges #1), you can now add a blanket stitch around your elements. Starting with a vector shape, you can choose to have long or short stitches and you can pick any color for the thread. The end result is left on unmerged layers so you can tweak that thread color by changing the blend mode as needed.
For a sampler, I created some basic set of digits that are stitched for you. Each digit is about 500 pixels high so you can resize them as needed.
Tartan 1 brings the cozy feel of classic plaids to your projects, turning any color palette into a seamless, woven tile in seconds. The thread texture gives a realistic plain-weave look—perfect for papers, backgrounds, borders, and photo mats—so your layouts can swing from heritage tartan to modern plaid with just a couple of clicks.
For a sampler, I used a fall-themed color palette and generated three seamless tiles. Use them for larger surface with whatever scale and angle you want for your project.
This Sticky Album effect brings back the look of classic adhesive photo albums, complete with realistic ridges and subtle imperfections. It’s a fun way to add a nostalgic touch to your photos, or to create a unique textured overlay that feels instantly vintage.
For this week's sample, I am sharing a basic 6x4 overlay. You can adjust the opacity and the blend mode to get the result you want based on your own photo (different colors can require different blend modes).
This tinted silhouette effect is perfect to create striking accents from any photo, whether you want to highlight a single subject or layer several for a more dynamic composition. You can apply a solid tint, use gradients for colorful variations, or repeat the script with multiple colors to build creative overlays.
This week, as a sampler, I'm offering you these flower silhouettes in PNG format. They come in pink but you can easily recolor them as needed for your project.
This text portrait effect is great if you have a specific subject you want to showcase, and even better if the original image has odd colors since this effect can be applied to a black and white version. But you can still keep the original color, choose a monochrome effect, or even a gradient. So many possibilities.
Since I cannot make a sampler from this scripts because it would be based on your own photo, I figured you might be able to showcase something for this time of year: first day of school. Do you have photos of your children, grandchildren or other children in your life? You can use one of those datestamp for all those elementary grades.
Looking for a fast way to create colorful striped backgrounds for your projects? The Simple Stripes script will generate up to 25 seamless striped tiles in just a few clicks. Pick up to 10 colors from your palette and let the script create a variety of stripe arrangements for you. Each tile is produced with a transparent background, so you can easily add your own textures, colors, or designs behind the stripes. Use them at any scale or angle as fill patterns, and you’ll have endless possibilities for papers, accents, or decorative elements.
As a free sample, you can download a set of 10 striped tiles created with the August 2025 Blog Train palette. These PNG tiles are seamless and ready to use for your own papers. Simply scale, rotate, or layer them to create your own striped backgrounds.
Looking for a quick way to design unique corner clusters for your scrapbook pages? The Cluster Template Maker 4 script will generate corner cluster templates for you in just a few clicks. You can choose between a symmetric or asymmetric L-shaped design, then customize the result by replacing the placeholders with your favorite flowers, buttons, ribbons, or any other elements. Resize or rotate as needed, and you’ll have an instant decorative corner ready to go.
As a free sample, you can download Cluster Template 04, a ready-to-use layered PSD file. It’s approximately 2000x12800 pixels, easy to resize, and ready for you to fill with your own supplies. Use it to test out how a corner cluster can instantly bring focus and balance to your layout.