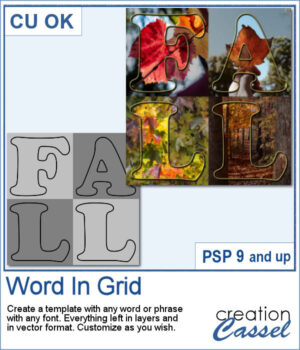
It is quite tedious to create a grid of letters to spell out a word, but this script will create it for you, in just a few seconds. And once your template is done, it is up to you to customize it, and replace the various elements with your favorite colors, papers, photos, etc.
You can use a single word, a name, a short phrase, or a date. Beware that the longer the text, the harder it becomes to read it! But you can let your creativity shine!
Once the template is completed, it is up to you to customize each component.
Get this script: Word In Grid
In order to win this script, add a comment on this Facebook post telling us the first word/phrase you would want in a grid format (remember, add a comment, not just a Like!) The winner will be announced in the newsletter, next week. Not a subscriber yet? Not a problem. You can register here and it is free (and you only get one email per week).
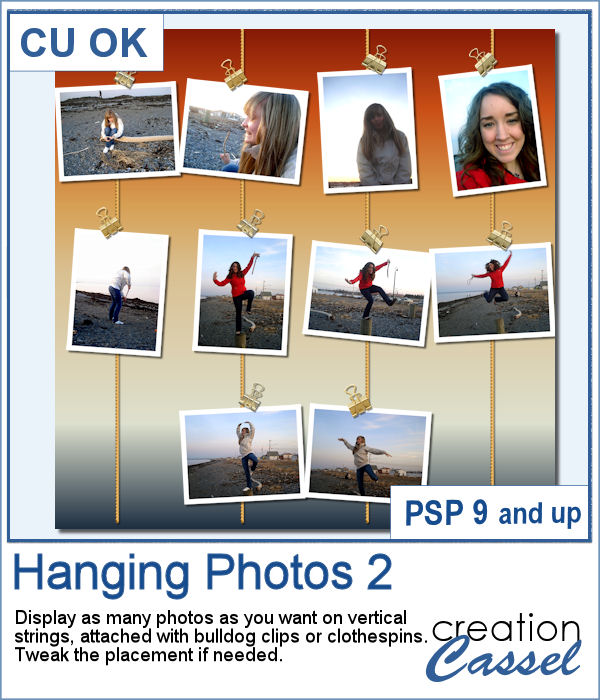
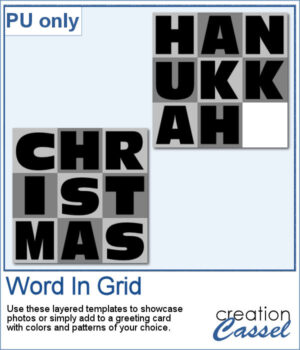
For a sample, I considered the two main holidays coming in December so you can use these templates to either showcase photos, or add to a greeting card (you would have to resize it then). Each template is 3000x3000 pixels in .pspimage format.
You need to be logged in to download this sample. You can either login, or register on the top of this page.

Here is another script to hold your photos onto paper. Although this is similar to the first slipped in corners script, this one offers a cutout design for each corner instead of a simple slit.
For a sample of this script, I created a template for a 5x7 photo. You can move the photo anywhere on the canvas (make sure you don't rotate it). You can convert the template into a mask if you want.
You might be able to get some ready-made templates to showcase your photos but how about creating some that will perfectly match what you need?
For a sampler, I am sharing the basic template created to make the preview. It includes eight circular areas for you to showcase your photos, or something else.
Whether you want to showcase school pictures or flowers in your garden, you might also want to feature one special photo. This script will create a template for you with all the settings you want.
As a sampler, I created a 6x6 template with small images on top and on the left only, leaving an even larger area in the bottom right.
It can be fun to display photos on a string, and in digital projects, it is just as easy, although it can be tedious to resize, move, rotate and attach all the photos on one image. That is why I coded this script.
As a sampler, I created this layered template where you can display 10 photos of your choice. The template is in .pspimage format and you simply have to put the photos into the individual mask groups.
In order to create a depth effect, you can use several cutouts in decreasing sizes along with large shadows. But doing it by hand can be tedious, which is why I created this script.
For a sampler, I created a template for a folded card, 2100x3000 pixels with a round cutout. You can use it as a folded card by keeping it in full size of you can just use the bottom part to make it into a postcard, or a framed image.
When working with PaintShop Pro to create frames or other effects, it is convenient to use guides so we can snap to them and keep our elements, our lines, or brush strokes aligned. Although adding guides along the edges of any image is not really difficult, it is a little tedious to place them exactly on the edges, especially for all four sides. Furthermore, if you want to place guides in the very center, you have to do some calculations too.
As a utility script, I can hardly create a sample from using it, right? So, as a freebie, I decided to create a mask template for you using the Fireworks picture tubes available in the Campus for the January theme blog post (you can get those tubes
Sometimes, it can look interesting to have a series of paper strips of different colors or patterns to serve as a background for a project. However, that can be tedious and time-consuming.
As a sample, I chose to create a series of strips, aligned to the bottom, and turned them into a template so you can use it with your favorite papers. These strips are grouped so you can copy and paste them onto your project in one step (instead of copying them one by one!).
Placing photos in a perfect circle is an interesting way to display them, but it can be very tedious to take care of resizing each photo to the correct dimension for their number, then spacing them, aligning them and rotating them perfectly to form that circle.
As a sample, I ran the script with 8 photos and simply replaced the photos with grey squares (you don`t need to have my photos, do you?). Everything is left in unmerged layers so you can change the color of the borders if you want. You can insert your photos inside the mask groups. You can add various papers or elements to decorate the page.
In order to showcase your photos, there are many different ways. You can use slats in different shapes but in order to create those slats evenly, it is a tedious process.
For a sampler, I created one mask and left it on a full-size project so you can simply add your favorite photo to it and customize it further. Change the color of the outline if you want.