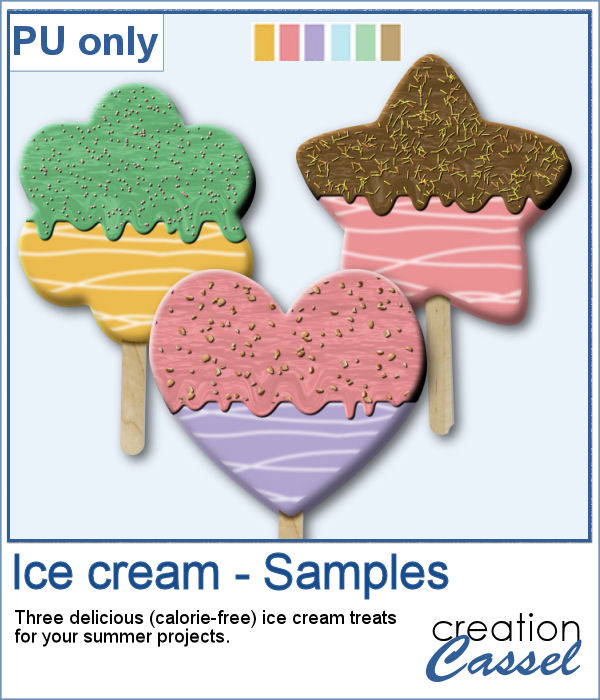
What is more refreshing than a delicious ice cream treat during those hot summer months?
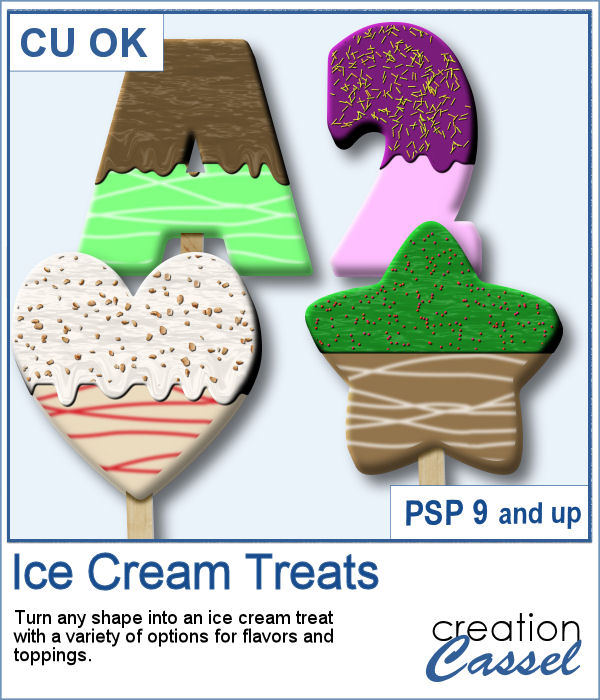
This script will convert any shape into a calorie-free ice cream treat. You can choose any flavor (even if they don't exist). You can add ripples in a different flavor. Then, you choose what coating you want, what texture it will be. You can even have it melting a bit if it is really hot. Then, if you want to be fancier, you can add sprinkles or crushed nuts on top. Hum...
In order to win this script, add a comment on this Facebook post telling us what flavor combination you would like to create (remember, add a comment, not just a Like!) The winner will be announced in the newsletter, next week. Not a subscriber yet? Not a problem. You can register here and it is free (and you only get one email per week).
For a sampler, I created three treats for you using the July Blog Train color palette from DigitalScrapbook. You need to be logged in to download this sample. You can either login, or register on the top of this page.
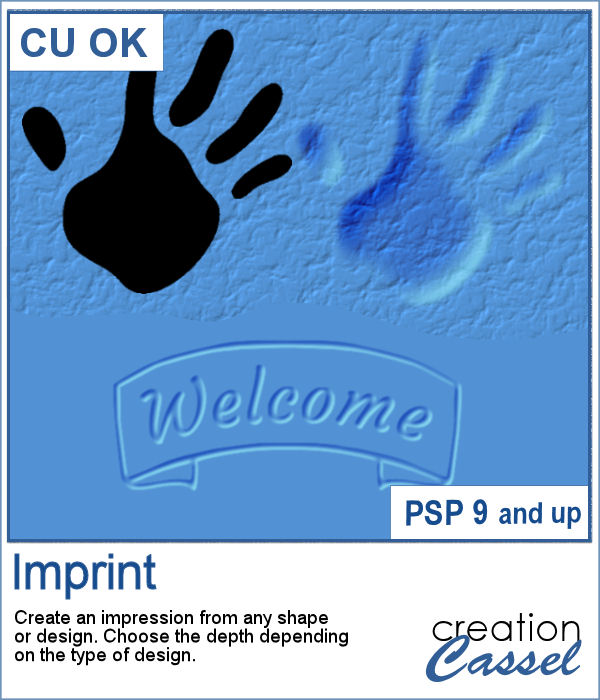
You can now turn any shape into an impression on your project, whether it is supposed to be sand, playdough or cardboard.
You can choose any shape or text and, depending on the effect you want, and the size you have, you get three possible depth to select from. You might need to experiment with the settings. In the end, you can also adjust the opacity to make the impression more obvious if you have a busy background. And don't worry, you can move it around if you are unsure where you want it on your project.
In order to win this script, add a comment on this Facebook post telling us what type of surface would you use these impressions (remember, add a comment, not just a Like!) The winner will be announced in the newsletter, next week. Not a subscriber yet? Not a problem. You can register here and it is free (and you only get one email per week).
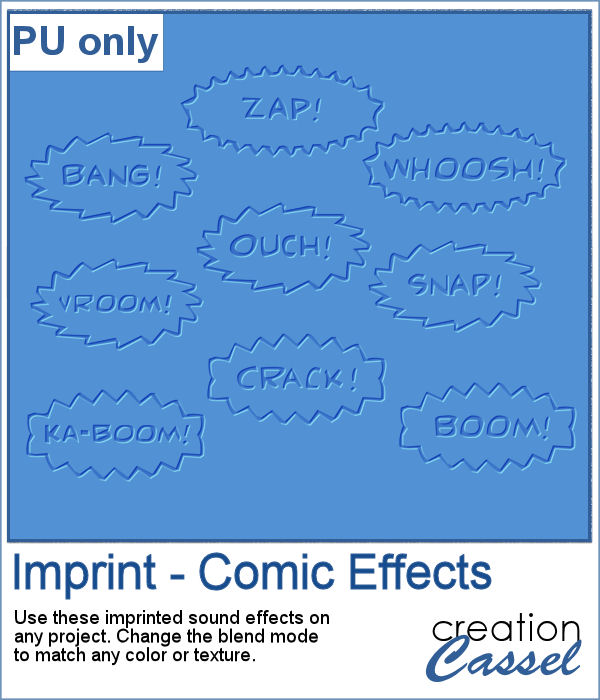
For a sampler, I created some fun imprints of sound effects like you would find in comic books. They are about 600-700 pixels in width and in PNG format. You would get a great result by changing the blend mode to Overlay once the elements are on your project. That will make the colors pop.
You need to be logged in to download this sample. You can either login, or register on the top of this page.
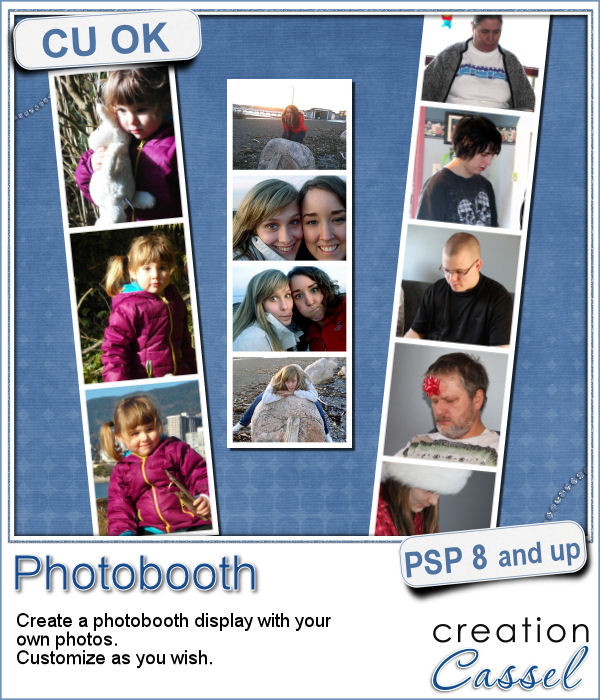
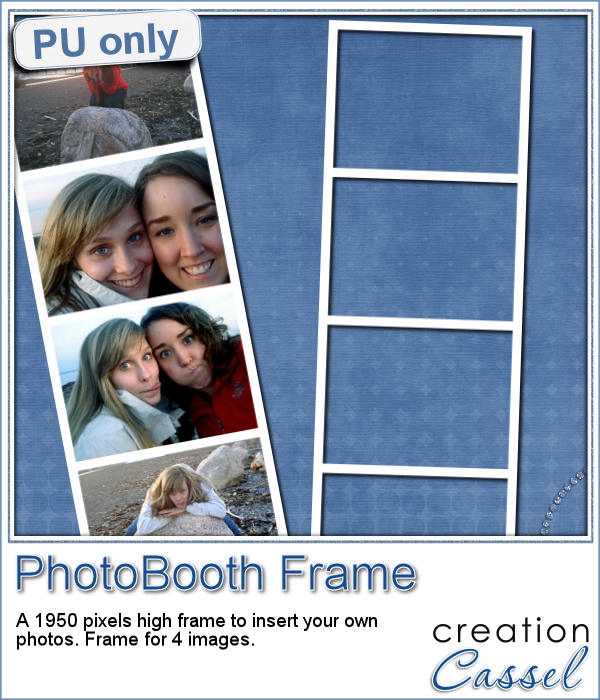
Although they might be getting less and less popular in real life, photobooth are still often associated with fairs, and fun places. Back in the days, you could get a set of 4 black and white photos in those booth. Over time, they became more modern and started offering color photos. Those strips of photos still bring back memories to many people.
This script will create such a strip of photos very quickly. You choose the number of photos you want, their orientation, and once you open the photos you picked, the script will place them all with the correct size and placement.
You still have many options because the photos, although they are resized, are not cropped so you can tweak them a bit, you can center the subject (of move it off-center), you can rotate the photos, you can apply various effects to them. So many ways to customize the end result.
Considering that you can apply any kind of effect to the individual photos once the script is finished, what kind of effect could you consider applying? Tell me in a comment below and I will pick a winner to be announced in the newsletter, next week. Not a subscriber yet? Not a problem. You can register here and it is free (and you only get one email per week).
As a free sample, I am offering you the frame that was created when I ran the script for the four pictures of my daughter and her friend. It is 660x1950 pixels, which is about the size of a real photobooth strip of photos. Add your own photos to it and place the result in your next scrapbook project.
You need to be logged in to download this sample. You can either login, or register on the top of this page.
Granite can be used in many ways, and although the first thing might be tombstones, it is still a material that has other associations. Imagine making a path with irregular shape stones. Or maybe you have a stone wall and would like to simulate a date engraved in it.
Whatever the theme you are working on, you can use one of those three granite texture to turn any shape into a permanent, and solid element!
You can have a light grey, a dark grey or a pink granite. Use any shape you want. Add an outline, or another detail to engrave or keep it plain.
Perfect to turn letters and shapes into granite element, but you can also use a simple shape and then engrave the letters or designs in it.
As for a giveaway, as usual, leave a comment below, and tell me what element would you create using this script? I will be back next week with the name of a winner.
To give you a taste of what this script can do, i created a set of digits on a simple ellipse shape. I chose the option to add design/text on it, to engrave the digits. And i left you a blank one, just in case you wanted to do something else with it. With those digits, you should be able to put a date, or a year, or a birthday number.
You need to be logged in to download this sample. You can either login, or register on the top of this page.
Do you like puzzles? Do you dream of turning your favorite photo into a puzzle? You can probably do it with some plugins in PSP but most of them do not allow you to tweak, move, rotate, or remove pieces at will.
This script will do just that. Take a square photo and run the script. You can also use a rectangular image, but obviously, the pieces will be somewhat stretched, but it is a puzzle anyway, so maybe it won’t matter too much!
Do you want a chance to win this script? Post a comment in the box below telling me if you ever created a puzzle from a photo and if so, how you did it. I’ll be back next week with the name of a winner.
Do you want to know who won the script from last week? Check the newsletter!
As a little gift this week, i obviously could not create a puzzle for you since you would surely prefer to use your own photo than any of mine. So i decided to give you a little frame made of corner brushes and the Mitered frame script. All the details of how i created it, will be in the newsletter.
You need to be logged in to download this sample. You can either login, or register on the top of this page.
News from the Campus
Did you know that the recording from the last live presentation is up for you to watch for free in the Campus?
And since there was so much stuff to cover, there is a need for a second part on the same topic. It is already scheduled to be on August 3rd, at the same time.
Our Custom Playing Cards were a real popular script a few months ago and after seeing some flashcards, i figured that it might be interesting to have photo cards with a word or phrase instead of a single card value.
These cards are a little bit more customizable as you can choose to have square or rectangular cards, and you can choose the card color, the text color, the font and obviously the text itself. And finally, as expected, you can have the photo you want too.
What could you do with those cards? I can imagine having school photos of your child, from kindergarten to graduation, with the grade listed on each card. Or how about having one card made for each member of the family? Or why not use those cards for your Project 365 or 52 to add a date on each photo? Or even just a short description.
But you can also get this script for free. Post your name in this thread in the DST Happy Place section for a chance. I’ll be pick a winner next week.
What would you think of having a card for each day of the week? I created these layered template cards with the days of the week. You can use the Speed Scrap Scripts, or the Clip to it to replace the template with your photo. Or you can also do it manually, if you prefer.
If you want this set of cards, just click HERE. (if the link is not active, just login or register on the top of the page)
You need to be logged in to download this sample. You can either login, or register on the top of this page.
What will you do with those cards? Maybe create a 2 page spread to show photos of your week-long vacation? Whatever you do, just post a link to it so we can admire your masterpiece.
Using a kid like font and three primary colors, i created this fun series of digits using the Twisted Text script.
This series is about 900 pixels long, so you can repeat it over and over again around a photo or a layout for a kid related theme layout or even a school themed layout.
Each digit is well separated so you can also cut some out and use the individual digits separately if you prefer. Why not?
You need to be logged in to download this sample. You can either login, or register on the top of this page.
Do you like this strip of digits? There are two more strips with alphabets (lowercase and uppercase) in the newsletter.
What would you do with a multi-photo frame? Here is one such frame created with the Multi-Photo Frame PSP script. Each photo placeholder is 600x800 pixels, which would match a 3x4 inch photo (just resized).
All the layers are left unmerged (including the shadows), so if you prefer to combine two adjacent photos into a larger one, you can do it on another layer, and remove the initial two.
How about removing the middle placeholder and have the photo under the white mat? Yes, you can do it as there is a hole hidden under that placeholder, complete with its shadow too!
This frame is in PSD format, so even non-PSP users can play with it.
You need to be logged in to download this sample. You can either login, or register on the top of this page.
(if the link is not active, just login or register on the top of the page).
What will you do with this? Show us. You can either post in the comments below, or on the FB page HERE, or pin on our Pinterest PSP Scrapbook Pages board.
(if you don’t have “permission” to pin on that board, just ask for an invite)
Do you know about directional tubes in Paintshop Pro? They are such convenient tools that can work for you in creating unique elements. Unlike “ordinary” tubes, the directional ones will allow you to place a simple tube either following the cursor move, like a line of footsteps, arrows, etc., or in a regular sequence where each individual image would be selected and placed one after the other in the same exact order, to make a repeatable pattern or picked randomly among the numerous images created.
Although it is easy to create your own directional tube, it can be time consuming, especially when you create over 100 images.
This script will do all the tedious work for you, while allowing you much flexibility in the creation of your tube. You can have a series of as few as 9 individual images or as many as 400.
Start with any small image (it would take a lot of resources if you are using a large image to start with, especially if you want a lot of rotated images), answer a few prompts and watch it. You can add an overall bevel or shadow to all the images after they are rotated so it would be all consistent when applied.
Do you want to create your own tubes too? Check out the Happy Place thread where you can add your name for a chance to win this script.
As a sampler, i created some simple journaling cards. I simply used the little footsteps directional tube that i created for the preview above and drew a straight line with it. I could have made a curved line that would have shown the rotated steps, but i really felt it was taking too much space on the cards.
You can use those cards for baby milestones, but also for any new step you might be taking in your life, for documenting personal journeys, places you visited, and more.
Each card is 3x4 inch so they would fit in regular pocket page projects if you want.
They are also large enough for you to cut them into tags if you prefer.
You get 5 basic colors.
You need to be logged in to download this sample. You can either login, or register on the top of this page.
Seed beads are a common supplies in many craft projects. Scrapbooking is one of those crafts where you can see those beads, but you can now do the same thing with digital scrapbooking: you can add strings of seed beads or a random spray of those tiny decorative elements.
With Paintshop Pro, you can place those picture tubes easily with the draw of a mouse. Use the directional tubes to create strings of beads in any of the 5 colors, any length you want, in any shape you want. You can place them in straight lines, curved lines or totally freehand shapes.
You also have 6 sets of tubes that will randomly place one of the 100 slightly different beads more or less along the path you will draw with the cursor. Five sets are monochrome (green, red, blue, gold and crystal) and one set includes all the colors for a truly random effect.
You can get this set of 11 picture tubes of silver lined seed beads in my store: Creation Cassel.
Do you want all those tubes too? You can enter the draw to get this set for free, by adding your name to the RAK thread here. What would you do with those randomly placed beads?
For a free sample, i created a couple of simple decorations. I placed the beads along a vector path using the VectorTube script for the flowers, and added a single “bead” in the center which was part of the Chain Beads tubes set. A little touch of colorization to match them a bit better. Then, the stems were just freehand drawn using also the string version of the green seed beads.
Finally, a little bit of multicolored beads were spilled around each element.
You get two decorative flower stems and 3 individual flowers that you can use separately.
You need to be logged in to download this sample. You can either login, or register on the top of this page.
Did you notice that it says Seed Beads 1 for this product? This means i have plans for several more types of beads tubes. Do you have any suggestion for other beads you would like to see in a picture tube format like this one? Tell me by either commenting below or by sending me an email with a specific bead name or even an image.
News in the Campus
Tomorrow is a big day for many American and Canadian football fans (and their families). Tomorrow is also the day for our next live presentation, on Photo-Graphics with PSP – Part 3.
Join us for this presentation BEFORE the Superbowl (if you are a fan of football) or just for this ordinary Groundhog day.
In the mean time, remember that the video of last month’s presentation is still available to watch (free if you are logged in).
 What is more refreshing than a delicious ice cream treat during those hot summer months?