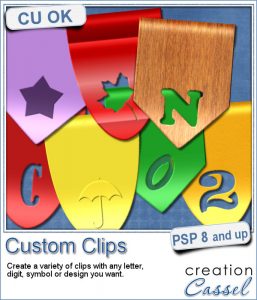
Sometimes, you might want to add identical borders to the photos on your layout, but since you want the photos to be of different sizes. How do you do that? Adding the borders before placing the photos on the montage is not the solution since you will resize the photos, and therefore, the border will also be resized.
Do you think you can select the photo and expand the selection? Unfortunately, that will create rounded corners. If that is what you want, go for it. But if you intend to have square corners on your photos, you need this script.
You can choose any color for the border, any size (up to 100 pixels) and you can also have the edges straight or irregular.
Grab this script in the store: Add Borders.
When you add a border on a photo, what would likely be the color? Tell me in the comments below for a chance to win this script. I'll pick a winner next week to be announced in the newsletter. Not a subscriber yet? Not a problem. You can register here and it is free (and you only get one email per week).
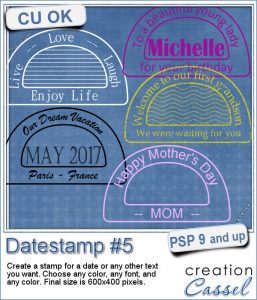
As a way to show you how this script can create identical borders even on photos of different sizes, I created this layered template for you. I had to tweak the end result since the script would merge the edge to the photo.
This is a full size layered template in PSD format.
You need to be logged in to download this sample. You can either login, or register on the top of this page.
And here is the simple layout i made using this template:

What will you make?
News from the Campus
.

Did you attend the live presentation last week but felt you needed to see it again?
Did you try to attend but came in late?
Did you want to attend but had other things preventing you from joining?
Well, you are in luck. This live presentation will be repeated. Not a recording! It will be another LIVE presentation.
It will be showing the same techniques, but using a different template, different photos, and a different kit.
Join us again. REGISTER NOW.

You might be able to use a photo of a brick wall as a paper background for your project, but you might wish to have something that would match more closely your favorite color, or color palette.
As a sample, I created 3 full size papers (3600x3600) all based around the same blue color. It gives you a good idea of how flexible this script can be.
We will have a live presentation on Sunday, August 7, at 5 pm Eastern Time.
Did you ever see those movies where someone has a plane write "Will you marry me?" in the sky? That is a cool idea but more expensive than most budget allow!
For a sample, I created some hand written digits so you can write a special date in the sky.
You have certainly seen those wooden blocks young kids have been playing with for decades. You can often see those blocks associated with baby or even pregnancy pictures. Now you can create them yourself to write any name or phrase you want in your baby project.
As a sample of what you can do with this script, here is a full alpha that includes letters, digits and a hyphen. I chose white so it is gender neutral.
A lot of scrapbookers and designers love to create and use clusters, but the task is often daunting because of numerous repetitive tasks that seem to drain their creativity. So, why not have a script to give them a jumpstart?
As a samplers, this week, I used a kit from Hat of Bunny, Baby Mine. I ran the script to create a corner cluster for the bottom right corner.
You probably have seen those images where a video has been shot vertically, but it has to fit in a horizontal space, then the extra on each side is a copy of the main image, but blurred and darkened to keep the focus on the main image.
Since this script is about creating a special effect on your own photo, i can't really create a sampler from any photo of mine. Well, I could, but i doubt you would find it very useful, so instead, i created a different sampler based on one that was VERY popular recently: the Wooden Window.
Join us for our live presentation on Ribbons and Bows, where we will take a look at how to create knots and bows from straight ribbons, using PSP.
Who can say they have enough bows in their digital stash? Nobody!
This coming weekend, it will be July 1st (Canada Day) and July 4th (Independance Day) so i created two basic ribbons with the blue white and red colors and one with red and white. Then, i ran the script for each one. I also used the Knot#7 script to create the additional knot.
Next week, we will have another live presentation in the Campus. Last month, Diana suggested we had a class on making knots and bows with the ribbons, so that is what we will play with. Will you join us?
Making clusters can be a great way to expand a kit you want to sell, or a way to use a kit you just purchased.
This week, with Heather T's permission, i am giving you the exact strip cluster that I made using this script.
If you want to add a touch of elegance or a formal look to a project, you might be looking for a wax seal. However, what you will find is often a set of ready-made seals that will not have the color you are looking for, or the font you wish it had. Or, you might find seal templates that will give an identical shape to all the seals you would create from them.
Do you want to add some wax titles to your projects? You can use this complete alphabet made of blue wax.
Did you register for our live presentation scheduled for this coming Sunday, June 5th?
Many years ago (at least 35), my mom got me a kit to do some quilling. I had no idea what it was and didn't even have the proper tools to do it, but I improvised and created a few fund designs by rolling those long strips of papers, and shaping them in specific ways. I loved that, and often wished I could find time (and tools) to do it again.
As a sampler of what can be done with this script, I made a little daisy. I used one of the preset shapes, in white. I duplicated and rotated that one petal 5 times and arrange those petals around another preset shape drawn in yellow for the center. Then, using the Pen tool, I drew a couple of free form lines. Finally, I used a third preset shape, in green, for the leaves and I placed them along those lines.

