Web
Analytics

New script – Circle Doodles

Circle Doodle script for Paintshop ProDid you ever like to play with those multiple gears in Spirograph (R) to create various types of designs?

Now, you can do the same in Paintshop Pro without the gears, and mostly, without the calculations needed to have a precise arrangement of the rotated layers, AND with the added speed of automation.

This script allows you to create an unlimited number of design, either from a randomly generated pattern, or your own. You can choose also the number of rotations, and you can even tweak the random design create for you.

Merge the layers if you want, or leave them unmerged if you want to tweak them some more. The possibilities are endless!

Get this script in the store: Circle Doodles

See how this script works and some ideas on how you can use the different options:

What could you do with such designs? Give me an idea of what element/effect you can create with this kind of design. I'll pick a winner, at random, and announce it in next week's newsletter. Not a subscriber yet? Not a problem. You can register here and it is free (and you only get one email per week).

cass-CircleDoodle-samplesFor this week, i ran the script twice to create two interesting patterns, and colored one version just with the brush tool.

One ends up as a frame, while the other is more of a solid shape. Maybe you can print them and cut them out to add to your Christmas ornaments? Or maybe use them on a greeting card?

They are all about 1000 pixels wide, and you get one version with only the outline, and one version with the filled in colors. You can use the outlined ones and paint them to your liking, to match your project.

You need to be logged in to download this sample. You can either login, or register on the top of this page.


Christmas bundle sale

Did you hear about the Creative Christmas bundle?

bundle-group-shot

It is a collection of 14 products offered by 14 fabulous designers, to help you save time, do more and enjoy the coming holidays.

You will find card templates to use with PSP (or with your favorite papers), craft patterns, scrapbook kits, recipe, printables, planners, ornaments to make, and much more. All those products would cost you over $200 to get separately, but you can save 85% of it, by getting the whole bundle this weekend.

You don't have much time: GET IT NOW for only $29.99!

It will be over, on Monday, Nov 30th, at midnight!

New script – Word Album 2

Word album script for Paintshop ProHow about creating a unique kind of photo album or scrapbook with a title right cut out of the pages? This is a totally unique idea, and you can do that easily with this script for Paintshop Pro.

The script will create full size pages (12 x 12) with a letter cut out of the top to form a word. The letters somewhat overlap to be visible as a whole. You can choose any word you want, whether it is the name of a person, a location, a sentiment, or any other word that is meaningful to you, and will summarize the content of the album.

This is perfect for those who have a cutting machine, but anyone can cut out the pages manually.

Choose any text, but also any font! Of course, thinner fonts will be harder to cut out, but if you have a cutting machine, that should be simpler.

The 12 x 12 pages can always be cropped to a different format, or resized to a different size, depending on what you would want to create in the end.

Use the pages as templates, a scrapbook layout, or maybe just blank pages that everyone can use to hand write notes for someone, for an event, etc. like a giant greeting card.

Get this unique script in the store: Word Album 2

Do you want this script for free? I have a little game for you: in the comments below, pick a word that you think would make a great title for an album (just ONE word). I will draw a winner and announce it next week but even better, the winner's word will become a free album template for everyone subscribed to the newsletter. Not a subscriber yet? Not a problem. You can register here and it is free (and you only get one email per week).

Word album in psd format - FamilyAs a sampler, i created a set of 6 pages that will form the word FAMILY. Of course, with the holiday season coming, it is a time when many people will visit family members, see some they haven't seen in a while, and so on. Close family, extended family. Why not create a keepsake using those pages? You can create layouts with holiday photos, but you can also just leave most of the pages blank and let everyone who visit this season, write a little note, a wish, a story, etc.

This will become a great keepsake to cherish all year long.

You need to be logged in to download this sample. You can either login, or register on the top of this page.


New script – Harlequin Pattern

Paintshop Pro script to create Harlequin patternAlthough it might be easy enough to get a greyscale template of a Harlequin pattern, it is still a task if you want the colors to be varied, and matching your chosen palette.

Creating the shapes, manually is very time consuming, but with this script and your Paintshop Pro, you can create those in seconds only.

This tool will allow you to create seamless tiles with specific colors of your own palette, but you can also create a larger pattern based on a gradient or even an image (try a picture of a texture!) for a very unique Harlequin pattern that will match your current project.

You have other options, like the presence or absence of outlines between each diamond. Again, that will yield quite different results for you to use.

Grab this script in the store: Harlequin Pattern script.

Have you ever created (or wanted to create) a Harlequin pattern? How did you do so, or how would you have done so? Tell me in the comments below and you will get a chance to win this script. Not a subscriber yet? Not a problem. You can register here and it is free (and you only get one email per week).

Seamless tile with Harlequin patternAs a sample, I created a set of 4 simple patterns made from simple gradients. Although the script asks for a minimum of 2 colors, I just provided the same gradient twice to create a repeated single pattern. If you want the same colors as your particular palette, you can use the foreground-background gradient, and having picked the colors ahead of time, you will get a fantastic match.

Those tiles are seamless so you can use them to create papers, or elements, and by changing the scale, you can create detailed designs too.

So what would you do with those tiles?

You need to be logged in to download this sample. You can either login, or register on the top of this page.

New script – Scattered Photos

Paintshop Pro script to scatter photosAlthough Paintshop Pro allows you to nicely arrange photos without too much effort of measuring (since you can use guides and templates), it might be a little bit more tedious to pretend you scattered photos randomly. Yet, it can be a great way to display lots of photos on a project.

In order to scatter photos, you need to open each of them, resize them (if needed), add a border (if you want), copy them, paste them on the base image, rotate them, move them where you want, and then repeat for each other photo. If you have 5 or 6 photos, that might be feasible, but what if you have 50 of them? That can definitely add up and take you time.

This script will take care of all the steps once you have given it the proper information: where the photos are, what size you want them, if you want a border, and where you want the photos to be scattered (in the center, on the outer edge or all over). Then, you can go get a coffee and it will be all done by the time you come back!

Since all the photos are left on unmerged layers, you can always tweak them later (after all, the script can't tell if it looks the way YOU want).

And furthermore, the script will add shadows to all the layers if you want to, saving you even more time.

Get this script in the store: Scattered Photos.

Do you want a chance to win this script (so you can display all your Halloween photos)? Tell me what is the maximum number of photos you have placed onto one layout. The winner will be announced next week, in the newsletter. Not a subscriber yet? Not a problem. You can register here and it is free (and you only get one email per week).

Facebook cover - layered template for scattered photosSince this script will work only on YOUR own images, I am sure you would not care much about using mine. So, instead of using photos to place them onto a base image, i simply created black rectangles, the size of regular photos, and used them instead of photos. I ran the script with those and let it place them all over the place on a Facebook cover template.

Since you surely didn't want to only have black layers, I promoted the borders to their own layers, added shadows on separate layers, and now, you can use the photo layers to place your own. Basically, with some extra work, I made a layered template for you.

Although you can manually replace each photo layer by your own photos, you can also save a lot of time by using the Speed Scrap script (especially the one for photos) as it will resize the photos, and mask them so you can tweak their placement and rotation without worrying about trimming the excess or having to use a photo of the same format.

You need to be logged in to download this sample. You can either login, or register on the top of this page.


Corel Paintshop Pro Challenge

Halloween-300Check out this week's #CorelChallenge. Obviously, for the time of year, the theme is Halloween. Do you have Halloween photos? Halloween decorations? Or maybe a Halloween theme scrapbook page? I know, they talk about Halloween PHOTOS but you definitely can show off more than just photos!

Post your project on their thread or tag it with #CorelChallenge.

I CHALLENGE you!

Did you see the one i posted on their thread? Just to test how many of you will see it, LIKE it on their thread.


News in the Campus

ToBlur-400Have you registered to the live presentation tomorrow?

We will look at how you can use the Blur command for some functional and creative effects.

It is FREE, as usual!

Register now


New script – Knot #12

Knot 12 - Paintshop Pro scriptHow you would use knots if you had a traditional ribbon can vary from day to day. You would have options to tie that ribbon in multiple manners, attach different objects, wrap that ribbon around all kinds of things. This is why, in digital scrapbooking, there are so many different knots available.

This script for Paintshop Pro will allow you to "tie" a ribbon into a simple knot, but unlike other scripts where you can only choose the color or pattern and everything looks like it is "flood filled" with that pattern, this script will use your own straight ribbon. This is perfect to have a match if you are using the other ribbon in the project, whether it is left straight, or tied into a different knot or bow created with another script.

Grab this script in the store: Knot #12.

For a chance to win this script, tell me how you would customize a knot for your project otherwise. Do you colorize greyscale ribbons? Do you manually create a knot with your ribbon? Do you use a script that asks you for the color to use? Leave a comment below and i'll announce the winner in the newsletter, next week. Not a subscriber yet? Not a problem. You can register here and it is free (and you only get one email per week).

Knot 12 - free samples in PSD formatThis week, i created three straight ribbons (from greyscale ones) and ran the script to end up with three simple knots. Each one is left in unmerged layers so you can put them around any object or insert something in the middle of the knot.

I had fun with colorizing those ribbons with a gradient instead of a solid color. I think that gives a different kind of look to the knot that makes it more interesting (at least, that is what i think).

I also included the straight ribbons so you can use them with other scripts, or as is on your project to match. Or you can insert the straight ribbon directly in the knot too. Why not?

Remember to show off what you used this knot for. What project did you create using it?

You need to be logged in to download this sample. You can either login, or register on the top of this page.


Corel Paintshop Pro Challenge

TextCheck out this week's #CorelChallenge. It is about using text on your project. Well, if you are a scrapbooker, you surely have text on your projects! It could be a fun journaling display, or an unusual title. Or how about a nice Subway art design? We can do so much with Paintshop Pro. Show off what you can do (or just what you have done already).

Post your project on their thread or tag it with #CorelChallenge

Did you see the one i posted on their thread?


News in the Campus

Text-in-silhouetteAs part of the Corel Challenge, i created a text inside a silhouette. I thought it was a great way to use the new text wrapping tool from PSP X8.

I also made a short tutorial on how to create this result. Read it HERE.

New script – Ribbon Banner

Ribbon Banner script for digital scrapbooking with Paintshop ProYou might have seen those vector banners on various sites, but you wish you could have something using real ribbons, right? Now, you can do that with this script and Paintshop Pro.

Pick any straight ribbon (it could work with a ricrac but it is not as pretty) or a long piece of paper and run the script. Answer the prompts, select the area you want in the center and voilà!

You can use any kind of straight ribbon: lace, translucent, directional, etc. The script is coded to use the whole length of the ribbon so nothing is lost, especially those frayed edges if you have them.

This is even better than using layered templates because it really curves the center piece so you can use patterned designs, text, or stripes and it will follow that curve. In addition, you can have the central part as wide or narrow as you want, and even use a section of the ribbon that is not in the very center.

Grab this fun script in the store: Ribbon Banner.

Banners are often used to announce something and in a layout, it could be a way to label or date it. What would you use it for? Would you add text? If so, what text? Tell me in the comments below and i'll pick someone who will win this script next week. I'll announce it in the newsletter. Not a subscriber yet? Not a problem. You can register here and it is free (and you only get one email per week).

Ribbon banner sampler with the seasonsSince it is harder to add text on a curved ribbon, i figured i might as well create a banner with the text already in for you to use. I could have done a banner for each month of the year, or each day of the week, but i thought it would be interesting to have the four seasons for you to share various photos in a layout.

Each banner is about 3000 pixels wide, so they would nicely fit on top of a layout, almost as a title. Yet, you can size them down, or even trim the ends if you want.

You need to be logged in to download this sample. You can either login, or register on the top of this page.


News in the Campus


WeatherWise-400Have you registered to the live presentation this coming Sunday?

We will play alongside Mother Nature in adding rain and snow to photos.

It is FREE, as usual!

Register now


Corel Paintshop Pro Challenge


Silhouette-300

Do you have a photo with silhouettes? Do you have photos you have edited to create silhouettes? Or do you have other projects (not photos) that use silhouettes, like a card, or a layout?

Submit it to the #CorelChallenge

Let's show the world what we can do with PSP (and not just photography)!

Check out the collage i made for the Create Magic with PSP class. I posted it on that #CorelChallenge thread. Now it is your turn.

And if you want to create your own silhouette, there is a brief tutorial in the Campus HERE.

New script – Painted wood

Painted wood script for Paintshop ProWhether you are creating a scrapbook page or any other graphic project, painted wood elements could add a special touch. And when you can choose one of SIX types of wood, when you can choose any shape, any design and any color, you are sure that your elements will be unique.

There are so many ways to coordinate them with your project, the theme and the the colors.

The script will use a black and white version of your design, leaving the white as bare wood and the black as painted. You will also get a textured paint that will match the grain of the wood, even though the script will randomize the angle and the scale.

You can get this script in the store: Painted Wood.

For a chance to win this script, add a comment below telling me what design you would first use to run this script on. Would you rather do alphabets, arrows, frames, basic shapes, etc.  A winner will be announced next week. Not a subscriber yet? Not a problem. You can register here and it is free (and you only get one email per week).

Painted Wood DigitsAs a free sample, this week, i created a fun set of digits. I used a black fill and a white outline to set the inside to be painted by the script. And instead of a solid color, i used a gradient with the 3 primary colors.

I have to say that i am particularly pleased with the end result. With those primary colors, you can easily embellish a child theme project, or a school theme layout.

You can use those to indicate the child's grade, his age, or the actual year a photo was taken.

You need to be logged in to download this sample. You can either login, or register on the top of this page.


#CorelChallenge

Primary-300

Did you hear about the #CorelChallenge?

This week, you can send in photo, scrapbook page or other graphic projects based on primary colors. Here are some ideas for you:

  • create a monochrome layout
  • use an ordinary photo, turn it in black and white and make one of those primary colors reappear (here is a tutorial).
  • create clusters with elements in primary colors (buttons, ribbons, flowers)
  • use the free digits above to add a colorful date

Go for it. Let's show how we can use primary colors in projects OTHER than just photos. You can do it!

Post your project here.


New script – Shattered Mirror

Shattered Mirror scriptIf you like the Shattered script, which breaks up a single image into many pieces, you might actually like this new script. It is somewhat similar to the first one, but in this case, each piece will be converted into a piece of mirror, reflecting the initial image.

You can also let the script move the pieces at random for a really scattered look, or move them yourself (and you can even remove some pieces completely). You can even let the script add a drop shadow to each piece with YOUR favorite settings.

Since every piece is left on a separate layer, you can customize the end result to your liking.

Grab this fun script: Shattered Mirror script.

Do you want to win this script? Add a comment below giving ideas on how you think this script could be used (hint, check the freebie below for another idea). I'll announce a winner in the newsletter, next week. Not a subscriber yet? Not a problem. You can register here and it is free (and you only get one email per week).

Shattered Mirror PapersSince this script should be applied on YOUR own photo, it would be totally useless to offer you a free sample with one of my photos. What would you even do with it, right? However, for the fun of it, i decided to run the script on a simple black and white gradient pattern image to see what it would look like. Well, i thought the end result was... interesting.

I ran the script once and then merged the layers, cropped the resulting image and ran the script a second time.  Since the initial image is untouched i was left with the original (the gradient), the first result, and the second one.

Now, what can you do with this odd-looking paper? Try to blur it to get an overlay. Or play with the blend mode to get something different. But if you were to use your own design or gradient, you can create a kind of "crazy quilt" effect, and add stitching along the lines.

You need to be logged in to download this sample. You can either login, or register on the top of this page.
.


Corel Paintshop Pro blog


64_32-bitWhat do you know about 32 bits and 64 bits as far as PSP is concerned? Do you have plugins that don't seem to work on your new PSP versions? check out this blog post on the Corel Paintshop Pro blog for some information from LeviFiction, a regular contributor on the Corel user-to-user forum.


New script – Random Dots

Random dot pattern script for Paintshop Pro
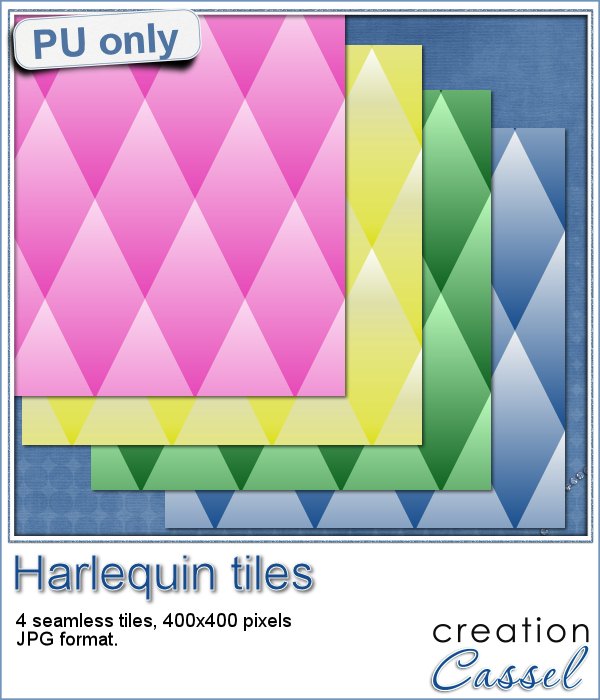
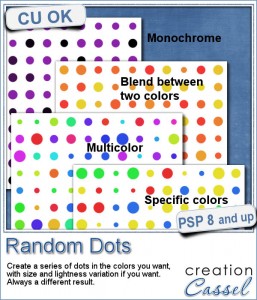
There are super simple ways to create regular dots in an even pattern. If you want a speed up tool to create a variety of polkadot tiles, you can use the Dots and Diamonds script. But if you want to create something that has more variety in the dots yet, still be regular, what do you do?

That is why I created this script. It will create a dotted pattern but with a completely different type of result with different options.

You can create a tile that you would use as a seamless pattern, or a full size paper where you will have no repeat at all. In addition, you have various ways to pick the colors. You can have a monochrome pattern with only lightness variations. You can have blended colors between two. You can have specific colors picked from your palette with no blending at all, or you can have totally random colors picked.

The dots can be created on a new image or take an open image and add them on a separate layer.

Use the end result as you wish, adding effects if you want.

Grab this script in the store: Random Dots script.

For a chance to win this script, tell me what you would do with those dots. Would you apply them to something? would you add a particular effect? Tell me in the comments below and i'll pick a winner next week to be announced in our newsletter. Not a subscriber yet? Not a problem. You can register here and it is free (and you only get one email per week).

Random Dot paper designHow about a little sample of that dot making machine? I created 2 patterns for you. One is made of primary colored dots (plus black an white) in a very regular pattern, where nothing touches the next dot. And one other in primary colors only where the dots are smaller and somewhat overlap.

Each pattern is 1000x1000 pixels (beware that one of them is not seamless ass some dots are over the edge of the image).

They are both png files so you can use them in most graphic programs. Add a background, apply an effect, use them as tiles, etc.

You need to be logged in to download this sample. You can either login, or register on the top of this page.


New in PSPX8

What is new in PSPX8This week, Corel released the latest version of Paintshop Pro, which is version X8.

It has some great new features and those will be particularly welcomed by scrapbookers, card-makers and other graphic artists using PSP for other than photo retouching.

Do you want to read more about those new features? Check out this blog post in the Campus.

New script – Bow #10

Layered Bow script for Paintshop ProNobody will ever say they have enough bows in their digital stash!

This script is one of the most detailed bow script that i have done, as it allows you to choose your own straight ribbons to create this bow. With the option of creating three layers of loops, using one, two or three different ribbons, and the choice of the number of loops to include, this script will let you create an assortment of bows for various occasions.

The script also includes a random option for the number of loops but also for where in the original ribbon, the pieces will be taken from, meaning that if you have a ribbon with a particular design or color variations, the script will always take a different section for every run.

Each loop is left on separate groups, allowing you to move them if needed (or you can remove some if you want, or tweak them any other way).

Grab this fun script in the store: Bow #10

See how this script works:


What would you do with such a script? Would you likely use the same ribbon for each layer or use different ribbons for each? Or would you use the same ribbon but colorized differently? How would you use this script and customize the end result to be unique? Share your ideas in the comments below. I'll pick a winner and will announce it in the newsletter, next week. Not a subscriber yet? Not a problem. You can register here and it is free (and you only get one email per week).

Multiple layer bow greyscale in PSD formatThis week, i created a three layer bow using two different greyscale ribbons (from Melissa Bennett). Each loops is on a separate piece (i merged the individual piece for each loop) so you can colorize each row as you wish, or even each loop as you wish.

Each layer has 10 loops.

The zip file includes two PSD files: one with basic shadows added, and one with no shadow at all, so you can add your own if you want something very specific.

Use the same color for each layer, or change for each. Or use the same hue but different brightness settings. Or go crazy and have a different color for EACH loop.

Since the last loop in the bow is kind of standing out, it is a perfect place to add a center piece, buttons, jewels, etc.

You need to be logged in to download this sample. You can either login, or register on the top of this page.