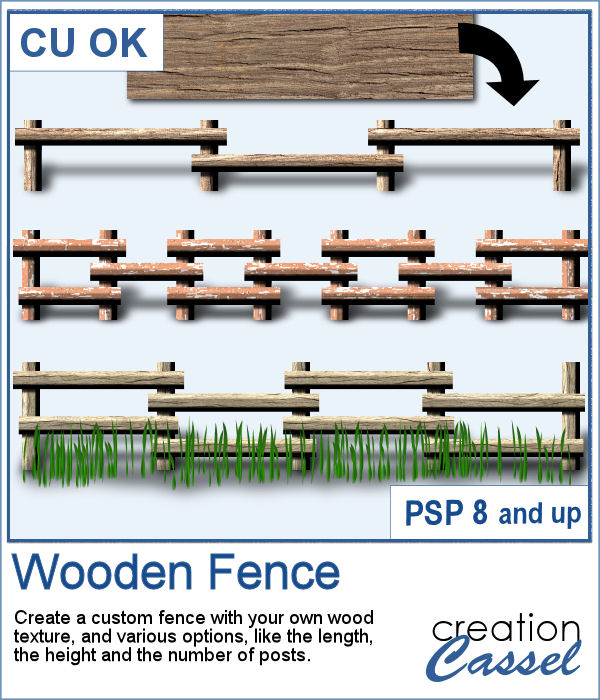
If you want a custom fence, you can do it with individual posts and boards you can measure and layer. It might not be too hard, but takes a while to build. What if you can create one in just a few seconds?
That is what this script will do, creating the fence of your dream based on any wooden texture image, and your choice of the length and the height, plus the number of posts you want. The script will do the rest.
Get this script in the store: Wooden Fence
In order to win these tubes, add a comment on this Facebook post telling us what is your favorite color of the twelve included (remember, add a comment, not just a Like!) The winner will be announced in the newsletter, next week. Not a subscriber yet? Not a problem. You can register here and it is free (and you only get one email per week).
Running this script with a simple wood texture image, I created this fence that is in separate layers for you to tweak it.
You can also resize it if you want.
You need to be logged in to download this sample. You can either login, or register on the top of this page.

There are various ways to add a date, but did you ever think of writing it on a button? Why not? They are perfect in size to add small text like a date and with this script, you can customize it with the color, gradient, pattern, text, font or even other designs.
For this week, I created a set of 13 buttons that you can use with those school pictures that you just took, or had for years, whether they are yours or your children's or grandchildren's.
Whether it is for a kid project, a school-related project or just for the fun of it, you can now create scribbled drawings out of any shape or letter, whether you drew it with a brush, a preset shape or the text tool.
As school is either starting or going to start soon, I created a full alphabet using this script. I picked four basic colors for a really bright effect. Remember that if you want those to be considered scribbles, you should not add shadows. However, if you want to pretend the lines are strings or wires, then you can add some. Don't go crazy with the shadows though; you don't want your element to feel like they are floating.
You can easily create an impression of a rubber stamp using a color and a texture, but how about creating the actual rubber stamp, complete with the ink and maybe even the mess too?
As a free sample, I created a few elements to celebrate Canada Day (if you don't know yet, I am Canadian). I created those three rubber stamps in addition to a "stamped" version of the design.
Those iron fences might be fun to use, but they are probably always the wrong length for your project. This set of tubes allows you to draw them as long as you want and at any angle (like on hills or down stairs).
Since it is graduation time now, for many parts of the world (it is the last day of school here), why not add a great message for anyone reaching graduation?
By popular demand, another set of punches have been made and this time, on the summer theme. You get 12 designs, with corner punches and edge punches. In addition, the individual shapes are also available.
As a free sample, this week, I created two templates for 5x8 and 8x5 photos with some wave edge along the top. Use it to showcase your favorite summer, water, beach or just fun photo.
You might want to create some kind of extrusion around the edges of your element and play with various thickness, height, and colors. Add those edges around shapes or text for a very unique effect.
To play around, I used some text to run the script on. I used gold, silver and bronze patterns for the edge and the inside and outside colors to give the metallic effect of the edges.
Aside from the typical deck of cards we use to play poker, bridge, or others, do you ever play games that involve a different kind of cards, like Magics, ?
This week, I created a simple set of four cards for you. They are in .pspimage format which includes the mask to insert your photo without having to cut it or adjust it in any way. Simply put your photo above the layer named "Photo here", and adjust the placement using the Pick tool (or the Raster Deform tool if you are using an older version of PSP).
Everyone likes ribbons, bows and knots. They can be very versatile, especially if they match. Finding the correct match is not always easy, but with this script, you can use any straight ribbon and get a simple knot to add to your project.
To show you what those knots look like, close up, I used three ribbons from a kit,
Every project can use ribbons and creating custom ribbons with the specific colors of a photo or a kit can be tedious. This script, which is an extension of the Ribbon Factory script, will create such ribbons using two colors of your chosen palette with a variety of patterns and other settings.
As a sampler, this week, I used the same color palette as I used last time to create those fun spring confetti and generated a dozen of ribbons, 200 pixels thick.