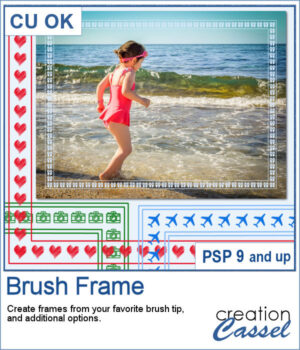
Although you can place brush imprints easily along the edge of an image, it is not always easy to make it EVEN on all sides.
This is what the script will do, taking care of all the calculations for you. You can get different options for colors, width, and whether you want the borders to be single or double.
Get this script in the store: Brush Frame
To win this product, add a comment on this Facebook post telling us what theme would use for your first frame (remember, add a comment, not just a Like!) The winner will be announced in the newsletter, next week. Not a subscriber yet? Not a problem. You can register here and it is free (and you only get one email per week).
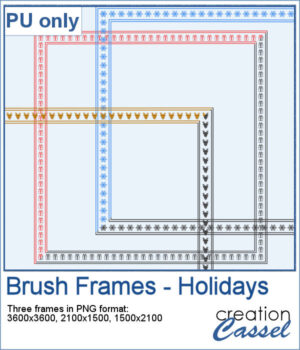
For a sample, I created three holiday-related frames of different formats: square 3600x3600 pixels, and rectangular 2100x1500 and 1500x2100 pixels with different holiday brush tips.
You need to be logged in to download this sample. You can either login, or register on the top of this page.

You can get the look of stamped letters, digits, and shapes in just a few clicks. You can create a single element or a whole series for a themed project.
For a sample, I created a full alphabet in orange color, perfect for Halloween. Each letter is about 500 pixels in height and in PNG format so it will show the background color of any paper or project.
It might not be hard to draw chevrons by hand, but it is tedious... very tedious.
For a sample, I created two seamless tiles with Halloween colors. Each tile is in PNG format so you can add whatever background color you want on it.
You don't have to limit yourself to boring, simplistic, or ready-made tags when you want something customizable.
For samples, I created 12 tags for the months of the year. Each one has a different color that matches the month. I used solid colors so you CAN brush over any section with the brush tool if you want to erase some text and replace it with something else. Each tag is in png and if you are doing traditional scrapbooking, you could even print and cut them.
More crochet laces for you to decorate your projects. Create them in any length you need, and colorize them in any color you want to match your project.
For this freebie, I used a long lace and created a square frame by manually "mitering" the corners. I needed to do it manually to make those corner look realistic.
This script will create a visual catalogue of all the masks that are available in your PSP. Whatever folders you have listed under the File Location, they will be scanned for any compatible masks (they can be in many file formats). Once done, it will place a copy of each of those masks on a page, along with the path of the individual folders.
For a sampler, this is the time of year where you might have some autumn projects. I have created a wood fence with fall color vines on it. The fence is 4000 pixels long and in PNG format so it can be used in most graphic programs.
You can easily create some simple polkadot patterns with PaintShop Pro, but as soon as the pattern is not as simple, it can become a headache to create.
For a sample, I greated two matching papers with the same 7 colors, one in straight lines, and one in zigzag. They are full-size so you can either size them down or trim them to suit your project.
Turning a photo into a completed puzzle might be simple when you use an overlay, but if you want to separate some pieces from the main puzzle, that is much more challenging.
This script is related to your own photos so I can't give you a sample of my photos! Being around back-to-school time, you could use this painted cardboard alpha using primary colors. Each character is about 500 pixels in height so you can resize them as needed for your project.
Double knots are hard to find because unless they are part of a kit, the colors and patterns are not likely to match the supplies you are using or the project you are making. However, with this script, you can use any ribbon you want so you can use the straight ribbons from the same kit. In addition, you can tweak and colorize the separate ribbons and the script will combine them, creating a unique knot.
For a sampler, I created four knots in pastel colors for you. They are all in png format (not layered) so they can be used in various programs.
This is the second set of wood fence picture tubes. It includes 6 sets of tubes that will allow you to draw fences however long you want. You can start with a 4000-pixel image if you want a fence that will go from end to end on your standard page, but you can also use a standard page and drag your cursor only for a little bit to get a shorter fence.
For a sampler, I created a long fence (more than 3600 pixels) with a cute squirrel and some vines on it. Add it to your project, add more critters if you want, and embellish with flowers or grass at the base.