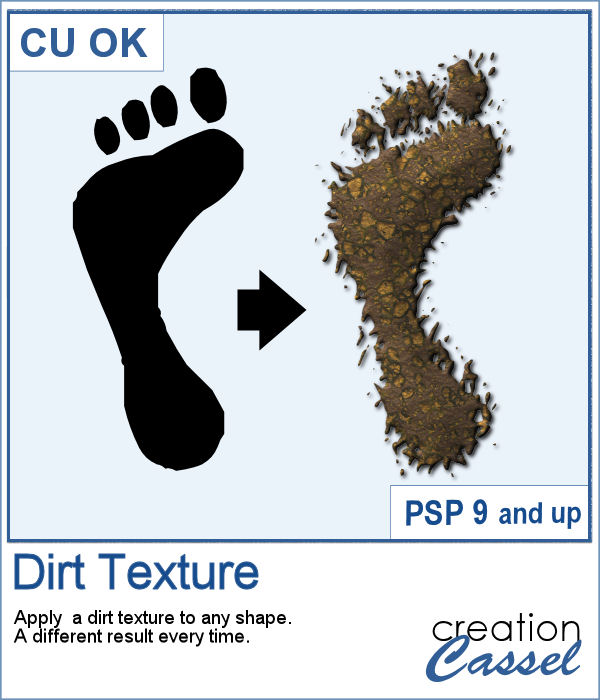
We might sometimes, want to showcase some photos of messy kids (ours or even ourselves). What better way than have a "dirty" element, complete with a splash of mud on the side?
This script will turn any shape into a splash of dirt or mud and you will even get a different look every time so you can run the script on the same shape multiple times to get a variety of results.
Get it in the store: Dirt Texture
In order to win this script, add a comment on this Facebook post telling us what photo you feel would be great to embellish with an element with this texture (remember, add a comment, not just a Like!) The winner will be announced in the newsletter, next week. Not a subscriber yet? Not a problem. You can register here and it is free (and you only get one email per week).
As a sampler, I created a basic square frame and ran the script. You now have the perfect frame to showcase those "muddy" photos.
You need to be logged in to download this sample. You can either login, or register on the top of this page.

I have seen various masks made from apparent chaos of random frames while allowing the display of a single photo through all those frames. I knew how to create those manually, but figured it would be simpler for PSP users to have a tool to do all the work for them.
As a sample, I am giving you the same template created in the preview. It has unmerged layers so you can add shadows on the frames if you want, you can merge them all before adding shadows or add them individually. You can also change the frame colors, add a bevel, or tweak them as you wish.
Now, you can create as many heart-shaped candies as you want, in any color you want. And they will also have random saying on them. With additional random features integrated into the code, each candy will likely be slightly different from each other.
As a sample, I simply am offering those candies created for the preview. You get twelve fun candies, about 300 pixels wide to use for this coming Valentine's Day project.
Some cameras will automatically add a date on your photo and often, you might want to remove those dates to concentrate on the photo itself. However, in other situations, adding a date might be needed. If your camera took the photo while saving the EXIF information, this script will retrieve that date and add it on your photo. You get to choose whether you want the date on the left or the right of the photo and in which color.
As a sampler, I decided to play with a recent script, the Wooden Puzzle 2, to make you a Valentine theme puzzle. This is a .pspimage (so the file is fairly big) and each element is part of a group, so you can copy and paste it onto any other project, and since all the layers are unmerged, you can move the pieces around as you wish.
A Bargello pattern is made of multiple strips of fabric, cut into more strips and gradually offset from one another. All that delicate work is tedious when sewing fabric, and definitely as tedious if using a graphics program as it will involve multiple selections, cutting and moving.
I created two tiles using individual patterns: one is in the red tones, which you could use for Valentine projects and one with pastel colors for a softer type of project.
Who can say they have too many bows and ribbons? Not a scrapbooker! This script will let you tie a straight ribbon into a multi-loop bow, attached with a centerpiece. Each piece is left unmerged so you can tweak them separately if needed.
For a sampler, this week, I used a starting ribbon from Janet Scott at Pixel Scrapper and modified it slightly (to make it straighter) and ran the script for the basic bow. Then, playing with the Hue map to change the colors from the base ribbon, I created 3 additional versions to run the script again. That will give you those 4 bows to use.
You can easily use a rusty texture image to add rust to your elements or shape, but rust is not always the same, right? So you would need to have many different images to have different types of rust.
This new script will allow you to slash images or shapes, in addition to add colors or patterns in various ways. Use this to create templates, add colors, make a monogram, and much more.
For a sample, I created a template made by running the script on a single plain back rectangle. This yielded this template that has random slashes. Use the Clip to It script to quickly fill those areas with your favorite photos very quickly.
Although paperclips can be common on various projects, they can also be boring. How about customizing your paperclip with a name, a date, a place or another message to make your project unique.
How about some simple clips to help date your photos?
This week, the script will let you create a puzzle from any element or design you want, whether they are letters, numbers, drawings, photos or shapes. Whatever you want on the puzzle, you can draw or paste.
This week, I created a full alphabet that you can use with any child theme project. You can even use the letters from the puzzle to spell out the name of someone (if they need more than one of the letters, add them in writing, so it is just like you would do in real life, missing one letter).