Last week, I released some new corner punches and they were a hit! But not only that, I got some inspiration from Sue, who suggested some more punches for Christmas next year. But I didn't wait until next year! I started working on those immediately.
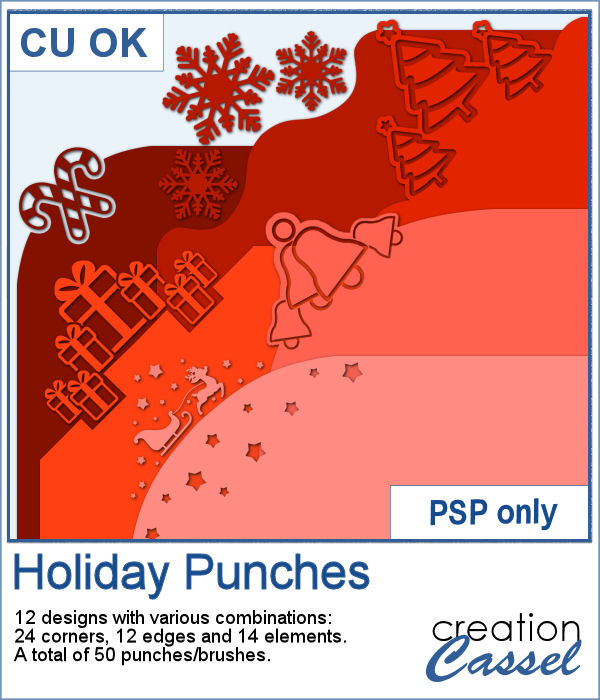
Not only this set includes corner punches, but also edges so that you can cut out along the edge of your paper. And even more, I included the basic shapes so you can punch anywhere else. Do you realize that you can't easily punch a snowflake in the middle of a paper if you are a traditional paper scrapper? But with these, you can punch ANYWHERE!
The whole set includes 50 different punches! You'll have enough to embellish your cards, tags and many other elements.
Get these brushes in the store: Holiday Punches
Have a look at some of the edges that can be created using the Edge punches from this set:

In order to win these punches, add a comment on this Facebook post telling us what shape/element you like to use on holiday projects (remember, add a comment, not just a Like!) The winner will be announced in the newsletter, next week. Not a subscriber yet? Not a problem. You can register here and it is free (and you only get one email per week).
As a sample, I created a fun frame for you using one of the corner brushes. Since the brush was not making an exact circle, I added some parts to make it into a real circle. Then, using the locked transparency, I painted all the elements separately. It is not hard, but a bit tedious. Then, I simply added some colored edges inside the frame. The whole frame is about 3200 pixels wide so you can size it down as needed.
You get a colored frame and the template if you want to make more with different colors.
You need to be logged in to download this sample. You can either login, or register on the top of this page.

It might be simple to create a black and white photo with Paintshop Pro, and it is also easy to colorize that photo with one color, but how about using TWO colors? So, instead of light red and dark red, you would want yellow and red, or blue and purple, or blue and brown, or whatever color combinations you want to make a unique image?
As a freebie, this week, I obviously could not give you a sample of the script since it is applicable only on your photos, so I thought you might want to showcase some photos in a holiday frame so I created one wooden frame using the
Creating paper trees might be a simple task but it still takes a bit of time when you have to open a paper, make a selection, copy it, paste it to another image and then, create another piece, slightly smaller and repeating the process piece by piece.
To offer you a sample of what can be done with this script, I created 3 layered paper trees made from the kit
Did you have a peek at the Layered Flowers script from last week? You could create a set of layered circles, but this week, you can create a set of layered papers cut into various shapes with points. Although you can decide how many points each shape will have, the script will randomly create those shapes to give you a unique result every time.
For a sample of this script, I used papers from the bundle
If you had some traditional papers, you might want to cut out some circles and layer them to create a "flower" in the color of your kit or project. Doing that is tedious with paper, but also very tedious with digital ones.
For a sampler, I ran the script with a few papers from a kit, Happy Birthday, from Marisa Lerin. You can get the whole kit for free, HERE.
Scallops can be a fun design but other than getting a simple template that is a single color, you are limited in the options available. This script will allow you to create a variety of scallop outline patterns that will be either seamless or a full sheet of the size of your choice. Using that outline, you can add a background of any color, or even using a gradient.
Since this is October, you might plan either a Halloween party or expect to take some Halloween pictures. This set of two seamless scallop tile will be perfect to create your paper or background. Since they are in .png format, you can add a custom color behind it.
Do you sometimes find some interesting masks, but they are the wrong shape or the wrong orientation?
As a sampler, I am giving you the mask created for the preview. It is square and has some delicate flower designs on the edges, both inside and outside of the basic shape. This should allow you to showcase your photo with little interference from the cutouts.
This is the second set of tubes to create crochet lace edges on any element you create. This set includes 5 more picture tubes that you can use simply while drawing with your cursor.
As a sampler, this week, I created an oval lace frame using one of the tubes in this set. It is left in greyscale so you can colorise it as you wish. You can use it to frame a picture but also a quote or a particular element you might have scanned and extracted, like a memorabilia.
With this script, you can pretend that you cut out the top layer of your project to show something underneath, while in fact, you cheated and what you see underneath is actually on top.
To show how these cutout shapes can be portable, I used a stencil font to create a set of white digits. They are png format so you can use them anywhere, on any project and give the impression that your paper is cut, and curled up to show these numbers. You will obviously get better results if you don't use a very dark paper!
Do you like lace edging? Can you find some that suits your project? Something that is the right color, the right length?
As a sample, this week, I created a long strip of lace and turned it into two frames using the Mitered Corner Frame script. In order to make nice corners, i trimmed the strip exactly between "loops" then measured the length of a loop in order to set a size, in the script, that would use complete loops. I think it turned out great.