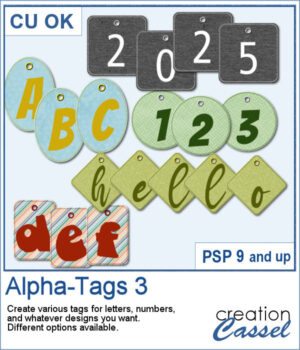
Photo corners are probably one of the most traditional ways to fasten a photo to a page. With the digital era, those fasteners were not long NEEDED, but we can still pretend we use them.
They are fairly easy to make but using a script will speed up the process and allow you to generate several sets (yes, with four corners) very quickly. Use any color palette and the script will combine the colors, the shapes, and the designs for those corners.
Keep the ones you like and discard the others.
Get this script: Photo Corners
To win this product, add a comment on this Facebook post telling us if you ever used photo corners in a layout (remember, add a comment, not just a Like!) The winner will be announced in the newsletter, next week. Not a subscriber yet? Not a problem. You can register here and it is free (and you only get one email per week).
For a sampler, I used the color palette from the June bog train on DigitalScrapbook.com. You get 6 sets of corners. They are available in .PspImage format (where the four corners are on separate layers) and in PNG format (where you will have to cut them out separately).
Check out the other resources available in this blog train.
You need to be logged in to download this sample. You can either login, or register on the top of this page.

Although most bow scripts in the store are suitable for translucent or lacy ribbons, this one is not, at least, not for the whole bow. However, you can use an opaque ribbon for the knot and it will allow you to use that translucent ribbon on the loops. With the same script, you can also use a different ribbon for the knot, whether it is matching or contrasting.
For a sampler, I am offering you the three bows from the preview: one with a single opaque ribbon, one with a translucent ribbon (and opaque knot) and one with two different opaque ribbons. These ribbons are in PNG format so you can use them in most graphic programs.
Argyle patterns might be simple to create but if you want a series of tiles matching a color palette, it becomes tedious. This script will generate up to 10 tiles starting with your choice of color palette, and a few more options. It will create those tiles for you in just a few seconds. Keep the tiles you like and discard the others.
For a sampler, I used the color palette from the June 2024 blog train at DigitalScrapbook.com. I generated 10 different seamless tiles that you can use for your next project.
These braids combine a white section and a colored section. You get 12 different colors. Each braid is slightly different and not just colorized versions of a single image.
For a sample, I created two large frames: one red and one grey that you can colorize to match your project.
Not only can you use this font to create banners hanging from a string, but you can also have combinations of colors with the thick and thin trim options. Use one, or both trims to match the colors to your photo, your project, or your school colors!
For a sampler, I created a simple string of 12 banners that are left in layers (string, banners, trims) that you can colorize however you want to suit your project. The file is in .pspimage format and compatible with all PaintShop Pro versions.
You can now create your own alpha from keyboard keys. You can have thick keys or thin ones, depending on your preferences.
For a sampler, I created a simple thick green set of keys with white characters on the bottom left (a little unconventional). The alpha includes all the letters, the digits and a hyphen to let you type in dates and more.
You can now showcase your photo in a unique way. Unlike ready-made templates that might not feature everything you want on your photo, this script will let you showcase all the details you want, without cutting anything off.
For a sampler, I created a layered template for you to showcase two photos: one wide photo and one more square photo. It has the grey layer that you can modify as you wish.
For any summer theme, you can create watermelon slices in any shape you want. How often have you seen a watermelon slice in a heart shape, or an arrow shape?
For a samplers, I created a complete alphabet (A to Z) and also a set of digits (0 to 9) to allow you to create just about any title for your summertime projects.
You can now create unique chevrons papers without having to rely on a template or reusing something over and over. The script can use up to 6 colors for a unique palette, and will pick the colors randomly to draw the chevrons.
For a sample, I simply created some greyscale papers that you can colorize the way you want. Use the Colorize command or the Hue/Saturation/Lightness command. One page has more subtle variations and the other has bolder contrast.
Engraving metal can be a way to customize a variety of elements and this script will help you achieve that.
For a sample, I created a set of gold alphas pieces that can be used for titles or as initials. Each piece is just under 500 pixels in size so you can resize them as needed.