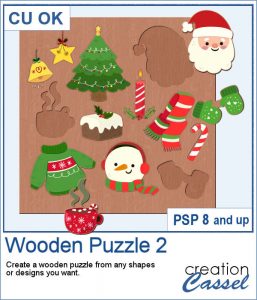
This week, the script will let you create a puzzle from any element or design you want, whether they are letters, numbers, drawings, photos or shapes. Whatever you want on the puzzle, you can draw or paste.
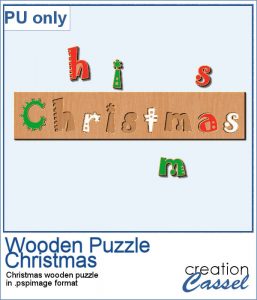
You can still change the color if you want, but even better, you can attach elements together for example, if you want a whole word to be in a single puzzle piece or a pair of mittens, or two elements that normally go together (like the mug and the steam).
Get this script in the store: Wooden Puzzle 2
In order to win this script, add a comment on this Facebook post telling us what design you would turn into a puzzle (remember, add a comment, not just a Like!) The winner will be announced in the newsletter, next week. Not a subscriber yet? Not a problem. You can register here and it is free (and you only get one email per week).
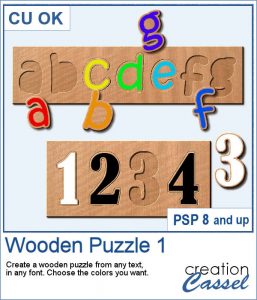
This week, I created a full alphabet that you can use with any child theme project. You can even use the letters from the puzzle to spell out the name of someone (if they need more than one of the letters, add them in writing, so it is just like you would do in real life, missing one letter).
You need to be logged in to download this sample. You can either login, or register on the top of this page.

This script will allow you to create a custom-made wooden puzzle with any text you want. You can add a really unique look by choosing any font, and also any color, gradient, pattern or combination of those.
This is that time of year with the holidays coming up, and this sample puzzle will spell the word Christmas using a funky font. The whole puzzle is in .pspimage format, so you can move the individual pieces around. Furthermore, all the layers are grouped so you can copy and paste the whole puzzle onto another project. You can ungroup all the layers OR simply rearrange the pieces you want to move, above the group so they will display their thickness correctly.
Directional tubes are perfect to create decorative elements in any length and shapes. These are no exception. They are extracted from silky braids and tweaked to be directional and as seamless as possible. You get 12 different colors of silky braids to use in various ways, to create straight trims and frames.
For a sample, this week, I created a triple frame but also included the individual frames so you can use them separately. I simply started with a vector ellipse and ran the VectorTube script. I changed the size of the ellipse every time to have different size of frames without resizing the frames (or the trims) themselves.
Instead of starting with a fixed photo shape and ending up with an odd sized frame, how about starting with the final frame size and working your way back to the size of the individual images.
Since everyone loves to display their own photos, I am offering you the layered template in .pspimage version of the frame showcased in the preview. Each photo spot is part of a mask group so that you just have to copy and paste your photo inside that group for it to show through. No need to select, or delete anything.
Nobody ever has too many ribbons, bows and knots in a toolbox. This script allows you to create a layered knot from any straight ribbon. Whether you have an opaque ribbon or a translucent one, or even a lacy one. Whether your design is simple or even directional, and the script will align the elements correctly. Although you need a ribbon that is 18 times its thickness to get the full effect (with directional design mostly), you can have great alignment of the design.
As a sampler, I am offering you the same knots as in the preview. I edited the files so that the whole knot is one layer and the back loop is on a separate layer. That should allow you to insert something in that loop.
Do you sometimes want to use an accordion fold on an image or a roadmap? It is a fun way to display an image but it can be quite tedious to complete accurately. You need to measure, cut, skew, and align each piece correctly. In addition, there is also a matter of light and dark on each piece to make them consistent with the light source.
Since this script is applied directly to a photo that is yours, you likely would not care for a sample from my photos. So I decided to create a few straight ribbons in Halloween colors, and run them through the Knot #13 script. You now have 3 straight ribbons and 3 matching knots to embellish your own Halloween themed projects. What will it be?
Placing photos in a fanned display is not very difficult, but it can be tedious, especially if you have many photos. That is where this script comes in. It will automate every step, from opening the images, resizing them, copying and pasting them, rotating them correctly and aligning them precisely. In addition, the script can also add a white border and/or a drop shadow to each of the photos in the same run.
For a sampler, I was a bit unsure what to give you. Well, I used the display from the preview and I made a layered template for you. It is in .pspimage format and has mask groups so you can simply place the photos inside those groups and only the area within the frame will show through, even if your photo is larger than that "hole". That means you have no cutting or trimming to do with your photos.
Do you like the diamond patterns? Although it is easy to create a seamless tile for a single diamond shape, it might be a little more tedious to add a second color. However, when you want to be fancier and create tiles with more colors, it can definitely get more complicated. And if you want specific patterns, like lines, it can get even harder to create.
As a sample, I created 10 tiles from a basic Halloween color palette.
If you want a custom fence, you can do it with individual posts and boards you can measure and layer. It might not be too hard, but takes a while to build. What if you can create one in just a few seconds?
Running this script with a simple wood texture image, I created this fence that is in separate layers for you to tweak it.
You can draw a fun twisted cord any length or any shape you want, using this set of picture tubes. You get 12 different colors that you can combine with any theme or color palette you have. Of course, you can also tweak the colors to get something more muted, or pastel if that is what you need.
As a sampler, you can get ahead of everyone with these fun Halloween tags, decorated with the twisted cords and cute little black cats. You get 5 tags with combinations of black and orange cords.