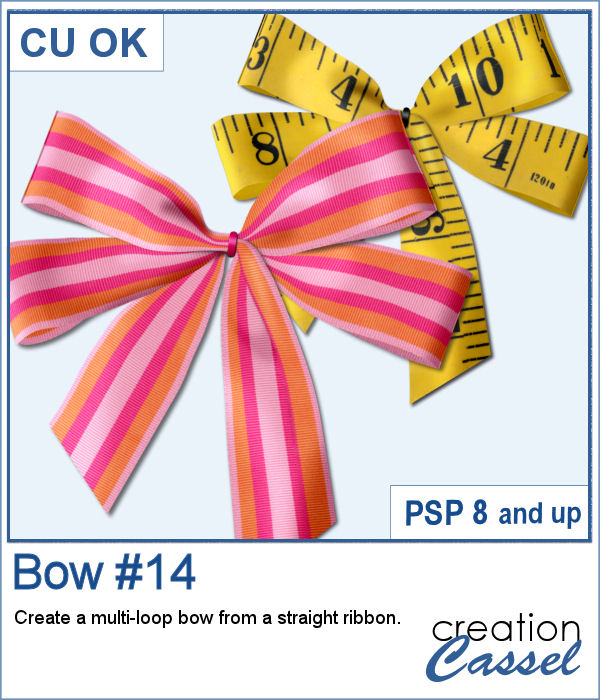
Who can say they have too many bows and ribbons? Not a scrapbooker! This script will let you tie a straight ribbon into a multi-loop bow, attached with a centerpiece. Each piece is left unmerged so you can tweak them separately if needed.
The script will also add a default drop shadow on the loops but all the shadows will also be left on separate layers so you can tweak them, adjust them or even replace them altogether.
Get it in the store: Bow #14
In order to win this script, add a comment on this Facebook post telling us whether you tend to use bows in your projects or not (remember, add a comment, not just a Like!) The winner will be announced in the newsletter, next week. Not a subscriber yet? Not a problem. You can register here and it is free (and you only get one email per week).
For a sampler, this week, I used a starting ribbon from Janet Scott at Pixel Scrapper and modified it slightly (to make it straighter) and ran the script for the basic bow. Then, playing with the Hue map to change the colors from the base ribbon, I created 3 additional versions to run the script again. That will give you those 4 bows to use.
You need to be logged in to download this sample. You can either login, or register on the top of this page.

You can easily use a rusty texture image to add rust to your elements or shape, but rust is not always the same, right? So you would need to have many different images to have different types of rust.
This new script will allow you to slash images or shapes, in addition to add colors or patterns in various ways. Use this to create templates, add colors, make a monogram, and much more.
For a sample, I created a template made by running the script on a single plain back rectangle. This yielded this template that has random slashes. Use the Clip to It script to quickly fill those areas with your favorite photos very quickly.
It is a festive time, and sweets are everywhere. How about creating some delicious licorice to decorate your cakes, cookies or scrapbook pages? Although we are used to seeing traditional green, red or black licorice, with the magic of PaintShop Pro, you now have 12 different colors, and even more, if you want to adjust the given colors or colorize the grey one.
For the freebie, this week, I created another alphabet using 5 of the licorice tubes. This alphabet also includes 10 digits so you can include some dates.
Although paperclips can be common on various projects, they can also be boring. How about customizing your paperclip with a name, a date, a place or another message to make your project unique.
How about some simple clips to help date your photos?
This week, the script will let you create a puzzle from any element or design you want, whether they are letters, numbers, drawings, photos or shapes. Whatever you want on the puzzle, you can draw or paste.
This week, I created a full alphabet that you can use with any child theme project. You can even use the letters from the puzzle to spell out the name of someone (if they need more than one of the letters, add them in writing, so it is just like you would do in real life, missing one letter).
This script will allow you to create a custom-made wooden puzzle with any text you want. You can add a really unique look by choosing any font, and also any color, gradient, pattern or combination of those.
This is that time of year with the holidays coming up, and this sample puzzle will spell the word Christmas using a funky font. The whole puzzle is in .pspimage format, so you can move the individual pieces around. Furthermore, all the layers are grouped so you can copy and paste the whole puzzle onto another project. You can ungroup all the layers OR simply rearrange the pieces you want to move, above the group so they will display their thickness correctly.
Do you sometimes want to use an accordion fold on an image or a roadmap? It is a fun way to display an image but it can be quite tedious to complete accurately. You need to measure, cut, skew, and align each piece correctly. In addition, there is also a matter of light and dark on each piece to make them consistent with the light source.
Since this script is applied directly to a photo that is yours, you likely would not care for a sample from my photos. So I decided to create a few straight ribbons in Halloween colors, and run them through the Knot #13 script. You now have 3 straight ribbons and 3 matching knots to embellish your own Halloween themed projects. What will it be?
If you want a custom fence, you can do it with individual posts and boards you can measure and layer. It might not be too hard, but takes a while to build. What if you can create one in just a few seconds?
Running this script with a simple wood texture image, I created this fence that is in separate layers for you to tweak it.
There are various ways to add a date, but did you ever think of writing it on a button? Why not? They are perfect in size to add small text like a date and with this script, you can customize it with the color, gradient, pattern, text, font or even other designs.
For this week, I created a set of 13 buttons that you can use with those school pictures that you just took, or had for years, whether they are yours or your children's or grandchildren's.