Web
Analytics

Merry Christmas

cass-HolidayWreath

Happy Holidays to all my readers, customers, fellow designers, CT members, and their families.

Thank you all for your support and i hope that your holiday season is the best it can be.

Christmas Sale – 30% off everything

ChristmasSale

What product of mine have you been hoping to get? Did you put it on your wishlist for Santa? Yeah, Santa is looking at your list and he told me you all seemed to want so many different products that i decided to put EVERYTHING on sale.

Whether you are a Paintshop Pro user or not, you will find interesting and useful products. Whether you are a scrapper or a designer, there are tools for you. So just check out my stores. Yes, i said my stores, because both Creation Cassel and DigiScrap Warehouse are offering 30% off everyone of my products.

So hurry! only a few days.

What are you wishing for?

New script – Mosaic Maker

cass-MosaicMaker

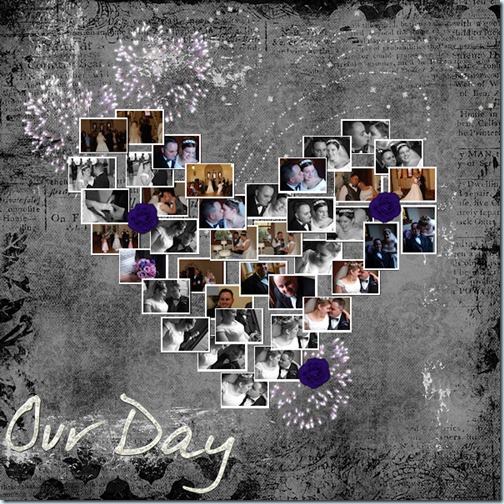
Getting to the end of the year, did you gather lots of pictures in the last 12 months? Do you want a way to display many many pictures in one layout but you don’t want to spend toooooo much time resizing, cropping, copying, pasting, aligning, etc.? This script is made for you. You can create a mosaic of many pictures in just a few seconds. You decide how large you want your montage: you can make a whole standard page, a double page, or maybe a smaller area that will contain the pictures, while leaving you some room for journaling, title or other larger photos. Whatever you prefer, this script will let you do it. Then, you can choose how many rows and columns you want (ranging from 4 to 20, meaning you can use up to 400 pictures in a single scrapbooking montage!!). Several other options are available like the shape of the small pictures, and the padding between them. In the end, since all the images are on separate unmerged layers, you can customize the montage as you wish. You can remove some photos, replace them by text, elements, other photos, paper pieces. You can move photos around if you want. The script will place some guidelines, so moving photos and aligning them will be very easy to do.

This Paintshop Pro script is perfect for a year in review, or a simple collage of many photos that you want to use, although they might not need a full page on their own.

See another layout i made using this script. This time, i chose round photos, and i deleted the ones in the middle to place the larger photo, and some at the bottom for the text/title.

cass-MosaicMaker_01

This script is available in my stores: Creation Cassel and DigiScrap Warehouse.

You can get a chance to win this script by adding your name to the RAK thread at DST. Just tell me what theme would be suited for a collage of many pictures like that, or, what is the maximum number of pictures you have used in one layout. A winner will be picked on Monday night.

cass-Digit-buttons And this week, as a free sample, i figured it would be hard to give you something made with the Mosaic Maker script so i made something using an older script: the Custom Buttom script. I made this set of digits. They would be well suited, with the white and gold, for a holiday layout, to write the date, or maybe for a birthday layout.

You need to be logged in to download this sample. You can either login, or register on the top of this page.


New Script – Cogwheels

cass-cogwheel

This week, my new script will help you create various cogwheels. You will be able to add any color or texture to them once they are done as the script will only create the shape. You will have the options of creating your own, custom design, or ask for a randomly generated wheel. You can have square, triangular or round teeth, and you can have between 15 and 60 of them. Talk about variation! but that is not all. You can create straight “spokes” inside (between 6 and 12), or some decorative cutout. Again, you can let the script generate them, or draw them yourself, using any tool you want. You can make bold designs, or delicate and intricate motifs. How many different wheel patterns can you create? As many as you dare design! Each wheel will measure about 1000 x 1000 pixels, and you can resize it as you wish.


You can get this script for Paintshop Pro in my stores: Creation Cassel .


If you see cogwheels, what does it make you think of? We know that those into the Steampunk style might like those cogwheels, but can you think of other themes where they could be used? If so, just tell me in this thread at the DST forum for a chance to get this script.cass-Cogwheels-cluster


And now, for a sampler. I am not particularly good at clustering, but i tried it. I made this corner cluster for you, using 6 different cogwheels, and some old chain tubes. I am not sure if you will like the cluster, but in case you dont, i am including the individual cogwheels in the zip so you can make your own cluster, or add them separately. If you make another cluster out of them, would you care to show me? I would LOVE to see how you can use them.

You need to be logged in to download this sample. You can either login, or register on the top of this page.


Corduroy sampler

cass-Corduroy-sample

Did you think i had forgotten about a sample this week? I guess i was just not quick enough. I didn’t know what kind of sampler would be useable and then, i thought of one pair of pants i had to patch/customize for my daughter and when i asked her what design she would like, she said “mushrooms”. So i figured that if a mushroom appliqué was interesting for her, it might suit you too so here is my sampler for this week.

You need to be logged in to download this sample. You can either login, or register on the top of this page.

The appliqué is about 900 x 900 pixels and the texture was created using the Corduroy script. Looking at it closely, you can get an idea of what the script can do (all three designs).

Enjoy!

New script – Corduroy texture

cass-Corduroy

Remember those pants you had in corduroy? or maybe some furniture upholstered with corduroy fabric? This script will let you recreate those textures using any color, gradient, pattern, or even photos. Maybe you never saw a corduroy-ed photo, but you can do it with Paintshop Pro and this script now!

This is a simple script that lets you choose the design, and the width of the “wales”. So in the end, you have 12 different options for texture, but since you can apply it to just about anything, the possibilities are endless.

You can find this script in my stores: Creation Cassel and DigiScrapWarehouse.

And for a chance to win this script, go add your name to the RAK thread, here, and tell me of one thing you have that is made of corduroy.

Holiday Sample – Wreath

cass-HolidayWreath-preview

Following the two articles on tubes, i thought it would be appropriate to show you how tubes CAN be used to create an item. So i made this holiday wreath for you.

The green part is actually made from my green garland tubes simply drawn by hand. I  made little branches, and overlapped them. That garland tube is one multiple image tube.

Then, i used Bernadette Hunt’s Bubble blobs to decorate. Those are multiple images so clicking here and there would place randomly chosen balls.

I used the gold chain tubes to add… the decorative chain. It is a directional tube which gives this appearance of being a continuous chain.

And to add more festive look, i added a bow made using the Bow #3 script that created a large organza ribbon and tied it into a fluffy bow.

It is yours to enjoy, but for personal use only.

You need to be logged in to download this sample. You can either login, or register on the top of this page.

New products – Fancy Text paths and script

cass-FancyTextWrapping    cass-FancyTextPaths

A few weeks ago, i coded a script to write text inside a specific shape, using special types of path and matching script coding. This made up for one missing feature of Paintshop. At that point, you could write text inside a simple shape (like a rectangle, or a circle), or a more fancy shape (like the alphabet shapes, school theme shapes). Then, my script mentor, Suz Shook, told me it would be great if the script could work on non-horizontal or wavy, but that meant a whole lot of different type of coding. But, this became a challenge for me. And this challenge led me to code this script for you. Now, this set includes two products: one script and one set of 12 paths.

The script will let you write out your own text, in your own font. You can use the path to give you an idea of how much space you will be using. Once you have all your text typed, you run the script. Depending on the paths, you can still align left, right or center (not all paths can be center aligned). The text stays as vectors so if you notice a typo, it is still easy to edit. If you want to edit your text, change it, add or remove more than just a letter, you can simply undo the script and rerun it. The path will stay untouched, so you can also reuse it.

The set of paths include various types of curves or angles. Some paths are doubled so you can have a left and right version when applicable (never mirror a path unless you want the text to write from right to left!). One little trick to use these paths (or any other paths): copy the path on your layout and run the script from there. That will save you the headache of copying and pasting the many layers that will be created by the script. In addition, it will make it easier for you to edit the text if needed.

You can find both those products in my stores: Creation Cassel and DigiScrapWarehouse.

This week, i have a RAK at the DST forum where you can with BOTH products as a set. So, go over there, add your name, and tell me if you have ever done text on a layout in this manner, and if you did, how you did it (of course, a link to the layout would be great too).

What do you do with tubes anyways?

Last week, I explained what “tubes” were and what types of tubes you can find. Now that you know what it is, you probably want to know what you can do with those.

Of course, what you do with a tube depends on what type of tube you have so let’s go back to the types we mentioned last week and we will see some specific uses for each of them.

1- Single image tubes

Although you can have just about anything converted into a single image tube, not all of them are really that useful to be converted. If you have an image that you likely will use only just a few times per layout, it might not be necessary to convert them to tubes. For those, you can just as well use a png format and it will be enough for your needs. However, among the great single image tubes you can have, let’s mention images like beads or pearls, stars that you can place all over a page, kind of randomly, flares to add to glitters.

Here is a random placement of a single flower (the grass background is another tube, but a different kind). With a single image tube, you simply have to randomly click wherever you want and get that kind of look:

Image161

You can also prefer to have the same tube repeated at regular interval. Here is a basic ribbon where i added a single eyelet. One nice thing about placing tubes  is that you can click where you want the first one, then, holding the SHIFT key, click where you want the last one to go and they will all be placed evenly.

Image164

But you do not have to use them always in a straight line. In fact, you can hand draw with them and they will go wherever you write. Here is a little doodle made using some star tubes.

Image162

And of course, you can also follow a vector path if you want using Gary Barton’s Vector Tube script. You can use any path or preset shape you want. Perfect if you want to create a frame to place a photo, or even place beads or other elements around letters, since letters are also vectors!

Image166


2a- Tubes as series of images placed randomly

As mentioned before, those types of tubes include various images, usually of the same type and are best used in a fairly random manner. Yup, this is the same image as above, but this time it is to illustrate the use of tubes to create the grass. This set of tube includes a total of 10 individual images that are chosen randomly as you move your mouse along your work. This is great to create a background without having to draw images one by one.

Image161

Choose the step to have your elements closer together or spread widely around. Another example of using these kinds of tubes, is using them as confetti (if you want to create your own confetti, there is a script to do that, here). Those are great to create an overlay or border, or to accent a section of your page.

Image165

2b- Tubes as series of images placed in a continuous manner

These types of tubes can give you a great deal of effects and let you follow various path, and still look like it is supposed to. Here is sample of tube that came with PSP. With freehand drawing, you can create a fun chain. Create more than one, on different layers for an intricate look. You can make it a neat look or a messy look. It all depends on your drawing.

Image171

You can use the rope tube to make strings attached to whatever you want:

Image170


3- Tubes as directional images

Directional tubes are also very versatile as you can use them in the same way as the previous ones, meaning, hand drawn, or along a path, but the difference i that you can use images that are not always facing the same direction, like stitching, foot steps, chain links, zipper teeth. What can you achieve with these? You can hand draw or hand write elements. Yes, you can write with those tubes just like you would write with a pen. Check this (this letter is part of a whole alphabet posted as a freebie on June 11, 2010 in this blog):

cass-Rope1-B 

Just like all the other types of tubes, you can hand draw but also place along a vector path. This method is often used when you want a perfect placement of the individual images since hand drawing can be a little less precise, but again, it depends on what look you want to achieve.


Now, what will YOU do with tubes? Show us what you do. Add a comment and link us to a layout or a kit you created using tubes in a creative way.

If you have questions about PSP, about the tools and effects, just drop me a note and i will look into writing a little article on my blog.

New script – Stacked up

cass-StackedUp

I have seen on some layouts, this kind of effect of using a single photo and stack several duplicate of the same image. I guess it is a good idea to use the same photo as opposed to different photos, since the viewer would get annoyed at not being able to see what is peeking out from under the main one. Thinking of all the steps required to accomplish this, I figured that a script would probably make this easier and much faster than manually do all the step: duplicating, rotating, displacing, bevelling, shadowing and possibly linking. This script will do it in less than a minute (i timed 32 seconds to duplicate 10 times, and add a bevel and a shadow to each and then linking everything).

And you know, you do not have to keep all the images placed where the script put them. The end result will be different every time since there is a random feature coded in the script. Also, all the layers can be linked but always left unmerged so any layer can be moved further. You can even use all the layers to scatter the pictures around your layout instead of keeping them stacked in one place. Or,  how about stacking two sets of pictures and kind of mix them as if you were shuffling two decks of cards? Or how about adding some extra elements, like tickets, stickit notes, or scrap paper between some of the layers? Talk about easy to personalize!

You can get this script in my stores: Creation Cassel and DigiScrapWarehouse.

cass-StackedUp-samplerAnd for a chance to win this script for free, check out this RAK thread in the DST forum. This week, even non-PSP users will have a chance to win something so even if you do not have access to a Paintshop Pro version, head over there.

And now, i know you were waiting for a free sample. Since this script runs on your own photo, i could not run it the same way, but i created a layered template for you. It includes 11 layers of the polaroid type of frame. It is up to you to insert one photo (or more, if you want). The sampler is in psd format so just about anyone can use it.

You need to be logged in to download this sample. You can either login, or register on the top of this page.

Will you show me what you can do with these?