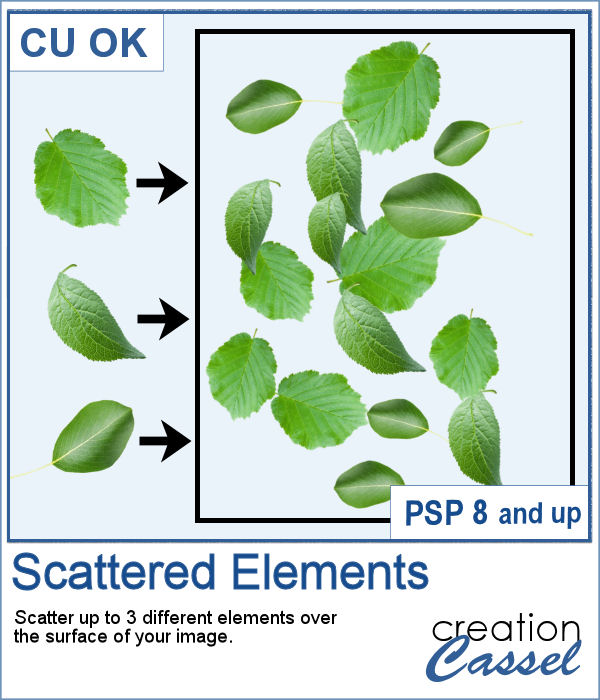
Sometimes, designers would like to create a set of scattered elements as embellishment and although it is easy to do, it can also be quite tedious depending on the number of copies they want.
This script was inspired by a request from Mimi who likely wanted to create such scatters and wanted to save time. And this is exactly what this script will do as it will copy and multiply an element from the active layer as many times as you want, adding some rotation, and resizing to each individual element. And you can repeat the process with up to 3 different elements.
Get it in the store: Scattered Elements
In order to win this script, add a comment on this Facebook post telling us what elements you would like to use to create some scatters (remember, add a comment, not just a Like!) The winner will be announced in the newsletter, next week. Not a subscriber yet? Not a problem. You can register here and it is free (and you only get one email per week).
As a sample, I ran the script on three star shapes. I added the bevel and the shadows after the script so that everything would be angled correctly and have consistent lighting. The whole scatter is 2000 pixels wide and does include shadows, so that layered elements could be shadowed correctly.
You need to be logged in to download this sample. You can either login, or register on the top of this page.

You can easily create solid color beads with the Balls and Bubbles effect, but in order to add a random marble texture to those solid colors, you need to add a few more steps.
As a freebie, I am sharing the pink beads that I created for the preview. With Mother's Day coming in May for parts of the world (I know, in UK it is already passed), you can create something for that special woman in your life. Just save the .pspTube file in your Picture Tubes and it will show up for you.
Creating patchwork can be a very tedious way to display various colors or designs, but with PaintShop Pro, you can create them much faster than sewing them piece by piece.
To create this week's freebie, I simply used 4 basic papers that were made of solid colors with a texture added. No other pattern since I wanted the patchwork itself to show the design. I used 4 solid colors and ran the script. At the end, I ran the VectorPaint script to add some chain stitching instead of the straight stitching generated by the script.
In order to get a perfectly matching knot, you would need to use your own ribbon. It might not be so hard as you can colorize one already made, but in order to get a double knot, that will become much more difficult.
As a sampler, I started by editing a star-patterned ribbon with pastel colors, then used a solid colored ribbon and colorized it to match the little stars. The end result is a set of four double knots with pastel colors.
If you want a totally unique effect applied to your photos, this script is what you need.
As a sampler, I created a mask using the same brush tips but in a more generic shape since the script would otherwise run on a custom shape on your own photo. You can use this mask on any photo of your choice.
Whether you are celebrating St-Patrick's day or not, you might want to add a shamrock shape to your project.
As a sampler, I created one green shamrock for you with a little lacy ribbon (which is also included).
Do you like droopy bows? They can be a fun change from the standard "straight" bows that we see all over, but how do you get something that will match your project?
For a fun Valentine project, you can use this droopy bow made of a custom heart ribbon. This was a simple ribbon made and then, I ran the script on it. That is all. It is now yours to use in your layout.
If you like to have some text as a background paper, you probably can find some generic text, or some themed ones in specific colors to match a kit, but how about getting something totally unique, with the text YOU want to match your story or your project, in the colors you want to coordinate perfectly? That is exactly what this script will do, allowing you to create custom text paper.
Since it is just two weeks from Valentine Day, I created two Love themed papers that you can use for your upcoming February projects, whether they are scrapbook pages, or cards. Each paper is 3600x3600 pixels in jpg format.
It is always fun to get some random patterns as they are... well... always different from one another. But they are hard to create from templates since they would have the same pattern even if the colors can change.
Since Valentine Day is coming up, I thought of making some papers using reds as a starting color. So you have three full-size papers that will be perfect for your Valentine projects (you can also use the darker one for Christmas photos!)
Do you have a sweet tooth? Whether you do or not, having some digital candies to use to embellish various projects can be fun, and even more if you can choose the color palette and even the text on them. Once you have a series of candies, you can even export them as picture tubes to scatter them around.
As a sample, I created chocolate candies with the whole alphabet, so you can write names and places with them.