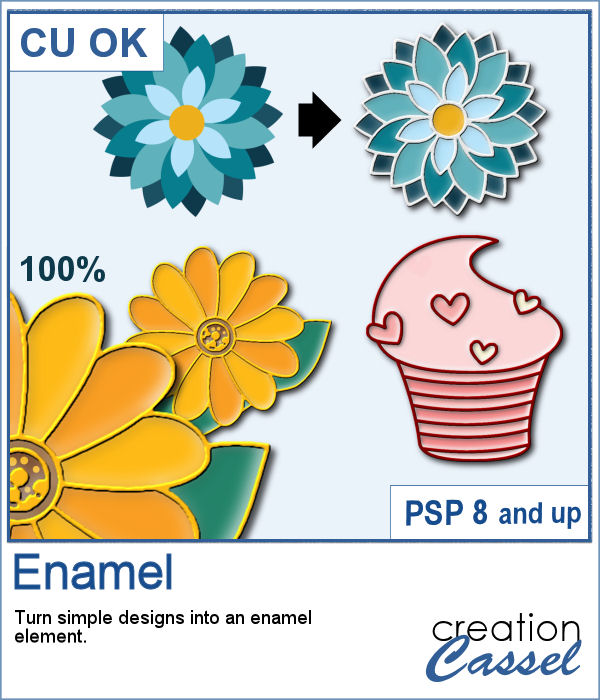
You can create some enamel look on any simple flat design you have, whether it has borders or not.
Create pins, alphas, tags, etc. and add them to your next project. You get the option to choose any color edge for them, and in the end, you have several unmerged layers that will allow you to tweak them separately as needed.
Get it in the store: Enamel.
In order to win this script, add a comment on this Facebook post telling us what simple design you would want to use to create an enamel element (remember, add a comment, not just a Like!) The winner will be announced in the newsletter, next week. Not a subscriber yet? Not a problem. You can register here and it is free (and you only get one email per week).
For a sampler, I created a set of digits that you can use for your next project. Each digit is about 500 pixels in height so you can easily resize them to suit your project.
You need to be logged in to download this sample. You can either login, or register on the top of this page.

This is another way to add a small detail to your project, whether it is an actual date, a name, a location, or an event. And this format is quite unique and more interesting than just a little bit of text on your page.
For a sampler, I created four elements based on the seasons. Of course, they are fairly generic, but you can create more customized ones with the script.
You can find all kinds of stickers if you are doing traditional paper scrapbooking, but in digital scrapbooking, you have the option to create your own and not have to rely on what someone else has produced. You can choose any shape, or design to match your project. Add stickers to your scrapbook, but also any other digital project like planners, etc.
As everyone is in need of some smiles and sunshine, I converted those fun shapes into plastic stickers that you can use to embellish your next project.
Sometimes, designers would like to create a set of scattered elements as embellishment and although it is easy to do, it can also be quite tedious depending on the number of copies they want.
As a sample, I ran the script on three star shapes. I added the bevel and the shadows after the script so that everything would be angled correctly and have consistent lighting. The whole scatter is 2000 pixels wide and does include shadows, so that layered elements could be shadowed correctly.
You can easily create solid color beads with the Balls and Bubbles effect, but in order to add a random marble texture to those solid colors, you need to add a few more steps.
As a freebie, I am sharing the pink beads that I created for the preview. With Mother's Day coming in May for parts of the world (I know, in UK it is already passed), you can create something for that special woman in your life. Just save the .pspTube file in your Picture Tubes and it will show up for you.
Creating patchwork can be a very tedious way to display various colors or designs, but with PaintShop Pro, you can create them much faster than sewing them piece by piece.
To create this week's freebie, I simply used 4 basic papers that were made of solid colors with a texture added. No other pattern since I wanted the patchwork itself to show the design. I used 4 solid colors and ran the script. At the end, I ran the VectorPaint script to add some chain stitching instead of the straight stitching generated by the script.
In order to get a perfectly matching knot, you would need to use your own ribbon. It might not be so hard as you can colorize one already made, but in order to get a double knot, that will become much more difficult.
As a sampler, I started by editing a star-patterned ribbon with pastel colors, then used a solid colored ribbon and colorized it to match the little stars. The end result is a set of four double knots with pastel colors.
If you want a totally unique effect applied to your photos, this script is what you need.
As a sampler, I created a mask using the same brush tips but in a more generic shape since the script would otherwise run on a custom shape on your own photo. You can use this mask on any photo of your choice.
If you were to work with traditional paper scrapbooking, you would likely own and use some punches that would create cutouts on your papers, so why not do the same with your PaintShop Pro?
As a sampler, I used Brush #12 to punch out the middle area but added extra frames on new layers to then merge them together. I colorized with gold dust and added a bevel for a more 3D effect.
Whether you are celebrating St-Patrick's day or not, you might want to add a shamrock shape to your project.
As a sampler, I created one green shamrock for you with a little lacy ribbon (which is also included).