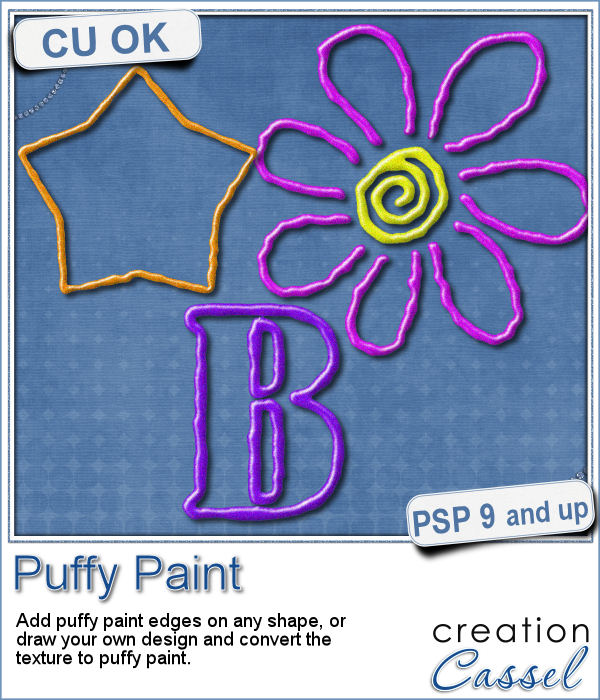
Web
Analytics

New Paths – Halloween theme

cass-Path-Halloween

Do you have some photos or anecdotes to share about Halloween time? These are great to add some journaling or stories while keeping inside a Halloween theme shape.

Since Paintshop Pro does not have an integrated text wrapping feature, you can use those paths to manually add text (just like Text on path) and adjust the spacing and kerning, or you can use the Text Wrapping script that will automatically adjust those for you, to have your text along those paths and inside the shapes.

The paths and the shapes are on separate layers so you can use one without the other, or even use the templates to create something completely different, like a frame, a cutout, or just a decorative element.

You can grab this “scary” set of Halloween paths in my store.

Do you want a chance to win those paths? Add your name in the Happy Place thread HERE while answering the simple question. I’ll be back next week to announce a winner.

cass-PaperCutout-sample-cauldronThis week, to make sure that everyone (using Paintshop Pro or not) could use my product, I opted to create a paper cutout using a cauldron image, which was turned into a sticker (with a little white edge). Then, i ran thePaper Cutout script and it generated the long string of colored cauldrons, but also a separate template in unmerged layers. Both the png string of cauldrons and the layered template in PSD format are included in the zip.

Each string (the png and the psd ones) are 4000 pixels long so they are long enough to reach both sides of a full size layout.

You need to be logged in to download this sample. You can either login, or register on the top of this page.


News from the Campus


ScrappersDozen-250x250You know about the Scrapper’s Dozen event, right?

Did you watch the first video where i shared a trick to organize your digital kits?

This week, i am sharing another trick to help you save money, by reusing kits that have colors you are not too sure about. Maybe they are too bright for your project, or they are too washed out to add life to your layout.

Be sure to watch that video, and add your name to the mailing list for the event.

Watch Now

New tubes – Halloween Garlands

cass-GarlandTubes-Set2

Halloween is coming and you need some seasonal decorations but you cannot find the element in the right length, or the right color, or the right shape.

With these garlands, you simply “draw” the shape you want, or doodle to fill in an area with a special texture.

You get a total of 16 tubes, in four colors and 4 “shades” for each of them.

You can write letters with them, you can create an outline, you can use them to attach elements. Change the size and you can turn them into ropes, and more.

Grab this set of Garland tubes in my store.


cass-GarlandSet2-SamplersNow, how about a little look closer at those garlands and their texture? I created a few Halloween decorations for you using those garlands.

With the help of some drop shadows, that pumpkin has some interesting 3D effect, don’t you think?

All those elements are in png format, so you can use them in any graphic program (you don’t need to use PSP to use those).

You need to be logged in to download this sample. You can either login, or register on the top of this page.

New Script – Instant Photo Effects – 1

cass-InstantPhotoEffect-1

Do you like to apply some different effects to your photos? Do you like the idea of hiding some not-so-great photos with some “make-up”? This is what you need then.

This is a single script that provides 8 different photo effects. They are mostly just made from various adjustments to the colors, brightness and so on. Nothing fancy.

The advantage of this script over the Instagram effects is that you can apply it to any photo, any size, any shape, even if you don’t have the app (i know i dont have that app myself as i dont have a “smart” phone of any kind).

You can grab this Instant Photo Effects script in my store (and on sale until Monday night).


If you want a chance to win this script, hop over to the Happy Place thread in the DST forum and tell me which of the 8 effects you like the best. I’ll be back next week to pick a winner.


cass-LaceEdge4b-samplesThis week, i created more mats for you, using the lace font from last week.

These are much larger than the ones from last week so you can use a larger photo on them or use them to frame a series of photos.

Again, i used the Mitered Corner Frame script for the rectangular and the square mats.

As for the oval mat, it is simply a matter of adding “text on a vector path” as if it were regular text to read. This is the beauty of that being a font.

You need to be logged in to download this sample. You can either login, or register on the top of this page.

Will you show us what you do with those mats? Don’t hesitate to add a link to the comments below so we can admire your work. After all, if you download them, you probably plan on using them, right?


News from the Campus

CalendarClass-previewDid you start thinking of your holiday presents? Did you consider a calendar for family and friends?

If you are new to PSP, new to digital scrapbooking, or just interested in creating a fun project, thisCalendar Making Class will be perfect for you.

Everything is included: quick pages, instructions (video and written), alphas, even the dates.

And if you start now, you will have ample time to finish it and get it printed and shipped to whoever you want to give it to (unless you want to keep it for yourself, which is ok too!)

Get started now!

New tubes – Tire Tracks #2

cass-TireTrackTubesSet2

Whether you are a fan of car racing, mountain biking, or monster trucks, you will love these picture tubes.

Just like any directional tubes, you can just draw a line with your cursor and down goes the tire tracks. Make straight lines, curve to the right, or the left, ride in a zigzag or in circle. Anything is possible with those tubes.

They are all in black but if you want them in a different color, simply increase the brightness and colorize. Add some monochrome noise for texture.

You get 10 different tubes.

Grab this set of tire tracks tubes in the store.

This is a perfect add-on to the first set.

You can also add your name to the Happy Place thread in the DST forum for a chance to win this set. I will be back next week with the name of a winner.

cass-TireTracks2-sample-Digits

For a chance for you to view these tubes, i created a set of digit tags, with a different track on each (lucky, there are 10 tubes and 10 tags!). You can use those to add a date to your “vehicle themed layout”.

In order to create a less obvious track, i increased the brightness and colorized it. Then, i added some noise, reduced the opacity of the layer and changed the blend mode to multiply.

Each tag is 300x400 pixels, in jpg format so you can use them in just about any graphic program.

You need to be logged in to download this sample. You can either login, or register on the top of this page.


News from the Campus

ScrappersDozen-250x250The Scrapper’s Dozen is taking shape, gradually. The ingredients are not all collected yet. The utensils are still in the dishwasher, but you will get something fun and yummy.

Have you joined the Scrapper’s Dozen mailing list yet? No? Check it out and you will hear all about the newest development.

Join the list

And remember to bring in your friends too.

New script – Crayon Rubbing

cass-CrayonRubbing

Did you ever rub a crayon or a pencil on a piece of paper with an object underneath just to see the details of the texture appear? What kind of objects do you remember using?

Doing that with Paintshop Pro is now very easy as this script will do all the work for you. Use a solid shape or an image and choose your “crayon” color.

Once the script is done, you get a heavily rubbed shape or design and a lightly rubbed background. You can remove the background altogether (since it is only a separate layer) or you can erase the excess and leave only a little bit. You can also “rub” another area as the script will leave the material with the exact same setting as what it used for the background.

You can grab this Crayon Rubbing script in my store.

cass-CrayonRubbing-sample-timeDo you want a chance to win this script? Just tell me what you would use it in a scrapbook project, in this thread. I’ll be back next week with the name of a winner.

As a sample of this, i created some time-related words for you. You get the same words with and without the background paper. They are in PNG format, so they are useable in most programs. And they are very large (up to 3000 pixels) so you can use them as large title on a layout, or you can resize them down.

Each one has a different color (although you can still colorize them differently if you want) and has a different angle of crayon marks.

You need to be logged in to download this sample. You can either login, or register on the top of this page.

cass-BokehPapers-monochrome1Did you download your free Bokeh papers on myFacebook page? I said that once i reach 400 fans, i would add another set of papers. I am pleased to announce that this milestone has been reached, so, as promised, i will add another set this weekend.

Thanks so much for joining my store page!

And thanks for sharing it!

It is much appreciated.

Keep sending your PSP friends to “like” it.

New Script – Bokeh Maker Script

cass-BokehMaker

Did you ever see those fancy photography shots with lights shining out of the darkened and blurred background? Can you do that with your camera? If you can, good for you, but my little point and shoot camera cannot do that, at all. But i still like that look and wanted to see how to do it with Paintshop Pro.

In fact, creating that effect is very easy with PSP, but it is very tedious as each spot has to be done manually, one by one, each time by picking the color from the image. Imagine how many spots one has to create? Well, scripts are just meant to do faster what we COULD do, very slowly, right?

This script will do just that for you. Starting with ANY photo, of ANY size, you will be able to choose between 3 densities of the spots and 4 shapes, and then, let it work on its own. It will create 3 layers with the Bokeh effects, in different blurriness, and one background layer with a copy of your image, very blurred and darkened. All those layers will be left on separate layers so you can tweak them more. You can vary the blurriness more, change the opacity, or even remove one layer if you prefer.

You can really use ANY photo, including the bad ones, since it will be all blurred anyways!

You can grab this fun and creative Bokeh Making script in my store.

And for a chance to win this script, just add your name tothis thread in the DST forum. I’ll be back next week with the name of a winner.

cass-BokehMaker-sample-paperFor this week’s free sampler, i created four full size papers for you. Since i dont really know what type of photos you have to use in a layout, i decided to create three of those papers using just gradients i had in my stash: one for silver, one for gold and one for copper. Once i had a paper made out of those gradients, i just ran the script on it.

For the fourth paper, i created a base paper using the Airbrush Paper script with 3 primary colors plus white (for good measure), and then ran the Bokeh script on it. Those two scripts work very well if you want to create a Bokeh background paper to match a specific color palette instead of a photo.

Those are full size (3600x3600) and have no texture so you can add your own to match your particular project.

You need to be logged in to download this sample. You can either login, or register on the top of this page.

cass-BokehPapers-monochrome1


And there is another little freebie for you, but this time, it is only for FB fans. Check out the FB fan page and you can grab this set of 6 monochrome Bokeh papers.

Go LIKE thefan page and it will be under the FREEBIE tab.

If you don’t have a FB account, join the newsletter HERE and you will get it too.

Send your friends over and when the page reaches 400 fans, i will add another set of Bokeh papers for all.


News from the Campus

ScrappersDozen-300x300


Did you hear about the most yummy event for digital scrappers?

The recipe will include tutorials, goodies, and of course, scrapbooking!

Do you want to learn more about this event taking place this fall?

Click on HERE to get the updates for this delicious event!

New script – Distressed Edge

cass-DistressedEdge

Do you like the look of distressed edges? Maybe for a worn or vintage look? It might be easy to select pieces to remove all around the edges, but it can be tedious, and making the unevenness regular is a chores. This script will do the work in just a few seconds. You can apply this script to elements, shapes, frames, alphas, tags or photos of any size.

You have the choice of three degrees of distressing and the option to add a darkened edge around too.

Best of all, you will NEVER get the exact same result twice. This means that if you want to grunge up your papers, you will be able to have different borders for every paper you run the script on. It will really look like you spent a whole lot of time grunging those papers one by one! (but we know your secret!).

You can get this Distressed Edge script in my store.

As usual, you have a chance to win this script by adding a post to the RAK thread HERE in the DST forum. I’ll be back next week with a winner. Mendy won the Gemstone script from last week. Congratulations.

cass-DistressedEdge-sample-templatesOne neat use for the distressed edge is that although you can use it directly on the element you want to have irregular edges, you can also create your own templates for shapes you might want to use in the future. In fact, that is what i did for you. Since i could not show you a sample on YOUR elements, i made some grey templates. They are for 4x4 and 4x6 photos. If you are into pocket scrapbooking, or Project life or using Instagram, you will surely find some use for those. Use them for photos or journaling cards.

As you can see, i use them on photos, but you can use them to cut pieces of papers for a mat too.

Available for FREE when you register to our mailing list HERE.

Will you show me what you do with them?


Are you an Adobe user?

If you have CS4 or CS5, and you want to get Paintshop Pro to add to your arsenal of tools (for a very reasonable price), you can do so as Corel is offering you a great deal: you can get a full version of PSP for the upgrade price only.

Not only you can apply this offer to Paintshop Pro, but to AfterShot, CorelDraw and more Corel products.

Are you unhappy with the Creative Cloud option being the only one offered to you by Adobe? That is one additional reason you can want to switch to Corel.

Are you on a Mac? Yes, i know: Paintshop Pro does not have a native Mac version, but do you know that the Product Manager for Paintshop Pro at Corel works on a Mac? Yes, he uses a Parallels software (you might have it too?) and has had no problem with it. Do you have it? Download PSP trial version and have a look!

But you better hurry. This offer ends on August 31st.

Read more about it here.

New script – Gemstones

cass-Gemstones

Linda emailed me last week asking if i could code a script to create gemstone effects. She saw how Photoshop users had styles to do that, but nothing was available for Paintshop Pro.

I was not sure i could do it, because i needed a specific texture. I was lucky that i had a copy of Filter Forge and i decided to look and see if they had a filter to make that background design. And yes, they did. So that was the first step into making this script, which also uses a combo of bevels and blend modes.

I also drew 10 shapes of gems that you can use to create your own (or tweak them). They are Preset Shapes, so being vectors, you can use them in any size you want.

You can use any color for the base of your gems. You can even use a gradient for a very special effect.

There is a random setting in the script which means that even if you were to use the same size, the same shape, and the same color, you would get different results, just like real gems.

You can grab this Gemstone script in my store.

Do you want a chance to win this script? Head over to the DST forum and add your name to this thread. Tell me what you would do with gems like those. I’ll be back next week with the name of a winner.

cass-Gemstones-sample-flowerThis week, i had a lot of fun creating your free sample and i am super happy with the result. I created these gem flowers using the script. Here are some tips i used to get such a great result:

- i used a gradient instead of a solid color for the petals.

- i created each petal individually so that the bevels would be appropriate (it would have been a mistake to rotate them)

- when using the gradient, i also rotated it to match the angle of the gem being created.

This flower sampler is quite large. With 1000 pixels in width, you have plenty of options to resize it down to fit your project.

You need to be logged in to download this sample. You can either login, or register on the top of this page.

And remember that you can share this link on FB, Twitter or pin it to your Pinterest board.

New Script – Alpha Sheet Separator

cass-AlphaSheetSeparator

Last week, Kim emailed me about the Element Separator script. She was using it to separate the individual letters of her alpha sheet and usually ended up having the letters saved in the wrong order, because of the way the script was working. That meant that for the renaming part (which the script could not do), she had to do it manually since a renamer utility would not work in the order the files were saved, so she asked if there was a way to separate the characters in a different way, so they could at least be saved in the correct (or mostly correct) order.

Such a request is always a fun challenge for me so i looked at different ways a script could work in order to select the characters in order. I really think it paid off because this script will separate your alpha sheet in no time. Not only it will separate the letters, digits or symbols in order, but if they are simple alpha-numerical characters, the script will ALSO name them correctly, while saving them directly in the same folder the alpha sheet is saved. That means:

- no editing of the script each time you run it to indicate the folder to save the files to

- no renaming needed after the script is done

- no grid to work with

- no lengthy preparation needed in order to use a “time-saving” tool

How long do you think it could take to split, save and name all the characters of an alpha sheet? Check out this video to see for yourself (maybe take a guess before watching it?). Could you work that fast?


After Kim got to play with this script, she posted this review in the store: “I wrote to Cassel to ask if there was a way to modify the element separator script so that it could be used to separate alpha's on a sheet from left to right, as the element separator took elements in the row from the highest point. She not only came up with a modification for the script to work on alpha's, she also coded it to NAME them!!! Talk about a HUGE timesaver! Thank you Cassel, and I HIGHLY recommend this fantastic script!!” What will YOU say?

Now it is your time to grab this fantastic time saver script in my store:Creation Cassel

And if you want a chance to get this script for free, just go add your name to the thread in the Happy Place HERE and tell me what you will do with the time you save using this tool! I’ll be back next week with the name of a winner.

cass-PlasticPocketPage-small-2x2

Are you taking pictures with your phone? Are you often using square photos in your layouts? I created this small set of plastic pockets to display up to 4 square elements, whether they are photos,  cards or other elements. It is a layered file in PSD format, so you can actually insert your elements between the layers, and even have elements stick out of one pocket and show up on top of the pocket above it. It is just that easy to make it look as real as possible.

This set of pockets is 1800x1800 so it will not take over the whole page, and you will still have room to add other elements, photos, journaling, etc.

You need to be logged in to download this sample. You can either login, or register on the top of this page.

(if the link is not active, just login or register on the top of the page)


News from the Campus

Are you wasting time looking through your digital stash to find the perfect kit with the perfect color to match your photo? You don’t need to.

Check out the Creative Scrap Course in the Campus.

The course will give you the means to create your own elements in the perfectly matching colors, size, shape, etc. You will never find, in a ready-made kit, the papers, designs and elements you could create yourself.

Yes, you CAN do it.

Check it out and invite your friends too!

New script – Alpha Tags

cass-AlphaTags

I saw little tags with digits to create a date on a layout and i thought it was cute. I also thought that it must be tedious to do if you need more than just a few. How about if you want to write a word, a title, or a phrase?

Of course, scripts are made to save time and once coded correctly, that is exactly what they do. So i proceeded to code this script for Paintshop Pro users. This is not a template where you get the script to stop at each layer, ask you what you want to fill it with and go on to the next layer. Once you have chosen the font, the color, the text, the papers and a few other options, you can just go make yourself a coffee and the script will do everything by itself, whether it is a 5 letter word, a 26 letter alphabet or a 50 letter phrase. It is all automatic.

In addition to doing all the work for you, the script will add a touch of randomness that would be visible if you were to use a pair of scissors and cut the papers yourself: you would not get the same patterns or stripes or creases at the same place for each tag. That is the beauty of the random feature coded into this script: you will NEVER get the exact same tags twice. After all, if you wanted the exact same tag, with the same papers cut in the same place, it would be just simpler to create ONE tag and change the letters, but you want something more unique than a carbon copy of a tag for a whole alpha, right?

Then, it is up to you to fasten these tags the way you want, whether you use a staple, a button, a stitching, a pin, or just tuck it under a photo.

You can get this script in the store here: Creation Cassel.

You have a chance to win this script and create your own tags for your kits or layouts. Add your name tothis thread and tell me what you can think of using these tags for. I’ll pick a winner on Monday night.

cass-AlphaTags-sampleAs a sample, i made this set of digits based on papers from an old kit of mine. The basic blue, white and red should make these tags very versatile. The shadows are added to the inside layers but not the outside ones. That will allow you to add a fancy shadow, making the tags lift off the papers.

You need to be logged in to download this sample. You can either login, or register on the top of this page.

Initially, i thought of giving you only the 0, 1, 2, and 3 so you could write 2013, but then, i figured you might want to use those tags for something else. What else could you use digits for?


Do you like to see layouts made using my products (freebies or purchased)? I am sure you do, and so does everyone else. That means that if you are using ANY of my products, you are allowed to share them with us. I can post your project on this blog, or in the newsletter. You can even post it in the Facebook page if you want. That is allowed! And if you don’t have a Facebook page and would be ok in sharing your layout, i can post it myself with credits to you. How is that?

Dont hesitate. Here is the store FB page: https://www.facebook.com/CreationCassel