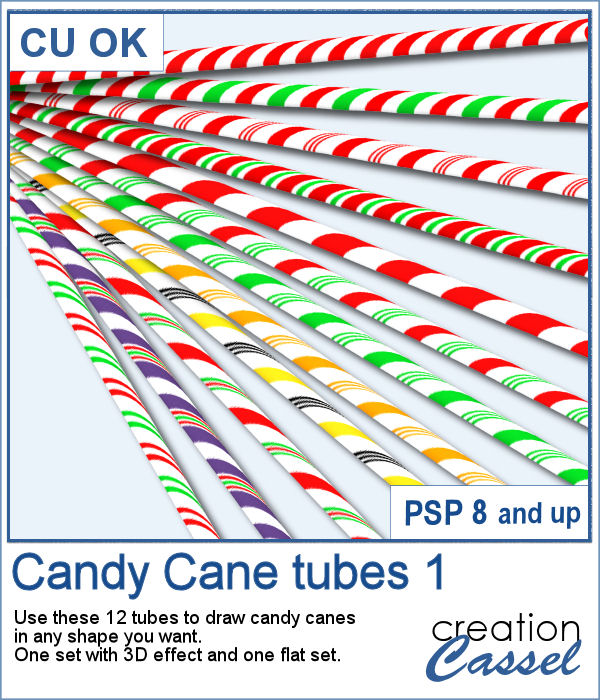
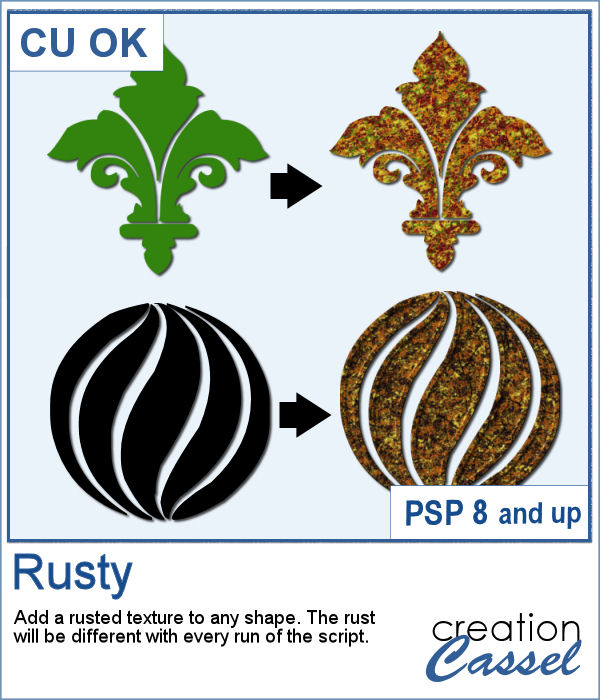
You can easily use a rusty texture image to add rust to your elements or shape, but rust is not always the same, right? So you would need to have many different images to have different types of rust.
This script will randomly generate a rust texture in the yellow/orange tones that will be different for every single run of the script. So even if you are using the same starting shape, you will always get something different.
Get it in the store: Rusty
In order to win this script, add a comment on this Facebook post telling us what element you would like to see rusted (remember, add a comment, not just a Like!) The winner will be announced in the newsletter, next week. Not a subscriber yet? Not a problem. You can register here and it is free (and you only get one email per week).

As a freebie, I created half a dozen cogwheels (using the Cogwheel script too) and rusted them all. I added a plain bevel on the edges. Each cogwheel is 1000 pixels wide so you can resize them as needed.
You need to be logged in to download this sample. You can either login, or register on the top of this page.

It is a festive time, and sweets are everywhere. How about creating some delicious licorice to decorate your cakes, cookies or scrapbook pages? Although we are used to seeing traditional green, red or black licorice, with the magic of PaintShop Pro, you now have 12 different colors, and even more, if you want to adjust the given colors or colorize the grey one.
For the freebie, this week, I created another alphabet using 5 of the licorice tubes. This alphabet also includes 10 digits so you can include some dates.
Have you ever wanted to create candy cane shapes that are not just like a cane? With these tubes, you can create candy cane circles, squares, hearts and anything in between. Since these are tubes, you can draw them in any shape, regular or irregular, and you can even just free draw them.
As a sampler, I created a simple alphabet using one of the candy cane design. Each letter is about 500 pixels high in png format. You can resize them as needed.
Although paperclips can be common on various projects, they can also be boring. How about customizing your paperclip with a name, a date, a place or another message to make your project unique.
How about some simple clips to help date your photos?
This week, the script will let you create a puzzle from any element or design you want, whether they are letters, numbers, drawings, photos or shapes. Whatever you want on the puzzle, you can draw or paste.
This week, I created a full alphabet that you can use with any child theme project. You can even use the letters from the puzzle to spell out the name of someone (if they need more than one of the letters, add them in writing, so it is just like you would do in real life, missing one letter).
This script will allow you to create a custom-made wooden puzzle with any text you want. You can add a really unique look by choosing any font, and also any color, gradient, pattern or combination of those.
This is that time of year with the holidays coming up, and this sample puzzle will spell the word Christmas using a funky font. The whole puzzle is in .pspimage format, so you can move the individual pieces around. Furthermore, all the layers are grouped so you can copy and paste the whole puzzle onto another project. You can ungroup all the layers OR simply rearrange the pieces you want to move, above the group so they will display their thickness correctly.
Directional tubes are perfect to create decorative elements in any length and shapes. These are no exception. They are extracted from silky braids and tweaked to be directional and as seamless as possible. You get 12 different colors of silky braids to use in various ways, to create straight trims and frames.
For a sample, this week, I created a triple frame but also included the individual frames so you can use them separately. I simply started with a vector ellipse and ran the VectorTube script. I changed the size of the ellipse every time to have different size of frames without resizing the frames (or the trims) themselves.
Do you sometimes want to use an accordion fold on an image or a roadmap? It is a fun way to display an image but it can be quite tedious to complete accurately. You need to measure, cut, skew, and align each piece correctly. In addition, there is also a matter of light and dark on each piece to make them consistent with the light source.
Since this script is applied directly to a photo that is yours, you likely would not care for a sample from my photos. So I decided to create a few straight ribbons in Halloween colors, and run them through the Knot #13 script. You now have 3 straight ribbons and 3 matching knots to embellish your own Halloween themed projects. What will it be?
Placing photos in a fanned display is not very difficult, but it can be tedious, especially if you have many photos. That is where this script comes in. It will automate every step, from opening the images, resizing them, copying and pasting them, rotating them correctly and aligning them precisely. In addition, the script can also add a white border and/or a drop shadow to each of the photos in the same run.
For a sampler, I was a bit unsure what to give you. Well, I used the display from the preview and I made a layered template for you. It is in .pspimage format and has mask groups so you can simply place the photos inside those groups and only the area within the frame will show through, even if your photo is larger than that "hole". That means you have no cutting or trimming to do with your photos.
If you want a custom fence, you can do it with individual posts and boards you can measure and layer. It might not be too hard, but takes a while to build. What if you can create one in just a few seconds?
Running this script with a simple wood texture image, I created this fence that is in separate layers for you to tweak it.