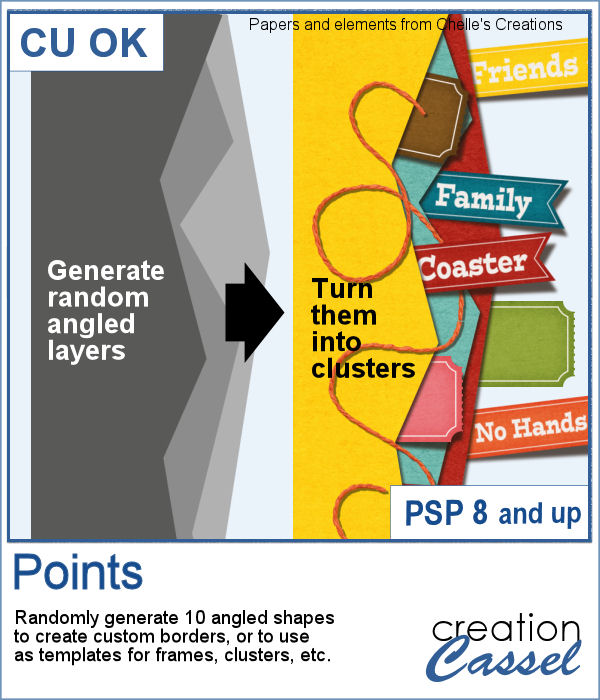
Web
Analytics

New script – Knot #12

Knot 12 - Paintshop Pro scriptHow you would use knots if you had a traditional ribbon can vary from day to day. You would have options to tie that ribbon in multiple manners, attach different objects, wrap that ribbon around all kinds of things. This is why, in digital scrapbooking, there are so many different knots available.

This script for Paintshop Pro will allow you to "tie" a ribbon into a simple knot, but unlike other scripts where you can only choose the color or pattern and everything looks like it is "flood filled" with that pattern, this script will use your own straight ribbon. This is perfect to have a match if you are using the other ribbon in the project, whether it is left straight, or tied into a different knot or bow created with another script.

Grab this script in the store: Knot #12.

For a chance to win this script, tell me how you would customize a knot for your project otherwise. Do you colorize greyscale ribbons? Do you manually create a knot with your ribbon? Do you use a script that asks you for the color to use? Leave a comment below and i'll announce the winner in the newsletter, next week. Not a subscriber yet? Not a problem. You can register here and it is free (and you only get one email per week).

Knot 12 - free samples in PSD formatThis week, i created three straight ribbons (from greyscale ones) and ran the script to end up with three simple knots. Each one is left in unmerged layers so you can put them around any object or insert something in the middle of the knot.

I had fun with colorizing those ribbons with a gradient instead of a solid color. I think that gives a different kind of look to the knot that makes it more interesting (at least, that is what i think).

I also included the straight ribbons so you can use them with other scripts, or as is on your project to match. Or you can insert the straight ribbon directly in the knot too. Why not?

Remember to show off what you used this knot for. What project did you create using it?

You need to be logged in to download this sample. You can either login, or register on the top of this page.


Corel Paintshop Pro Challenge

TextCheck out this week's #CorelChallenge. It is about using text on your project. Well, if you are a scrapbooker, you surely have text on your projects! It could be a fun journaling display, or an unusual title. Or how about a nice Subway art design? We can do so much with Paintshop Pro. Show off what you can do (or just what you have done already).

Post your project on their thread or tag it with #CorelChallenge

Did you see the one i posted on their thread?


News in the Campus

Text-in-silhouetteAs part of the Corel Challenge, i created a text inside a silhouette. I thought it was a great way to use the new text wrapping tool from PSP X8.

I also made a short tutorial on how to create this result. Read it HERE.

New script – Ribbon Tag Banners

Ribbon Tag Banners script for Paintshop ProSometimes, you might have some interesting straight ribbons, but you would like to use them differently. How about creating some banners with bits and pieces of those ribbons? Does it sound like too much work? Of course, it can be tedious to do by hand, but with this script, you will have it done perfectly, in no time.

You have many options and even if you used the same options with the exact same ribbons, you will always get a slightly different result. Add a rope or a stitching on the top and you get another result.

Use your Paintshop Pro and this script to create a matching decorative element for your project, especially if you are using the straight ribbons elsewhere on the page. Or, if you want to add a decorative banner in your kit.

Have fun with this script. Get it in the store: Ribbon Tag Banners.

For a chance to get this script for free, tell me how you would like to "tie" those ribbon pieces: a string or a stitching or something else? I'll announce the winner in next week's newsletter. Not a subscriber yet? Not a problem. You can register here and it is free (and you only get one email per week).

Ribbon Tag Banner for Halloween for freeFor a sample of what this script can do, I used a single ribbon and colorized it in orange, and darkened the other copy to create a Halloween theme banner. The whole element is 3600 pixels wide, but you can easily resize it down to match the the space you need on your project.

Use this banner across the page, or between two photos, or just under the journaling to add focus on it.

The string on top, was made using the VectorTube script and I applied one Rope tube.

You need to be logged in to download this sample. You can either login, or register on the top of this page.

New script – Painted wood

Painted wood script for Paintshop ProWhether you are creating a scrapbook page or any other graphic project, painted wood elements could add a special touch. And when you can choose one of SIX types of wood, when you can choose any shape, any design and any color, you are sure that your elements will be unique.

There are so many ways to coordinate them with your project, the theme and the the colors.

The script will use a black and white version of your design, leaving the white as bare wood and the black as painted. You will also get a textured paint that will match the grain of the wood, even though the script will randomize the angle and the scale.

You can get this script in the store: Painted Wood.

For a chance to win this script, add a comment below telling me what design you would first use to run this script on. Would you rather do alphabets, arrows, frames, basic shapes, etc.  A winner will be announced next week. Not a subscriber yet? Not a problem. You can register here and it is free (and you only get one email per week).

Painted Wood DigitsAs a free sample, this week, i created a fun set of digits. I used a black fill and a white outline to set the inside to be painted by the script. And instead of a solid color, i used a gradient with the 3 primary colors.

I have to say that i am particularly pleased with the end result. With those primary colors, you can easily embellish a child theme project, or a school theme layout.

You can use those to indicate the child's grade, his age, or the actual year a photo was taken.

You need to be logged in to download this sample. You can either login, or register on the top of this page.


#CorelChallenge

Primary-300

Did you hear about the #CorelChallenge?

This week, you can send in photo, scrapbook page or other graphic projects based on primary colors. Here are some ideas for you:

  • create a monochrome layout
  • use an ordinary photo, turn it in black and white and make one of those primary colors reappear (here is a tutorial).
  • create clusters with elements in primary colors (buttons, ribbons, flowers)
  • use the free digits above to add a colorful date

Go for it. Let's show how we can use primary colors in projects OTHER than just photos. You can do it!

Post your project here.


New script – Text Confetti

Text Confetti script for Paintshop ProIf you want to scatter some confetti in the shape of a "50" or a "Mom", you can use the Picture Tubes function in Paintshop Pro, but you still have to create those custom picture tubes.

This script will let you create exactly that. You can pick the font and the text you want (numbers, or short words work best). You can pick any single or multiple papers to punch the text out from. And you can also add some brightness variation on each individual image.

In the end, you will get a set of picture tubes that will include 81 different "punched" versions of the word or number, so you can scatter them all over your page, if you want to.

Grab this fun script in the store: Text Confetti.

Do you want to win this script? Tell me, in the comments below, what would be your first word or number you would create when you get your hands on this script (and tell me why... i am curious). I'll announce the winner in next week's newsletter. Not a subscriber yet? Not a problem. You can register here and it is free (and you only get one email per week).

For free samples, i decided to offer two. One will be exclusively for Paintshop Pro users, and one will be for everyone.

The first freebie is a set of confetti picture tubes for "1st". In fact, you get TWO sets: one in black and white and grey (which you CAN colorize if you want), and one in primary colors. You just have to drop the .psptube files in the Picture Tubes folder, and you will be able to access them from your Picture tube tool. Then, it will just be up to you to scatter them over your project for a fun accent.

The second freebie is a set of two frames. They are both made from the picture tubes above, but if you can't use a picture tube because you are not a Paintshop Pro user, you can still use those frames. They are 3600x3600 in png format, so almost all graphic programs can use those.

Text Confetti picture tubes - 1st   Text Confetti frames in png format


You need to be logged in to download these samples. You can either login, or register on the top of this page.

#CorelChallenge

Firsts-300

Did you hear about the #CorelChallenge?

Every week, Corel proposes some specific topics or themes and invite viewers to submit projects, photos, or scrapbook pages on Facebook. You just have to tag your post with #CorelChallenge.

Well, last Monday, the theme was "Firsts". So it could be the first tooth, the first kiss, but since it is the start of school, it is a perfect time for the first day of school. Did you take a picture of your child on their first day of school? If so, why not take the freebie from today, and create a fun "First" layout and submit it to the #CorelChallenge? That would be a PERFECT opportunity to showcase something OTHER than photos (since we all know that Paintshop Pro can do much more than just photo editing, right?)

Last week's theme was "Letters and numbers". View my layout HERE. (comments, likes and shares are more than welcome)

Now, it is your turn: use those tubes and create a fun "First" layout for this challenge.

New script – Shattered Mirror

Shattered Mirror scriptIf you like the Shattered script, which breaks up a single image into many pieces, you might actually like this new script. It is somewhat similar to the first one, but in this case, each piece will be converted into a piece of mirror, reflecting the initial image.

You can also let the script move the pieces at random for a really scattered look, or move them yourself (and you can even remove some pieces completely). You can even let the script add a drop shadow to each piece with YOUR favorite settings.

Since every piece is left on a separate layer, you can customize the end result to your liking.

Grab this fun script: Shattered Mirror script.

Do you want to win this script? Add a comment below giving ideas on how you think this script could be used (hint, check the freebie below for another idea). I'll announce a winner in the newsletter, next week. Not a subscriber yet? Not a problem. You can register here and it is free (and you only get one email per week).

Shattered Mirror PapersSince this script should be applied on YOUR own photo, it would be totally useless to offer you a free sample with one of my photos. What would you even do with it, right? However, for the fun of it, i decided to run the script on a simple black and white gradient pattern image to see what it would look like. Well, i thought the end result was... interesting.

I ran the script once and then merged the layers, cropped the resulting image and ran the script a second time.  Since the initial image is untouched i was left with the original (the gradient), the first result, and the second one.

Now, what can you do with this odd-looking paper? Try to blur it to get an overlay. Or play with the blend mode to get something different. But if you were to use your own design or gradient, you can create a kind of "crazy quilt" effect, and add stitching along the lines.

You need to be logged in to download this sample. You can either login, or register on the top of this page.
.


Corel Paintshop Pro blog


64_32-bitWhat do you know about 32 bits and 64 bits as far as PSP is concerned? Do you have plugins that don't seem to work on your new PSP versions? check out this blog post on the Corel Paintshop Pro blog for some information from LeviFiction, a regular contributor on the Corel user-to-user forum.


New script – Random Dots

Random dot pattern script for Paintshop ProThere are super simple ways to create regular dots in an even pattern. If you want a speed up tool to create a variety of polkadot tiles, you can use the Dots and Diamonds script. But if you want to create something that has more variety in the dots yet, still be regular, what do you do?

That is why I created this script. It will create a dotted pattern but with a completely different type of result with different options.

You can create a tile that you would use as a seamless pattern, or a full size paper where you will have no repeat at all. In addition, you have various ways to pick the colors. You can have a monochrome pattern with only lightness variations. You can have blended colors between two. You can have specific colors picked from your palette with no blending at all, or you can have totally random colors picked.

The dots can be created on a new image or take an open image and add them on a separate layer.

Use the end result as you wish, adding effects if you want.

Grab this script in the store: Random Dots script.

For a chance to win this script, tell me what you would do with those dots. Would you apply them to something? would you add a particular effect? Tell me in the comments below and i'll pick a winner next week to be announced in our newsletter. Not a subscriber yet? Not a problem. You can register here and it is free (and you only get one email per week).

Random Dot paper designHow about a little sample of that dot making machine? I created 2 patterns for you. One is made of primary colored dots (plus black an white) in a very regular pattern, where nothing touches the next dot. And one other in primary colors only where the dots are smaller and somewhat overlap.

Each pattern is 1000x1000 pixels (beware that one of them is not seamless ass some dots are over the edge of the image).

They are both png files so you can use them in most graphic programs. Add a background, apply an effect, use them as tiles, etc.

You need to be logged in to download this sample. You can either login, or register on the top of this page.


New in PSPX8

What is new in PSPX8This week, Corel released the latest version of Paintshop Pro, which is version X8.

It has some great new features and those will be particularly welcomed by scrapbookers, card-makers and other graphic artists using PSP for other than photo retouching.

Do you want to read more about those new features? Check out this blog post in the Campus.

New script – Bow #10

Layered Bow script for Paintshop ProNobody will ever say they have enough bows in their digital stash!

This script is one of the most detailed bow script that i have done, as it allows you to choose your own straight ribbons to create this bow. With the option of creating three layers of loops, using one, two or three different ribbons, and the choice of the number of loops to include, this script will let you create an assortment of bows for various occasions.

The script also includes a random option for the number of loops but also for where in the original ribbon, the pieces will be taken from, meaning that if you have a ribbon with a particular design or color variations, the script will always take a different section for every run.

Each loop is left on separate groups, allowing you to move them if needed (or you can remove some if you want, or tweak them any other way).

Grab this fun script in the store: Bow #10

See how this script works:


What would you do with such a script? Would you likely use the same ribbon for each layer or use different ribbons for each? Or would you use the same ribbon but colorized differently? How would you use this script and customize the end result to be unique? Share your ideas in the comments below. I'll pick a winner and will announce it in the newsletter, next week. Not a subscriber yet? Not a problem. You can register here and it is free (and you only get one email per week).

Multiple layer bow greyscale in PSD formatThis week, i created a three layer bow using two different greyscale ribbons (from Melissa Bennett). Each loops is on a separate piece (i merged the individual piece for each loop) so you can colorize each row as you wish, or even each loop as you wish.

Each layer has 10 loops.

The zip file includes two PSD files: one with basic shadows added, and one with no shadow at all, so you can add your own if you want something very specific.

Use the same color for each layer, or change for each. Or use the same hue but different brightness settings. Or go crazy and have a different color for EACH loop.

Since the last loop in the bow is kind of standing out, it is a perfect place to add a center piece, buttons, jewels, etc.

You need to be logged in to download this sample. You can either login, or register on the top of this page.

New script – Chevron

Chevron pattern script to create seamless tilesIt might be fairly easy to create chevron pattern manually, but it still takes time, and in order to get something that is different each time can be a challenge.

This script will take care of that challenge by randomly picking the colors from your palette, and randomize also the thickness and the order of the lines, and also randomize the angle. In the end, you get a variety of seamless tiles you can pick from.

You can generate up to 25 different tiles in one run. And it will take just a few seconds too! Keep the tiles you like, and discard the others (nobody will know).

This is perfect to create background paper or accent elements like ribbons, borders, tags, etc.

Grab this time saving script in the store: Chevron script.

Do you want a chance to win this script? Tell me, in the comments below, how you have used chevron patterns in the past (you can link to a layout if you have one too!). I'll announce a winner in the newsletter, next week. Not a subscriber yet? Not a problem. You can register here and it is free (and you only get one email per week).

Chevron tiles in greyscale for freeAs a sampler, this week, i thought of creating a series of tiles from a single color palette, however, I have no idea what colors you would need. So i chose to run the script using black and white and 4 other shades of grey.

The resulting tiles are obviously all greyscale and you can colorize them as you wish.

You can use those tiles as a flood fill pattern to create edges, background papers and more.

You need to be logged in to download this sample. You can either login, or register on the top of this page.


New script – Knot #11

Knot script for Paintshop ProWe never have too many knots and bows, do we?

This script is all about creating that knot that you can use to tie an element like a ring, a tag, or anything that has a hole on the edge.

Interestingly, unlike other knots (or bows), this script allows you to get the correct shading whether you plan on using the ribbons toward the left, or the right or the top or the bottom. You know that one element with the correct shading should NOT be rotated, flipped or mirrored as that shading will become incoherent with the light source. Well, this is like having 4 scripts in one!

Each layer is left unmerged (so you can tweak them), and furthermore, they are grouped so you can copy the whole set of layers to paste them on your project without having to re-align them one by one.

You can use just about any type of  straight ribbon: opaque, patterned, directional, translucent, lace, etc.

You can grab this script in the store: Knot #11.

For a chance to win this script, tell me how you can think of using this simple knot. Can you think of something even more original than others? Something a little "out of the box"? Share your suggestions in the comments below, and i will pick a winner next week. Not a subscriber yet? Not a problem. You can register here and it is free (and you only get one email per week).

Knot in greyscaleAs a sampler of what this script will generate, i created 4 knots using the same starting ribbon. So you get one for each of the 4 directions.

Each file is in PSD format and the layers are unmerged. If you want to copy the whole thing onto your project and not have to merge the layers first, here is the process (with PSP):

  • highlight the bottom layer
  • right-click and select New Layer Group; click OK to the window that will pop up
  • activate the layer just above the group; drag it into the group, just above the previous layer (which is now in the group)
  • repeat for each layer
  • activate the Group 1 layer (above all the individual layers); copy that one (Ctrl-C) and you can paste as a new layer onto your project (Ctrl-L)

That was easy, wasn't it?

What will you do with those tied ribbons? Remember to show use your end result!

You need to be logged in to download this sample. You can either login, or register on the top of this page.

New script – Cluster Template Maker 2

Cluster Template Maker script for Paintshop ProAdding clusters to a project can really make it stand out. But it seems that creating clusters often starts with staring at a blank page, or a bunch of elements, while being unable to decide where to start.

This script will just give you the boost you need by creating a starting point with a cluster of shapes on various layers. The shapes will vary between rectangles, circles, stars and flowers. They are just meant to help you and give you a guide to create your own cluster with papers and elements.

Run the script on a blank image (or a project) and it will determine the size of the elements based on the width of the canvas. You can always size down later.

Once it is done, you will have individual layers that you can adjust, tweak, reorder to your liking. If you don't like the result, just undo it (Ctrl-z) and run the script again. You will NEVER get the same result twice so enjoy the process!

Get this script in the store: Cluster Template Maker 2.


Cluster Making Toolkit scripts for Paintshop ProIf you are in love with clusters, there is also a Cluster Maker Toolkit in the store, which includes this script (Cluster Template Maker 2) but also the previous one (Cluster Template Maker) and the Speed Scrap Bundle of scripts to turn those templates into "real" clusters.

Get this Cluster Maker Toolkit in the store too.

Do you want a chance to win this script?  Tell me, in the comments below, how you usually manage to create clusters (if you create them). Do you use pre-made clusters? Do you use cluster templates? Do you work a long time to place the elements manually? I'll announce a winner in the newsletter, next week. Not a subscriber yet? Not a problem. You can register here and it is free (and you only get one email per week).


Cluster Template in PSD formatAs a way for you to sample the result of this tool script, i am offering you the cluster that is part of the preview. It is over 2000 pixels wide so you have plenty of room to resize it.

You can use it on a photo, but you can also use that to add a name for a signature tag, or just a decorative element on a flower.

Since it is saved as a PSD format, you can open it and use it in various graphic programs.

You need to be logged in to download this sample. You can either login, or register on the top of this page.

Remember that you can always tweak the template, add elements, move some, rearrange the order of the layers, etc.

Will you show us what you do with this template? Don't be shy. We want to see.