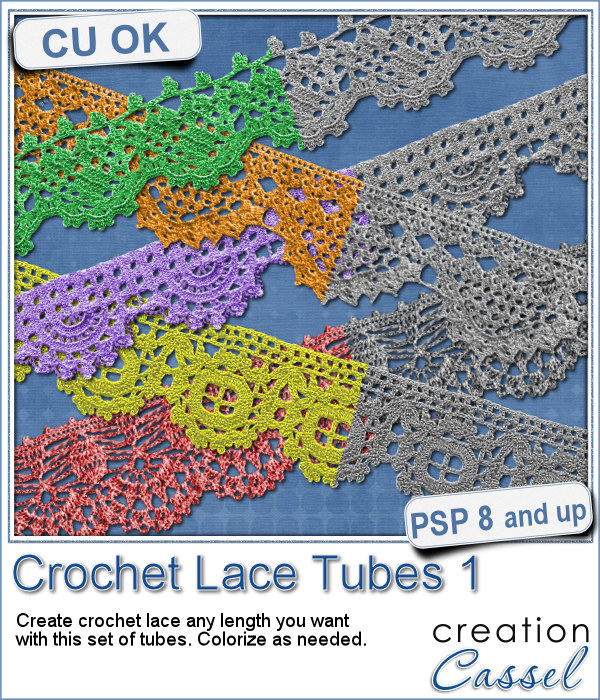
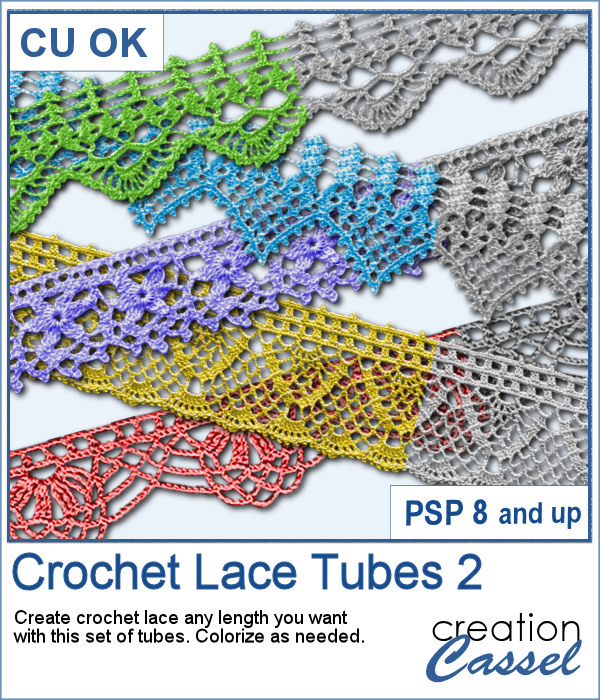
This is the second set of tubes to create crochet lace edges on any element you create. This set includes 5 more picture tubes that you can use simply while drawing with your cursor.
What will you make? Frames? Edges? Clusters?
They are in greyscale so you can colorize them in a color that will match your project. No more having to search for that perfect lace; you can create it.
In order to win this script, add a comment on this Facebook post telling us what type of color you would most likely colorize these laces (remember, add a comment, not just a Like!) The winner will be announced in the newsletter, next week. Not a subscriber yet? Not a problem. You can register here and it is free (and you only get one email per week).
As a sampler, this week, I created an oval lace frame using one of the tubes in this set. It is left in greyscale so you can colorise it as you wish. You can use it to frame a picture but also a quote or a particular element you might have scanned and extracted, like a memorabilia.
You need to be logged in to download this sample. You can either login, or register on the top of this page.
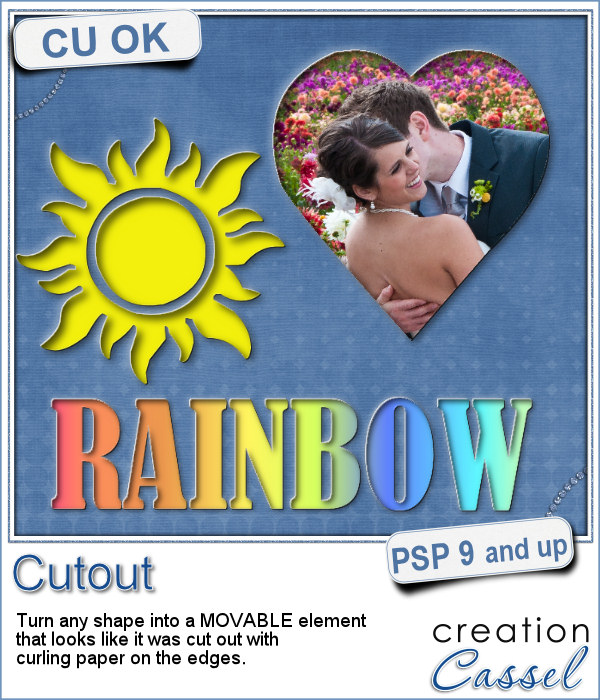
With this script, you can pretend that you cut out the top layer of your project to show something underneath, while in fact, you cheated and what you see underneath is actually on top.
This allows you to move your "cutout" piece anywhere on your project, or on a separate project if you want to. Save it for future use too and the effect will be applied wherever you place the shape.
The edges will look like the paper is slightly curled up, so make sure you place it on a layer that looks like paper (curled up wood would not look too realistic!)
In order to win this script, add a comment on this Facebook post telling us what shape you can think of using this script with (remember, add a comment, not just a Like!) The winner will be announced in the newsletter, next week. Not a subscriber yet? Not a problem. You can register here and it is free (and you only get one email per week).
To show how these cutout shapes can be portable, I used a stencil font to create a set of white digits. They are png format so you can use them anywhere, on any project and give the impression that your paper is cut, and curled up to show these numbers. You will obviously get better results if you don't use a very dark paper!
You need to be logged in to download this sample. You can either login, or register on the top of this page.
Do you like lace edging? Can you find some that suits your project? Something that is the right color, the right length?
These are tubes so you can drag your cursor anywhere and create a crochet lace as long as you want.
You can certainly use them as is, like a piece of lace to add to a cluster, or you can actually edge a paper, or make frames. You can even thread some ribbons through them for an even more customized look.
In order to win this script, add a comment on this Facebook post telling us what you might use those tubes for (remember, add a comment, not just a Like!) The winner will be announced in the newsletter, next week. Not a subscriber yet? Not a problem. You can register here and it is free (and you only get one email per week).
As a sample, this week, I created a long strip of lace and turned it into two frames using the Mitered Corner Frame script. In order to make nice corners, i trimmed the strip exactly between "loops" then measured the length of a loop in order to set a size, in the script, that would use complete loops. I think it turned out great.
These frames are left in greyscale so you can colorize them to match your own project.
I hope you will show me what you do with them!
You need to be logged in to download this sample. You can either login, or register on the top of this page.
These are picture tubes. Each set has 26 different "building" silhouette, and there are 3 sets: one for residential buildings, one for commercial buildings and one for industrial buildings (so you have a total of 78 buildings!)
Since they are picture tubes, you can simply drag your cursor along whatever path you want to place your buildings, and that's it. Adjust the scale if you want larger/smaller buildings.
All the windows are empty but you can easily fill them up by painting behind.
In order to win this script, add a comment on this Facebook post telling us what is the tube set you are most likely to use first (remember, add a comment, not just a Like!) The winner will be announced in the newsletter, next week. Not a subscriber yet? Not a problem. You can register here and it is free (and you only get one email per week).
In order to get a closer look at these tubes, I created 3 "borders", one with each tube set.
Change the brightness to turn them to grey, colorize (or paint) them. If you want more than one row, duplicate one and flip it around; it will look like a different set completely. Layer them as you wish.
Each border is 3600 pixels long so you can use them on a full-size project.
You need to be logged in to download this sample. You can either login, or register on the top of this page.
You might already be familiar with the script to create neat and regular chevrons, but sometimes, you might want something a little different, a little less regular.
This script is exactly what you need to create your next paper. It will use any color you want from your palette or the image you are working with, and will create up to 25 tiles with different chevrons. EVERY tile will be different because of the random feature integrated. The spacing will be different, the thickness of the lines, the length, and the colors.
Keep the tiles that interest you and discard those you don't like.
In order to win this script, add a comment on this Facebook posttelling us if you prefer regular or irregular chevrons patterns (remember, add a comment, not just a Like!) The winner will be announced in the newsletter, next week. Not a subscriber yet? Not a problem. You can register here and it is free (and you only get one email per week).
Since I didn't know what were your favorite colors, I created three tiles with chevron patterns in black, white and grey. They would be quite easy to colorize to your liking and match your current project.
These tiles are seamless so you can turn them into papers or elements of any size. You can rotate them as you wish, although a rotation of 0, 45 or 90 would likely be the best options but you can still play around with other angles.
You need to be logged in to download this sample. You can either login, or register on the top of this page.
Do you like to play with building blocks? Does it bring back memories of your childhood?
Now you can create fun elements made of blocks to match your project. And you can use any color you want, unlike the traditional limited colors that building blocks come in.
Although it is preferable to have very simple shapes with very few details, you can still give it a shot with other designs.
In order to win this script, add a comment on this Facebook posttelling us if you still play with building blocks (remember, add a comment, not just a Like!) The winner will be announced in the newsletter, next week. Not a subscriber yet? Not a problem. You can register here and it is free (and you only get one email per week).
As a sample, I created two simple frames made out of blocks.
They are about 2000 x 1500 pixels and in PNG format so they can be used in most graphic programs.
You need to be logged in to download this sample. You can either login, or register on the top of this page.
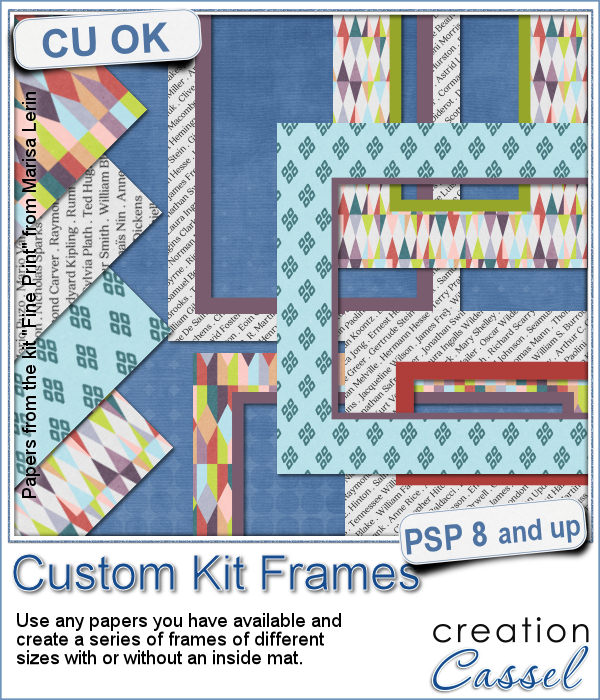
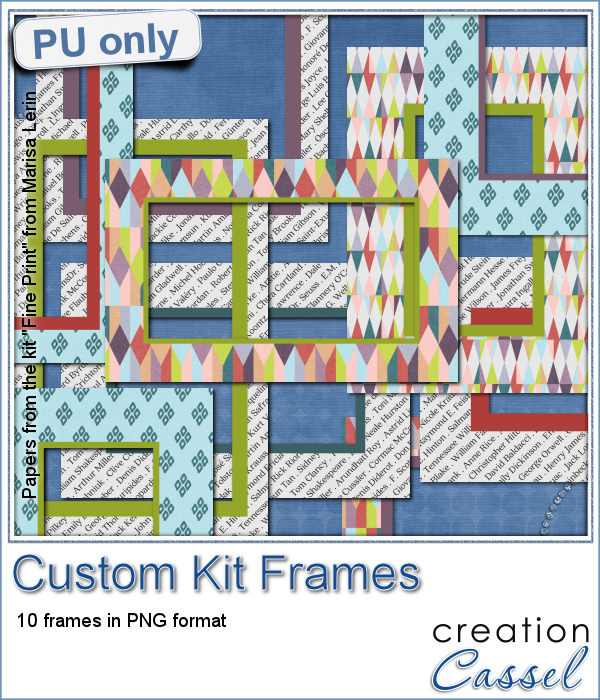
Now, you can create a series of frames of different sizes using several papers you have on hand. This is perfect if you want to create frames to go along with your kit, but it can also be an interesting tool to give you some frames that you can use on your own layout using the colors of your project.
You can generate plain frames or add an inner mat of the color you want (hopefully to match the papers you selected).
Keep the frames you like and discard the others. Create up to 15 frames in a single execution.
In order to win this script, add a comment on this Facebook posttelling us if you prefer frames with or without an inner mat (remember, add a comment, not just a Like!) The winner will be announced in the newsletter, next week. Not a subscriber yet? Not a problem. You can register here and it is free (and you only get one email per week).
This week, I am offering you 10 frames I made for the preview. It uses papers from the kit Fine Print from Marisa Lerin. This kit is free to download, so if you want some matching frames, papers and elements, check it out here.
You need to be logged in to download this sample. You can either login, or register on the top of this page.
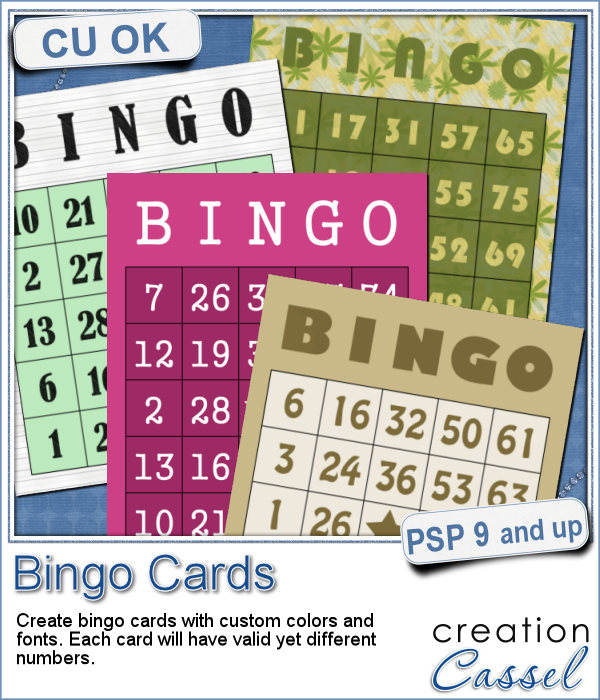
If you have a project about game night or bingo winners, you might want to add some bingo cards to your layout, but usually, you will find some pretty ordinary cards that won't necessarily match the colors or style you are using.
This script allows you to create some custom cards with your choice of colors and fonts, and you can even tweak them even more at the end since everything is left on separate layers.
This script includes a random function for each number so it generates "playable" cards that you can also customize with a theme and print out to play at the next birthday party, or family/friends gathering.
In order to win this script, add a comment on this Facebook posttelling us what is your favorite type of game (remember, add a comment, not just a Like!) The winner will be announced in the newsletter, next week. Not a subscriber yet? Not a problem. You can register here and it is free (and you only get one email per week).
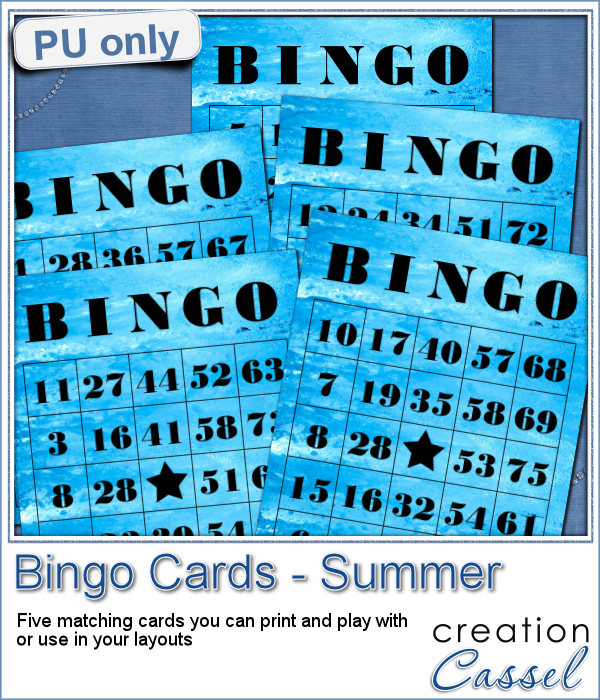
As a freebie for this week, I created 5 matching cards so you can actually print them out and use them to play. Laminate them so you can keep them for later.
I customized these cards in a few ways: I replaced the background paper by a water texture image (read the instructions and you will see that it is NOT possible to select a photo as a background during the running of the script), and I removed the colored area where the numbers are so you only see the numbers and the grid. It is ok since the black is contrasting enough for the cards to be usable.
You need to be logged in to download this sample. You can either log in or register on the top of this page.
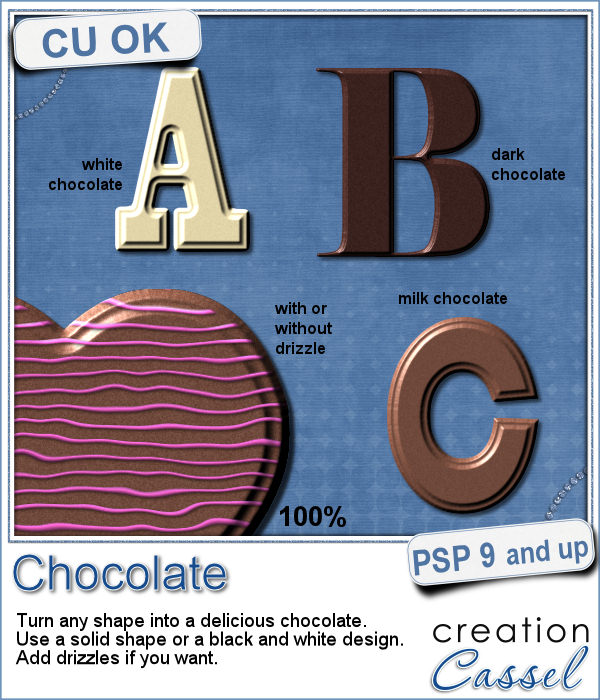
If you like chocolate, here is your chance to get a sweet treat for your next graphic project. Whether you like white chocolate, milk chocolate or dark chocolate, you are in luck!
Now, with a script, you can turn any shape into a solid piece of chocolate. If you want to be fancier, you can use a black and white design and get an embossed chocolate piece.
And to add to the joy of the taste buds, you can add a decorative drizzle of chocolate of any color.
In order to win this script, add a comment on this Facebook post telling us what is your favorite type of chocolate (remember, add a comment, not just a Like!) The winner will be announced in the newsletter, next week. Not a subscriber yet? Not a problem. You can register here and it is free (and you only get one email per week).
For a sample of this script, I used a few summer themed elements and ran the script with a milk chocolate flavor. You need to be logged in to download this sample. You can either login, or register on the top of this page.
As part of the celebrations of Canada150 (yes, on July 1st, 2017, Canada is turning 150 years old), several promotions are available to you, in the store and the Campus. Here they are.
Treasure hunt in the store
There are 13 gems hidden in the description of 13 products in the store. Find them to fill in a puzzle, and get a chance to win one of the five $30 coupons for the store.
If you loop this ribbon, you can even add an eyelet
You don’t need a curling iron to get this effect
Do you want to go on a date?
Cookie Monster is around!
ABC’s can be put on a string if you want
If you get third place, you don’t get gold
Let the two of you tie the knot together
Let’s split it in half
Brr... it’s cold out here (yes, it can be cold in Canada, in winter)
Time to throw confetti to celebrate Canada150!
It is still cold, and they are everywhere
Sitting between a rock and a hard place
Make sure you have it on your car!
Hint: you can use the search function in the store!
Special sale in the store
Since Canada turned 150 years old, I thought of giving you 15.0% discount on everything in the store, but then, I thought that Canada has 2 official languages, so I will offer you twice that discount, so everything will be 30% off from July 1st to July 4th.
Trial offer of the DIAMOND membership
If you are a customer of the store, you likely know that the Campus is somewhat linked to it as it is where you can learn to either create your own elements or how to use what you have, in a creative manner.
Do you wish you knew what was included in that membership? What types of tutorials are in there? or even how much is available to DIAMOND members?
Yes, there is another activity in the Campus, and there are also great prizes to be won.
You have to find the missing 10 pieces of a puzzle in order to enter into the draw for great prizes.
There is more than $150 in prizes to be won. To learn more about the Campus celebrations, check it out here.
FREE ebooks
If you want to get 202 tips and tricks to work with Paintshop Pro, my two Kindle books are FREE between July 1st and July 4th. Get them here (click on the previews):
And remember that you DON'T NEED a Kindle to read Kindle books. You can download the free app from Amazon to read them on your computer.
If it is not free when you go to Amazon, you might be just a bit early or too late. Beware of time zones!
 This is the second set of tubes to create crochet lace edges on any element you create. This set includes 5 more picture tubes that you can use simply while drawing with your cursor.