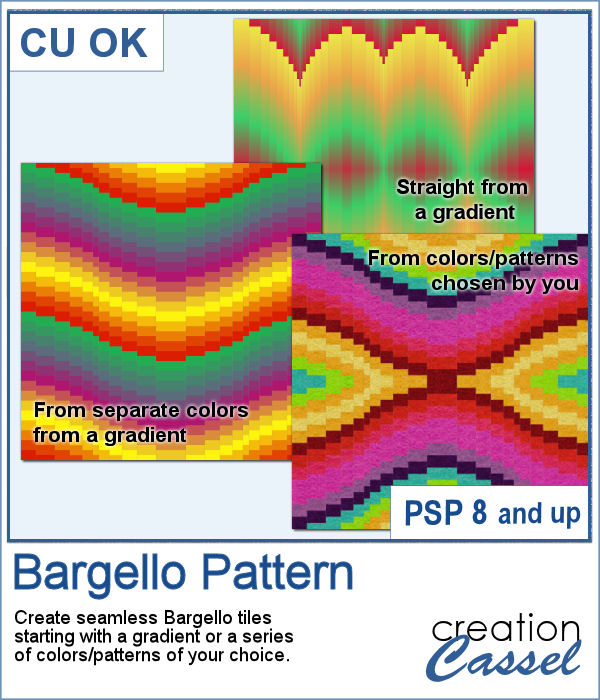
Web
Analytics

New script – Text Overlay

cass-TextOverlayI have seen overlays in stores and on various blogs, but there is so much *I* would like to see on an overlay and i can never find exactly the right thing.

Of course, i can never find an overlay with the name of my kids, or the place where i spent my vacation.

It is easy to create a single little tile with the text and use it as a fill pattern, but that is pretty simplistic and for a pattern, it kind of lacks originality.

This is when Martine said she would like to have a script to create her own overlays using any text she wanted, with any font too.

And now, this Paintshop Pro script is exactly what she was looking for. Not only this script will create a simple pattern using the text, but it will also create 4 more seamless tiles using the same text.

Sure, you can do it manually, but i can tell you that some of those tiles are quite tricky to get aligned perfectly, when you do it manually. That is the beauty of scripts!

Grab this script in the store: Text Overlay.

What text would you want to use to create an overlay? Tell me in the comments below and i will randomly pick a winner to get this script for free. Remember that if you purchase the script, you can still enter: if you win, you will get a future new release! Not a subscriber yet? Not a problem. You can register here and it is free (and you only get one email per week).

cass-TextOverlay-ValentineFor the month of February just at our doorstep, i created 3 overlays for you with a loving theme: Valentine.

I started with the simple sentence "Be my VALENTINE", and i ran the script twice: once, i used the option 2 (alternating) and once with the option 4 (zigzag).

Once i had the seamless tile from the zigzag option, i used it to fill a full size image, and i chose to change the angle to 45 degrees for a fun effect..

For the option 2, i also used the tile to floodfill a full size image.

Then, on a copy of the last image, i added a heart shape mask to make a fun heart frame.

You get all three overlays in this sampler.You need to be logged in to download this sample. You can either login, or register on the top of this page.

What will you create with these overlays, or with the script itself?

Show us your creative inspiration and post on our pinterest board HERE. And if you haven't been invited to post, just ask for an invite. And while you are there, remember to comment on all the fantastic images pinned there!

New script – Starburst Pattern

cass-StarburstPatternIf you like to use starburst patterns on your papers, you either have to make them yourself, or rely on purchased pages, either as overlays or as template to then colorize or customize them to fit your project.

This script will do that for you, in just a few seconds: run the script, select the color, choose how many papers you want to generate (up to 10), and if you want the patterns to have 2 or 3 colors. Then, in literally just a few seconds, the script will generate random patterns based on your selected options and colors.

Every paper will be slightly different even if it has the exact same color as others, because of the random feature integrated in the script. Add textures, overlays, or other effects for a real custom paper for your page or your kit.

Get that Paintshop Pro script in the store: Starburst Pattern script.

Would you like to get this script for free? Tell me what effects you would add to such a paper after being created by the script. I'll announce the winner in the newsletter, next week. Not a subscriber yet? Not a problem. You can register here and it is free (and you only get one email per week).

cass-StarburstPattern-ValentineTo give you a chance to see this pattern, i created 6 papers using a pink palette. The papers can then be used for any upcoming project for Valentine.

Add a texture, add layers and change the blend modes, overlay it on a photo, etc. Be creative!

You need to be logged in to download this sample. You can either login, or register on the top of this page.

New tubes – Leather Braids

Leather Braid picture tubes for Paintshop ProMany elements you can get online, whether they are free or paid for, are made from photographed objects that are then extracted. This has many limitations: you can only use the element in the shape or size you have, you can rarely use a different color (although you MIGHT be able to colorize it) and you cannot customize them to fit your particular needs.

These braids are not single elements, but they are picture tubes to use with Paintshop Pro. Those tubes will create a braid as long as you want, in the shape you want; it will just follow your cursor, as if you were drawing with them.

This set includes 12 different picture tubes, perfectly set to give a continuous braid, as long as you want.

Get those braids in the store: Leather Braids.

Do you want a chance to win those Leather Braid Tubes? Tell me, in the comments below, what element you would create using those braids. I'll announce the winner in the newsletter, next week. Not a subscriber yet? Not a problem. You can register here and it is free (and you only get one email per week).

Leather Braid Frames in PNG format for free

For a sampler, this week, i created two frames: one rectangular that would fit a 5x7 photo and one round that would fit a 4x4 photo.

As you can guess, i didn't draw those shapes freehand! (you would not want to use a frame i drew freehand!) so i used the Vector Tube script from Joe Fromm to place the tube around a vector shape, which makes the placement so even.

Due to the shape of the individual images of the tube, sharp corners can give some unwanted extras. That is what happened with the rectangular frame, so i had to do a little bit of erasing of the "extra" details. If you use a smooth curve, it won't happen to you, but if you have corners or sharp curves, you might need that little extra step to make the whole element looking smooth.

You need to be logged in to download this sample. You can either login, or register on the top of this page.


News from the Campus

After months of waiting, the brand new Basic Scrap Course is now live in the Campus.

This course will walk through from the moment you open your Paintshop Pro for the first time, to the completion of 5 different layouts.

Image16-shadowed  Round-and-Round-shadowed-600 Layout3-shadowed-600 Image2-shadowed-600 Layout5

It includes lessons on

  • how to customize your PSP to suit your workflow,
  • how to add simple and not so simple shadows,
  • how to use scripts to save time,
  • how to create clusters,
  • how to do layering,
  • how to use the guides,
  • how to cut out your own paper elements,
  • how to use picture tubes to create stitching,
  • how to create titles from alpha, alpha sheets or the text tool,
  • and much more.

Perfect for beginner scrapbookers, but also perfect for someone new to Paintshop Pro. No matter your learning style, you will find this course will suit you because you get both video AND written instructions.

Interested?

Check out the more details HERE.

Do you know a friend who is considering scrapbooking with PSP? Send them over and watch them create their first digital pages.

New script – Photo Mosaic

cass-PhotoMosaicIf you have photos and you want to display them in a new and original way, have you tried to make a mosaic?

This can also be a great way to hide the errors on a not-perfect photo, whether it is a color issue, a blurriness issue, etc.

This script will help you turn any photo, of any size, into a mosaic. You can choose the size of each tile. You can choose to have lines between the tiles, how thick and what color. You can also choose whether you want a lot of variations between the tiles or just a little.

And best of all, you can override the script by removing any area that you find are changed too much from the original; the script will place guides, and activate the Selection tool for you and a copy of the original image will be left underneath, so it will be very easy to remove one segment from the "mosaic" layer and just display the image below. That is one way to make sure that the important details are easy to see (like your baby's face, or the birthday cake).

You can get this fun photo script in the store: PhotoMosaic.

Would you like to get this script for free? Just post a comment below about how you think you could use this script and i'll will announce a winner in the newsletter next week. Not a subscriber yet? Not a problem. You can register here and it is free (and you only get one email per week).

cass-PhotoMosaic_Overlay4x6Since this script is run on a photo, and sending you one of my photo probably wont help you, i decided to play around a little. I used a grey based, the size of a 4x6 inch photo. I ran the script on that base, and got a series of tiles in different shades of grey. You can use that as an overlay on top of any of your photos, and adjust the blend mode. Depending on the starting photo you have, different blend modes might work, and others, not.

The file is a psd format as there is a "tile" layer and also a "line" layer in case you want to add some lines (which you can also colorize if you want).

You need to be logged in to download this sample. You can either login, or register on the top of this page.

So, which photo will deserve a mosaic treatment? Don't hesitate to show them. Pin them on Pinterest, on our own board HERE (ask for an invite and you will get it!)

New script – Groovy

cass-GroovyA little detail that can make an element look well finished can be an even groove all around it. Whether you are using a plastic object or a wooden one or even a metal piece, that fine groove can be a great detail to add.

This script for Paintshop Pro will do that for you. It will also measure your element to suggest a specific width based on the element you want to use.

In addition, since a groove can look so good on a wooden piece, the script offers six wood textures you can use to convert your shape.

You can get this script in the store: Groovy.

For a chance to win this script, add something in the comments below as in what element you can imagine adding a groove to or turn to wood. I'll announce a winner in the newsletter, next week. Not a subscriber yet? Not a problem. You can register here and it is free (and you only get one email per week).

cass-Groovy-HolidayAs a little sample,  i created some wooden holiday elements.

For fun, i added some interesting details to the candy cane element. How did i get those stripes? Simple: once i had selected the area for the stripes, i played with the brightness and contrast to get a different coloring. I could also have used a hue change instead.

Use those elements as a base to decorate them even more. Add glitters to the star, or lights to the tree. Add a string, a ribbon or a bow to attach them to your layout. Change the color too if you prefer. What will you do?

You need to be logged in to download this sample. You can either login, or register on the top of this page.

New script – Scallop Pattern 1

cass-ScallopPattern1You can probably create scallop patterns the loooooooong way and add individual circles, one by one, using a guide to align them perfectly, but that is so tedious.

This Paintshop Pro script will do all the calculations needed to align all the circles and create a seamless tile.

You can choose a solid color with an outline (obviously, without an outline, a solid color scallop won't show much!), or use a gradient. And furthermore, you can use linear, radial or sunburst gradients for very unique effects.

You can get this time saving script in the store: Scallop Pattern 1 script.

Do you want a chance to win this script? Tell me, in the comments below, how you would have made a scallop pattern before using this script (template? manually? other?) I'll pick a winner next week and it will be announced in the newsletter. Not a subscriber yet? Not a problem. You can register here and it is free (and you only get one email per week).

cass-ScallopPattern1-TilesFor a sample, this week, i made 3 different tiles using the script.

For the first tile, i simply used a solid white and a black outline. The script did the rest.

For the second tile, i just used a linear gradient, going from black to white and no outline.

For the third tile, i used the exact same gradient as for the second tile, but i inverted the colors (so it went from black to white instead of white to black)

Isn't that simple?


You need to be logged in to download this sample. You can either login, or register on the top of this page.


News from the Campus

63430_10152743902521281_3068966621549669937_n-400Remember to have a peek at the Creative Christmas Bundle. It is full of supplies, classes and ideas to create something unique this holiday season. It is still on sale for just a couple of days. You get to enjoy all those goodies at 90% off the individual price. That is worth a Black Friday or a Cyber Monday special, isn’t it?

Check out who are the 15 designers who contributed and what they can offer you.

Get help  and Get more help

*******************


12DaysFinally, here is a FREE event you can register into.

The 12 Days of Christmas is a series of daily email giving you 12 different templates for cards and matching envelope, along with inspiration and tutorials from various designers. And yes, it is 100% FREE.

Check it out and register HERE.

Scroll to the bottom and the registration form will popup for you (make sure you don’t have any popup blocker on!)

New script – Ghost Date

cass-GhostDateYou always need to find something different and original to add a date to a project. This is one of those unusual options.

The Paitnshop Pro script will help you create a date where the actual number will be the focus while the month and the year will overlap and cutout from the number. Even better, you can choose ANY font for each of the elements.

The year, at the bottom, is only optional.

The end result is a single raster layer so you can use it as is, colorize it, use it as a mask and more. It is a great idea to create journaling cards for a “Project Life” or to date photos in a “Project 365”.

In fact, you can also use other words than months. For example, you can use the word MONTH, or WEEK, or GRADE to associate with other kinds of numbers.

Grab this script in the store: Ghost Date.

Do you want to have a chance at getting this script for free? Just add a comment below giving me ideas of how you would use such a script. Who knows? I might just create it for all to share? The winner will be announced in the newsletter, next week. Not a subscriber yet? Not a problem. You can register here and it is free (and you only get one email per week).
cass-GhostDate-2014inReviewFor a sample, this week, i went a bit outside of the box with the script: i didn’t create an actual date.

Instead of a date, i put the year, and instead of the month, i used the word “in review”.

This is a great time to create a layout (even a double size layout) with the highlights of the year, things you want to remember, people you met, places you visited. Then, you can use this element as a title on top, or why not in the middle?

You need to be logged in to download this sample. You can either login, or register on the top of this page.

If you create such a year in review project, remember to show us!

New script – Ribbon Tag Wreath

cass-RibbonTagWreathYou can create so many elements using leftover pieces of ribbons in traditional scrapbooking, but what about digital scrapbooking?

Sure you can and although it would be VERY long and tedious to do manually, this PaintShop Pro script will do the work with little effort.

You can create a wreath using one or two or three or however many ribbons you want. They will be picked at random, cut at random (but based on the average you will choose), and placed correctly along the wreath shape.

Each individual piece will be left unmerged and will have a shadow if you want to.

You can add more than one “layer” to the wreath for a totally different look.

Since all the individual layers are left unmerged, you can always tweak them, insert decorative elements between then, etc.

Since each wreath could easily end up with over 100 pieces, just imagine the time you will be saving!

Grab this time-saving script in the store: Ribbon Tag Wreath script.

What would you do with such a script? It might be obvious to use it to create a holiday wreath, but i am sure you could think of more ideas, don’t you think? Add your suggestions in the comments below, and i will pick one person to receive this script for free. The winner will be announced in the newsletter. Not a subscriber yet? Not a problem. You can register here and it is free (and you only get one email per week).

cass-RibbonTagWreath-Holiday-previewWhat about a little free sample and a quick tutorial for this week?

For this wreath, I used a single ribbon that I colorized 3 times. Here are the steps:

  • before running the second part of the script, I colorized the ribbon in green and adjusted the brightness to get a rich color
  • run the script to complete the first “layer”
  • choose a blurred shadow
  • for the second layer, re-open the same ribbon, but colorize it yellow; adjust the brightness to get the color you want
  • run the script to complete the second “layer”
  • for the third layer, re-open the same ribbon, but colorize it red; adjust the brightness to get the color you want
  • run the script to complete the third “layer”
  • merge each group
  • select the Ellipse tool and draw a circle the size of the wreath; adjust the Line Style to use the Dashed, and a size of 10 pixels
  • convert to a raster layer
  • select outside the “stitch” layer with the Magic wand
  • activate the top “layer” and apply a large inner bevel; deselect
  • activate the stitch layer
  • add some noise and a small bevel

The sample you have has not had the bevel applied because it would require merging the groups and removing the option to customize it on your end.

Because the sample has 163 layers (yes, that many), the files are quite large. I have them available in two formats: one PSP format, where all the pieces are grouped by “layer” and one in PSD format, where the individual pieces are linked based on their “layer” (since the PSD format would not keep the groups). So it is up to you to download the file you need.

You need to be logged in to download this sample. You can either login, or register on the top of this page.

New script – Decorative studs

cass-DecorativeStuds
Decorative studs with Paintshop Pro script

Several years ago, it was fashionable to have multiple studs placed on a piece of garment, jeans, t-shirts, etc. It was a lot of work to create those, especially to have all those studs evenly placed.

In scrapbooking, it could seem easy to fill a shape with studs but the problem is that some of the elements would get cut off on the edges. How do you get only full studs and none of the cut ones?

This is what this script does. Using your Paintshop Pro, the script will actually measure the size of the studs you choose and the shape you want and will do the correct calculations to eliminate all the “part-studs”.

You can start with any shape of any size (obviously, if your shape is too small, the result might not be as good), and pick one of the two shapes for the studs: round or diamonds.

Then, the script will offer 4 possible metallic finish: gold, silver, bronze and copper, but if you want to use something totally different to match your photo or your kit, you can also do so. Use the sculpture effect or simply color and add a bevel.

You can grab this script in the store: Decorative Studs.

How about a chance to get it for free? Tell me what shape you would like to use to create a series of decorative studs? I’ll announce the winner in the newsletter, next week. Not a subscriber yet? Not a problem. You can register here and it is free (and you only get one email per week).

cass-DecorativeStuds-holiday
Free Decorative studs with a Paintshop Pro script

As a sampler for this script, i created some holiday decorations for you. To do them, i simply used a large shape and ran the script.

I used the gold finish for the star, but for the other elements, i chose the option 5, to add my own finish. In my stash, i had various color tiles from the Felt Presets, so i used those tiles as a base color for the other shapes.

For the tree, i selected the center area, promoted the selection to a layer and deleted them from the base shape. Then, i applied a different color to that layer.

I did the same with the mitten.

For the candy cane, i applied the red tile, then i used the point to point selection tool to select sections that would be white. Since the selection was cutting off some of the studs, i went through a few more steps:

  • edit selection
  • using the Eraser tool, with a round brush tip, i erased the sections over the studs that were mostly outside the selection
  • using the RIGHT click with the Eraser tool, i added selections for the studs that were mostly inside the selection
  • edit selection again
  • promote selection to a layer
  • delete from the original layer
  • deselect
  • increase the brightness of the promoted layer so everything turned white
  • inner bevel on those white studs
  • merge visible

And now you have it! That is the trick to have full studs in different colors without having to select them one by one.

You need to be logged in to download this sample. You can either login, or register on the top of this page.

New script – Knot #8

cass-Knot8

Although having a tight knot might be expected, it happens that some times, they are not completed, or maybe you want to attach something that is larger.

This Paintshop Pro script will take any straight ribbon and will tie it loosely. The ribbon needs to be pretty long (at least 3600 pixels for a 150 pixels thickness). Longer is fine, but shorter won’t work.

You can use a solid color ribbon, a directional one, a translucent one or even a lacy one. The script will cut the pieces accurately so that any continuous design (or text) will display correctly.

You can create the ribbons yourself, or use an extracted one. Just make sure it is really straight. If it is at an angle, the script will want it even longer to compensate. Also, if it is at an angle, you might need to tweak the end result manually (but it might be worth it if you are in love with a particular ribbon).

You can get this script in the store: Knot #8.

If you want a chance to win this script, add something in the comments below. Tell me what you would insert in a loose knot like this one, as opposed to a tight one like the Knot #7. I’ll announce the winner in the newsletter, next week.
cass-Knot8-HolidayAs a sample of what you can create with this PSP script, i created a ribbon using a greyscale one, added a layer and flood filled with a holiday color gradient. I adjusted the blend mode to Multiply to show the texture through while keeping the rich dark colors of the gradient. After merging the layers, i ran the script. I used the same steps for both ribbons but in one case the angle of the gradient was 0 and for the other it was 90, which gives you the two different ribbons that are perfectly matching in colors.

The ribbons are really long and the knots are in layered format (PSD) for all to use.

You need to be logged in to download this sample. You can either login, or register on the top of this page.