Creating a patchwork pattern might be fairly easy with selections, one after the other but some designs would be very tedious to create in a seamless pattern especially if it is not a design that fits inside a square or rectangle. However, with the calculations available in a script, you can actually create that seamless pattern from any design.
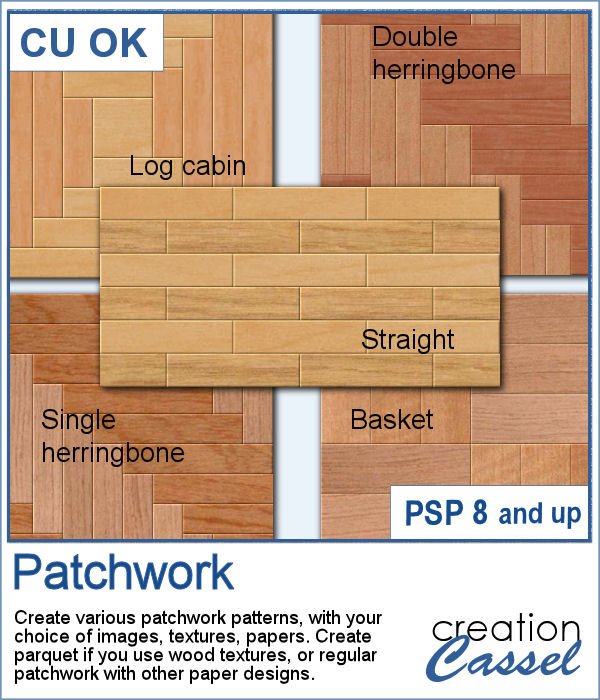
Each of the 5 designs will end up being seamless and you can then use the tile as a pattern to floodfill a larger image. Change the scale or the angle for interesting and varied effect. You can use wood textures, but also metal, stone, paper, fabric, etc.
Get this script in the store: Patchwork
In order to win this script, add a comment on this Facebook post telling us what textures/images you would like to use with this script (remember, add a comment, not just a Like!) The winner will be announced in the newsletter, next week. Not a subscriber yet? Not a problem. You can register here and it is free (and you only get one email per week).
As a sample, I thought you might like to have some of the tiles used in the preview. They were done using various wood texture images. One tile is 1000x1000 and the other is 1200x1200 pixels. Since they are both seamless, you can use them on a larger image. You can also rotate the pattern at 45 degrees for an interesting effect.
You need to be logged in to download this sample. You can either login, or register on the top of this page.

Yes, you can always check out the images in your Windows Explorer to view all the patterns you have but if you want a printed library, you would need a lot of work to create it. However, this script will create one for you, in just a few seconds. Choosing one pattern, the script will find all the other patterns in the same folder, and display them on a standard 8.5x11 sheet of paper, along with the name of the particular pattern and the name of the folder. This is perfect for you to then print out and keep in a binder.
For a freebie, this week, I created a fun frame made of sand, that you can use on top of your "beachy" photos. If you want more sand, you can always duplicate this image and add an Antique Mosaic effect to it.
What do you want to garnish your burger? This week, I am presenting you a fun addition to your summer projects, parties and barbecues. Now, you can add as many toppings to your burgers as you want without adding any calories, so dig in!
Since I didn't know what you would like to have on your burger, I could not create a burger for your specific taste, but since I expect you will be using these tubes for some summer activities, you surely will have some photos to showcase, so why not use this template?
Adjustment layers are applied to all the layers below them, in the Layers Palette. But what if you want to adjust only one element, on one single layer? You can still do it, if you add that layer into a group that will include that specific layer you want to modify. It takes a few clicks, but with these scripts, a group will automatically be created and the adjustment layer will be inserted. Just fewer clicks than doing it manually.
As a sampler for this week, obviously, I can't give you anything done with that script, since it is a tool, but since the Plush Texture script was quite popular, I decided to create a fun plush teddy bear.
Natively, you cannot view your brushes from Paintshop Pro when you look in Windows Explorer, so if you want to see what you have on hand, you have to go through PSP itself, and pull down the list of brushes from the Brush tool settings.
As a free sample, this week, I made a fun frame using star confetti made with basic colors. The whole frame is 3600x3600 pixels so you can use a single photo on your project. If you want to use it smaller, you can add a solid color border on the edges so you would not see the cut off confetti.
Every project can use confetti, either to add a feel of freedom or to emphasize particular colors of the featured photo. But it might be hard to find the exact colors in a ready-made confetti element. This script will really create a unique set of confetti tubes, with the exact colors you want, in addition to various other settings of your choice.
Always hoping for spring to come, I chose to use some spring-y colors and create a set of rectangular confetti. Maybe it will make spring come faster?
Delicious donuts are always tempting, and if you have any baking projects or layouts, it could be fun to have some custom pastries. This is where this script comes into play. You can create a variety of donuts based on any shape you want, and customize them with various icing flavors and additional toppings.
For a sample, I created 3 letters that can spell the word YUMMY. Each letter (Y, U, M) are made of a different flavor. They are about 2000 pixels in height so you can easily resize them to what you need.
Have you ever seen, in bakeries, bread in various shapes? Now you can create a loaf in any shape you want, using this script. You can create a simple white bread, a whole wheat bread or a rye bread.
As a sample, I created a variety of bread in the shape of simple digits. I know, you can't eat them, nor can you even smell them, but I am sure they smell wonderful!
If you liked to play with pipe cleaners when you were a kid, and loved making them into various shapes by twisting them, bending them, folding them, then you will LOVE these tubes. As tubes, you can just use your cursor and create them as long as you want, in any shape you want. You get a total of 12 different colors of pipe cleaners.
Did you get some pictures of your last Valentine Day with your valentine?
For a sample, I created a heart shape frame using a preset shape, and ran the VectorTube script to place the little hearts all along the shape. With a little shadow added, you have a fun frame. The shadow is only added to the chain, so you can add your own shadow to the whole frame if you want.