Web
Analytics

New script–Simple tags

cass-SimpleTags

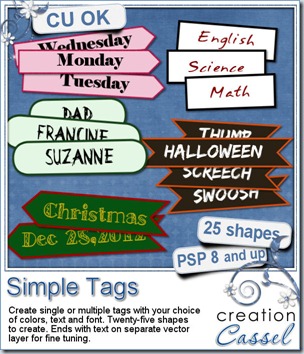
Suzy was asking me if there was a way to create multiple tags with her choice of text and still have them personalized. She is doing genealogy work and needed such “tags”. That is what led me to code this script.

The process for you is simple: you type in the words or phrases you want, in the script, set your font, and run the script, following the prompts that will ask you to choose various options:

- the tag shape: you can combine the end shape to create up to 25 different look

- the color of the outline and the center of the tags

- the color of the text

- you can have all the tags the same length, matching the longest word, or have each tag proportional to the length of the word

- you can also choose how high you want the tags to be, and the script will match everything, like the length and the font size to match that size.

And in the end, you get a fun set of matching tags. You can use them as date elements (perfect if you do P365 project, but also for everyday layouts), names, places, and more.

So what will you use this script for?

You can grab this script in my store: Creation Cassel

And if you want to have a chance to win this fun script, just add your name to this thread and i will be back on Monday night to announce the winner.

cass-SimpletTags-samples

Since the time is close to back to school for most, I am sure you will have some photos of your little one (or not so little) going back to school or going for the first time. You will definitely need to create layouts for that special occasion, right? These 20 tags are yours to use in those layouts. They were all made using the script, 5 words at the time.

They are all 150 pixels high so you can resize them if you need. And they are in PNG format, so everyone can use them, even if you don’t have Paintshop Pro

You need to be logged in to download this sample. You can either login, or register on the top of this page.

And remember to show us  how you use them!


News from the Campus


Did you follow our Monogram series? We already shared 12 monograms made by members of the Campus during one of our speed scrap (that was not really a speed scrap). There are still 14 to go. Mary had fun with those and sent me this lovely layout she did using one of the monograms.

May 14, 2012 P

Lovely layout, don’t you think? Some people have asked me how monograms could be used, since they were more familiar with alphas where you can use all the letters to create words and titles. Of course, monograms are only meant to enhance the initial letter of a word.

If you want to get the rest of the monograms, join the Campus. Another set of letters will be sent this weekend, so you still have time to join the fun! (it is FREE too!)

Join the campus


BasicExtractionOur next workshop will be on Basic Extraction techniques. This will be so much fun and might encourage you to start using your photos in different ways from now on. Again, it is free. It will be held on Sept 2nd. Will you be there?

RegisterNow-01-200


Finally, did you notice the DigiGrab special deal this week? It features one of our most popular Master Class: SHADOWS! You can get this complete Master Class for ONLY $8. This is a wonderful opportunity for scrappers and CT members to learn how to tweak the shadows on their layouts to make them look as real as can be. It is also perfect for designers who want to turn their previews from flat and boring to eye catching for their visitors. Click to view it!digigrab

Even thought the illustration is done using Paintshop Pro, it is likely easy to replicate using other graphic softwares.

New release – Delayed

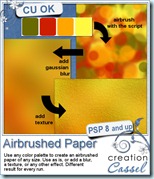
cass-AirbrushedPaperAre you waiting for a new release in my store? I am sure you are but due to some technical difficulties related to a store upgrade, it will be delayed somewhat. However, i wanted you to have a SMALL peek at what it will be. This script will create an airbrushed surface with YOUR choice of palette, from 2 to 6 colors. Because of the random feature integrated in the script, you can run it multiple times, and you will never get the same result twice. Once the airbrushing is done, you can add whatever effect you want to it, or use it as is. This is a great way to create background papers for any layout, or to match your kit. 

So, keep an eye on this blog and my facebook fan page to find out when this script will be available to you.

Merry Christmas

cass-HolidayWreath

Happy Holidays to all my readers, customers, fellow designers, CT members, and their families.

Thank you all for your support and i hope that your holiday season is the best it can be.

What is a tube anyways?

The word “tube” is pretty specific to Paintshop Pro. We can hear PSPers use this word and even some derivatives, like “tubing”, which has nothing to do with going down the river on an inflated tube! All in all a tube is a bit like a sticker that you place with a click of the mouse. That is an '”easy” description and does not cover the full potential of this tool.

Tubes can be used in three main ways: 1- as single image to place as often as you want  2- as a series of images that can be placed in randomly  3- a series of images placed directionally. Let’s see them all in a bit more detail.

1- Tubes that are single images

These kinds of images are doing exactly the same thing as if you had a png image, with a transparent background and you placed various copies of it on your work. It can be a star, an angel, a handprint, a toy locomotive, a flower, etc. There is no limit to what can be used as a single image. If you can extract it, you can use it as a tube. Here is an example of several repetitions of a single image tube.500

Image54

One thing you can do with tubes that is a bit different than with regular single images is that you can set the step and have the single image repeated and placed evenly along the way, either in a straight line, or when you draw freehand, like this:

Image56

and you can also overlap them if you set a smaller step:

Image57


2a- Tubes as series of images placed randomly

Another characteristic of tubes is the possibility of having several of them together. Some of them can have all different images and get placed, one by one, randomly on each click. Jasc and Corel have included several such tubes with the program. They are often grouped by types, since it makes more sense to have several autumn leaves, or pink buttons, or grass blades when you place them. Here is an example of randomly picked images (each item is placed where i click but they are randomly picked):

Image55

The randomness of this type of tube, combined with the adjustable step lets you create elements like this garland (available in my store):

Image58


2b- Tubes as series of images placed in a continuous manner

The previous uses of tubes are pretty simple and could be done with any set of png images, however, the “tube” tool has more potential when the images are created to be used in a continuous manner. In this case, they tend to create something very different. The individual images are often just part of something and their continuous placement will create something. As an example, here is a rope tube (very versatile tool!). Each of the

Image59

The top rope is the “finished” product with the default settings of a step of 1. On the bottom, i changed the step to 35 so you can see how each individual image is slightly different from the previous one so their sequential placement will create something else. Isn’t that neat? That is one of the most powerful characteristics of the PSP tubes.


3- Tubes as directional images

Well, this type of tube is my favorite and is, in my opinion, THE most powerful feature of the tubes. How good they will look depends on how many different pictures you have. The tool will place the images according to the angle of movement of the mouse. And the tube file will include many different images, oriented differently. One image will be oriented straight up, the next one will be angled at 5 degree, and the next one at 10 degree and so on. This will allow the pictures to seemingly follow the expected direction for it. Here is an example of a directional tube used:

Image53

And that is how all my directional tubes are created to make ropes, chains, tire tracks and zipper teeth!

So, if you didn’t know what tubes were all about, this must help you a bit. If you are a PSP user, play with them. As you can see, tubes are much much more than just transparent png images with a different name! Tubes are fun to use, and so versatile, especially since the tool comes directly with your PSP, and no need to purchase an outside plugin or such.

Have fun with them!!!

I have been tagged on Facebook…

Corel_on_FB

Yeah…. by COREL!!!! I am not THAT familiar with Facebook and when i saw that new post on my fanpage wall, i had NO idea what that was. I had to ask a friend what it meant. Well, apparently, it means that Corel noticed me! And what THAT means? still no idea. But i assume it is good! I followed the link to check on Corel’s wall page and yeah, there i was.

Now, just in case you feel like going and liking Corel you can get to their page here. If you are a PaintShop Pro user, it might help!

I Just joined Facebook – come join me

facebook-logo

Yup, you saw it right. I joined Facebook. I am still getting used to it as it is a totally new concept for me. I am not familiar with those “social network” sites as i usually dont have time to devote to that. I am too busy coding scripts, and such.

I am sure many of you are already used to Facebook and you know your way around. Just join me and let’s see where it will lead.

Click here to reach my fan page. I wonder how long it takes to reach that 100 fans milestone. Why not help me reach it? Click on the image to find my fan page. See you there!

ADSR5- Challenge #8

diosa-challenge9challenge9-600


Here are our challenge #8 Layouts. We each had to use opposite colors on the color wheel. I picked green and Diosa picked red.

Aren't they lovely?