Web
Analytics

New script – Stack’m all

cass-Stack-m-allDid you ever use a script that created many elements left on your workspace? What do you do with them? If you want to save them, you might have 20 images to save, each with a different name.

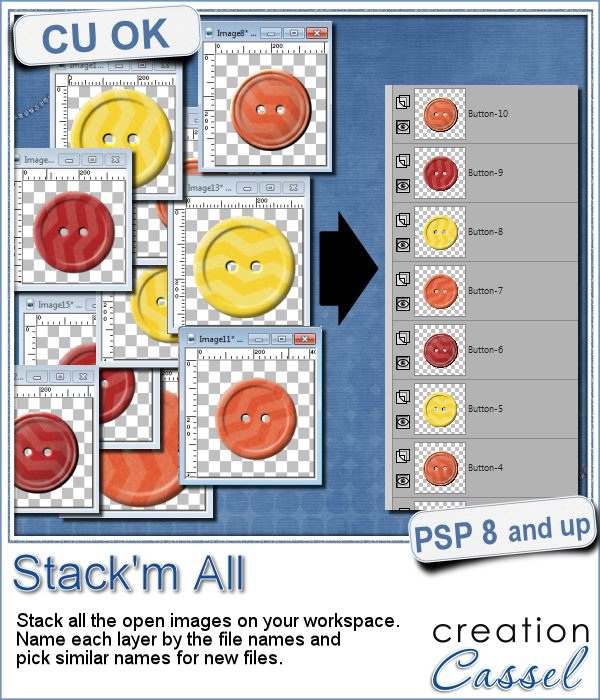
Now, you can save a lot of time using the Stack'm all script. It will stack up all the images from your workspace into individual layers on ONE file. So you you would have only ONE file to save.

You have various options too: you can rename all the images that were not previously saved (like those generated by a script) with a generic name; you can also group all the layers from a multi-layered image before stacking them into the new image. A great time saver.

Get this script in the store: Stack'm all

Do you want a chance to win this script? We'll make a little game this time around. Name one script that creates a lot of elements left on your workspace. I will announce the winner in the newsletter, next week. Not a subscriber yet? Not a problem. You can register here and it is free (and you only get one email per week).

cass-WoodFrame-Layered
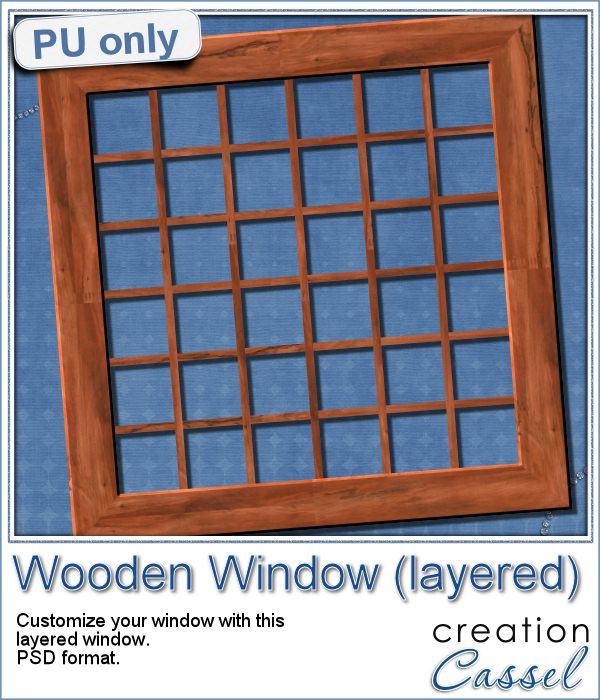
As a sample for this week, i am actually giving you a little challenge. I created a wooden window and i left it in separate layers for you to customize. You can remove some vertical or horizontal pieces to create a different disposition of the window panes. You can remove some of them, cut others, end up with a variety of pane arrangements, even if they are... uneven.

Once you have customized your window panes, merge the center pieces and add a bevel to your liking. Finally, it is time to add images or photos. Will you use a single image to show outside the window? Will you add separate images on different panes so the window will act like a frame? Or will you do use it as a curious cabinet front? Use your creativity.

You need to be logged in to download this sample. You can either login, or register on the top of this page.

Now that you have created a new masterpiece that is totally unique, the REAL challenge is to post it on the Corel Paintshop Pro FB page with the tag #FanFriday. I would love one of your creations to be showcased on their gallery, just like they posted mine.

New script – Acrylic Styles B

Acrylic Styles for Paintshop ProIf you like the idea of the Photoshop acrylic styles but can't seem to be able to replicate them in Paintshop Pro, here is the answer to you. You won't have to tweak and try various settings, as the script will do all the calculations to create a great effect, no matter what the size of the element is.

In addition, you can create a series of elements (many shapes, or an alpha) in one run as the script will also make the correct measurement to give you a proportionate result.

You get 6 different acrylic effects, that you can apply to ANY shape. Create accents with arrows, stars, frames or alpha. Create elements for a frozen theme or a dark Halloween one.

Get this script in the store: Acrylic Styles B.

If you want a chance to win this script, tell me, in the comments, what elements you would like to create with these styles OR which style seems to appeal to you the most. I'll announce a winner in the newsletter, next week. Not a subscriber yet? Not a problem. You can register here and it is free (and you only get one email per week).

Acrylic Alpha made using an Acrylic Style script in Paintshop Pro. Perfect for your scrapbookFor the sample, this week, I created a full alpha with a set of digits, using the Cracked style (that is the project that gave me the insight to adjust the script to add the possibility of creating multiple elements in one run).

Each character is 500 pixels high and in PNG format.

After creating the alpha in one run of the script, I used the Alpha Sheet Separator 2 script to separate all of them, again, in one run. That is such a time saver! Check out the video on how much time you can save with this script, if you are a designer.

You need to be logged in to download this sample. You can either login, or register on the top of this page.

New script – Button Machine 2

Button machine script for Paintshop Pro Who can say they have enough buttons in their stash? Who can say they always have a perfectly matching button for their project?

The Button Machine script allowed Paintshop Pro users to create a variety of buttons with the perfect color they wanted. So this time, 4 more button designs have been added to the store in the Button Machine 2.

You can choose any color, gradient or pattern to create the buttons and the script will randomly generate them. In fact, even if you end up with 5 buttons of the same shape, they will be already rotated randomly (so the light/dark areas will always be consistent), and there will also be some random variations of brightness on each button too, making sure you never have the exact same button twice, which is nice because you can then use them as if you literally had 10 individual buttons (which you really will have!)

You can get this script in the store: Button Machine 2

Do you like the idea of getting this script for free? In the comment below, tell me what kind of button you like to use in your digital project. I'll announce the winner in the newsletter, next week. Not a subscriber yet? Not a problem. You can register here and it is free (and you only get one email per week).

Button machine sample in pastel colors and PNG formatAs a free sample, i created 16 buttons, one for each shape and each of the basic colors. In fact, i only used the "Rice paper" pattern for the white buttons, and the "Blue pattern" that i colorized in pink and yellow so that makes them all matching and usable together without looking like they came from different sources.

I left them at 500 pixels, which is the maximum size for the buttons using this script. This will allow you to resize them all, or resize only some and have even more variety.

You need to be logged in to download this sample. You can either login, or register on the top of this page.

These buttons should be a nice addition to a spring theme layout. Do you have one to show us?

New script – Fastener Factory

Fastener Factory script for Paintshop ProAre you tired of always using and reusing the same fasteners in your kits or your layouts? You might have dozens of eyelets, brads and other fasteners but it might be hard to change the color or the texture and make them always unique.

This script will do that work for you. With 6 types of fasteners, and 4 choices of metal, you already have a base of 24 choices. But that is not all: you can also choose any other color or pattern you want for those fasteners (even polkadots if you want!)

In addition, the script is coded with a random function that will generate a slightly different element each time, varying the size, the rotation, the texture and the bevel.

This is now perfect to add a special touch to those otherwise boring fasteners to complete and match your kits or your layout.

Get this script in the store: Fastener Factory.

For a chance to win this script, tell me what texture would be your favorite to create fasteners. I'll pick a winner that will be announced in the newsletter, next week. Not a subscriber yet? Not a problem. You can register here and it is free (and you only get one email per week).

Eyelet FrameAs a sample, i thought of creating something a little original. I generated 20 eyelets using the gold pattern, and placed them randomly along a frame that was created using a twisted rope tube. Then, using the interlacing technique, i overlapped the rope on the edge of each individual eyelet.

Yes, that was a lot of work, but i think it gives an interesting effect, don't you think? It kind of looks like an eyelet necklace!

You need to be logged in to download this sample. You can either login, or register on the top of this page.

New script – Alpha Sheet Separator 2

cass-AlphaSeparator2If you are a designer, you might want to include an alpha in a kit you sell. Creating a single alpha on a single sheet is very easy and convenient as you can apply the exact same effects to all the characters, at once. But then, if you want to separate all those letters, digits and punctuation marks, it gets tedious.

This script will automate the process of separating, copying, saving, naming all the individual character files while you will have minimal work to do.

This script comes with 4 templates to help you work even faster, and allow the script to name the files properly too, especially for the punctuation marks.

If you prefer to use your own set of characters, you an also do so, but you will need to give the name of the files, one by one to the script, which will then be used to save them.

The main "work" you have to do, once your sheet is ready to be separated, is to draw lines to separate the rows and columns of characters. This allows you to have some rows and columns that might not be perfectly aligned.

NOTE: if you want to create your own template, make sure you  have the same number of elements per row, or the script will get confused and stop before completion.

Get this time saving script, in the store: Alpha Sheet Separator 2.

Do you want to see this script in action? Check this video:

Are you a designer and you want to get your hand on this script? Add a comment below telling us how you usually separate an alpha sheet. If you have already purchased this script and you win, you can get a future release instead. The winner will be announced in the newsletter, next week. Not a subscriber yet? Not a problem. You can register here and it is free (and you only get one email per week).

cass-Rainbow-Alpha


Since i can hardly give you a sample of the script itself, this week, i chose to give you a complete alpha that i created using the templates and separated using the Alpha Sheet Separator 2 script.

I used the Broadway font, and applied a Super Blade Pro texture.

I used the astatine effect. I don't know where i got it, or even when, but i thought it looked cool and since it used various colors, it might be usable with many different projects.

You get the full alpha: uppercase, lowercase, digits and punctuation marks.

How will you use this alpha? Remember to show us!

You can send me a link or post on our PSP Showcase pinboard if you want.

You need to be logged in to download this sample. You can either login, or register on the top of this page.


News from the Campus

AlphaMakingIf you like making alphas, you will love the live presentation scheduled for next week.

We will look at several ways you can create alphas, and tools to make this an easier, faster and more fun process, whether you are a scrapbooker, or a designer.

Register Now

New script – Alpha-Flip

Alpha Flip script for Paintshop ProDo you remember those clocks where the digits would flip, from one to the next, usually with a familiar "click" sound? Although most alarm clocks now have gone digital, some might still be around with those flipping digits.

This script will allow you to create any set of digits, but also use any character you want, if you want to write words, or phrases. Even better, you can also have a whole word in one tile instead of using individual characters.

This Paintshop Pro script offers more options than regular alphas you might find online. You can choose any font, any color, gradient or even patterns for the tiles, and also any color (or gradient or pattern) for the characters. This really allows you to match the alpha with any kit or project you are working on. Isn't that cool?

Each tile is set to be 400 pixels in height, whether it is a single digit tile, or a whole word tile. This makes it easier to mix and match words and digits and letters.

You can get this flipping cool script in the store: Alpha-Flip script

If you want a chance to get this script for free (of get a future one if you already bought it), add a comment below with the phrase you would like to create using this script. I'll announce the winner in the newsletter next week. Not a subscriber yet? Not a problem. You can register here and it is free (and you only get one email per week).

cass-Alpha-Flip-DatesHow about adding a date to your layout? You can do so with this free sampler. It includes all the digits, and all the months (in English) in their common 3 letter abbreviation.

This whole set was created in neutral colors, using a brown gradient for the background, black letters and using the Berlin Sand FB Demi font. Of course, if you want a different color, you can always colorize it (i won't mind).

So what will you do with this sample?

You need to be logged in to download this sample. You can either login, or register on the top of this page.


Do you like this script? Would you like to get it in the future? Pin it on Pinterest on a "Wish list" pin board. Who know? Maybe i'll see your pin and pay you a visit with a gift?

New script – Curled Ribbon

cass-CurledRibbonCurled ribbons add some dynamism to a project, but finding the right ribbon, with the right curl is not easy.

There is always the option to use a filter that can curl a ribbon for you, but the end result will be on a single layer, making it really hard to interlace an element inside the spiral, or to have the ribbon curl around an element.

This script will take ANY flat ribbon, and curl it in separate pieces. There will be no overlap of design if you have a pattern or a directional ribbon. There will be no gap, no guessing. Every pixel of the ribbon length will be used in perfect alignment.

Each piece will be placed on a separate layer, so you CAN easily place an element between the layers without any need for erasing, or extracting.

You can also choose the width and the tightness of the curl, giving you a lot of options.

You can get this script in the store: Curled Ribbon.

Do you want a chance to win this script? Add a comment below, telling me how you can use curled ribbons in a project. The winner will be announced in the newsletter, next week.

As a sampler for this week, i had fun creating 2 basic ribbons: one with digits cass-CurledRibbon-Alpha-Digitsand one with the alphabet. I made a translucent white ribbon, with edges and the text was added in rainbow colors. Once merged, i ran the script.

The sampler includes both the flat version and the curled version.

The curled ribbon is in psd format (so it is NOT grouped since this would get flattened when saving).

The flat ribbons are 4000 pixels wide and you can use them in many ways. You can even use them to run other ribbon scripts, like bows or knots.

You need to be logged in to download this sample. You can either login, or register on the top of this page.


cass-CurledRibbon-2010-2014
This week, there will also be an additional set of curled ribbons, exclusively in the newsletter (which should be available on Sunday morning). You still have time to REGISTER to get these fun date ribbons (it also includes the flat ribbons and the curled ones).

You still have time!

Sample – Photo Mask

cass-PhotoMask-01

I ran the script a few times until i got a simple edge that was then turned into a mask. Here is that mask, in black and white (and grey).

You can use this mask in Paintshop Pro but also in other programs, like Photoshop and Photoshop Element.

What will you do with it? Show us a layout or a project you make using this mask.

I know this will be downloaded by a lot of viewers. Are you just going to let it gather digital dust?

Comment below if you want, with a link to your blog or your gallery so we can see it, or you can post it on our Pinterest board!


You need to be logged in to download this sample. You can either login, or register on the top of this page.

Challenge results

cass-WrappedFrame-Round-ChallengeLast week, in the newsletter, i provided a layered covered frame, in greyscale and challenged everyone to do something original with it. It was really interesting to see what people came up with.

Did you participate in that challenge?

This is not a challenge to win something, or accumulate points, but a challenge to simply encourage you to be creative and share your result to inspire others. It is so easy to use elements in a “traditional” way, while in fact, there is much more that one can do with Paintshop Pro.

Let’s have a look at those projects.


GarryKarcher

Garry has been a regular attendees to the live presentations.

He likely used the colors from the photo (a nice looking cat by the way) to colorize the frame. Simple, yet effective!


JudyEstes2

Judy provided 3 very different uses of the same starting image.

As she said, you don’t need to use all the individual ribbons separately, so she merged the ribbon layers, colorized them, and used the PSP curlicues effect.

Very different from Garry’s frame, isn’t it? but that’s not all.


JudyEstes3

Here is another frame made by Judy. She said:

“The green one is also layers merged, then colored with a pattern, then the PSP weave effect applied. The birds and bows were added just to show how you could frame a picture with this.”


JudyEstes1

Finally, this one is very colorful and likely took longer as each individual ribbon layer had to be colorized separately instead of merging all the layers.

I think this is a great use of the traditional blue, white and red colors for our American friends (i think the French ones would like it, if the 4th was switched to the 14th). Of course, the decorative elements inside add to the theme.


How about you? What could you make with that layered wrapped frame? Not a subscriber to the weekly newsletter? Not a problem. You can SUBSCRIBE now.