You might have those lights, at home, to decorate your windows or your tree, but now, you can do the same with your digital projects (and no electric cost).
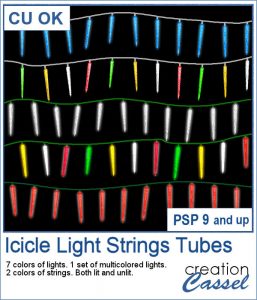
These are picture tubes that you can use to "draw" the strings wherever you want, and however long you want them.
You get a total of 32 strings!
Get these tubes in the store: Icicle Light Strings
In order to win these punches, add a comment on this Facebook post telling us where you would put REAL icicle light strings at home (remember, add a comment, not just a Like!) The winner will be announced in the newsletter, next week. Not a subscriber yet? Not a problem. You can register here and it is free (and you only get one email per week).
As a sample, I create another swag for the Holidays, made exclusively of tubes from PSP or from the store. You might recognize the light strings from last year (none of the light is burnt!).
The whole decoration is about 2000 pixels wide. Why not add that to your next holiday card?
You need to be logged in to download this sample. You can either login, or register on the top of this page.

In traditional paper scrapbooking, there are tools that allow the user to punch the corners into intricate shapes. They are great if you want to use the same size for all the projects you do. In digital scrapbooking (or card making), you now can use similar "punches" simply by using the eraser tool and those fancy "corner punches" shapes. This is the fourth set of those brushes.
As a sample, this week, I created this fun frame (and matching template so you can use it with other colors/papers/effects).
It might be simple to create a black and white photo with Paintshop Pro, and it is also easy to colorize that photo with one color, but how about using TWO colors? So, instead of light red and dark red, you would want yellow and red, or blue and purple, or blue and brown, or whatever color combinations you want to make a unique image?
As a freebie, this week, I obviously could not give you a sample of the script since it is applicable only on your photos, so I thought you might want to showcase some photos in a holiday frame so I created one wooden frame using the
Sometimes, you might want to showcase a word or a phrase in a unique way. Using a cutout is one of those original ways to add a title, a phrase, a greeting, etc.
As a sample of what can be done with this script, I wrote two common phrases that you might want to use in the next few weeks. The strips are black (the colors are for the preview only) and about 300 pixels high and 4800 pixels long so you can place them in various ways on your project.
Creating paper trees might be a simple task but it still takes a bit of time when you have to open a paper, make a selection, copy it, paste it to another image and then, create another piece, slightly smaller and repeating the process piece by piece.
To offer you a sample of what can be done with this script, I created 3 layered paper trees made from the kit
If you need to have some butterflies on a project, you might be able to extract photos of realistic ones, but maybe you would prefer to have some that perfectly match your kit, or your project.
For a sample, I ran the script using the Birthday kit from Marisa Lerin, and tweaked the resulting butterflies to give them some 3D looks, in addition to changing the color of the body and adding an inner bevel.
Did you have a peek at the Layered Flowers script from last week? You could create a set of layered circles, but this week, you can create a set of layered papers cut into various shapes with points. Although you can decide how many points each shape will have, the script will randomly create those shapes to give you a unique result every time.
For a sample of this script, I used papers from the bundle
If you had some traditional papers, you might want to cut out some circles and layer them to create a "flower" in the color of your kit or project. Doing that is tedious with paper, but also very tedious with digital ones.
For a sampler, I ran the script with a few papers from a kit, Happy Birthday, from Marisa Lerin. You can get the whole kit for free, HERE.
Scallops can be a fun design but other than getting a simple template that is a single color, you are limited in the options available. This script will allow you to create a variety of scallop outline patterns that will be either seamless or a full sheet of the size of your choice. Using that outline, you can add a background of any color, or even using a gradient.
Since this is October, you might plan either a Halloween party or expect to take some Halloween pictures. This set of two seamless scallop tile will be perfect to create your paper or background. Since they are in .png format, you can add a custom color behind it.
Do you need the look of burnt edges around a particular element but other than doing it yourself, it seems really hard to find the right shape, or the right font or the right size for your own element?
As a sample, this week, I created a few paper pieces that were run through the script. I created those shapes simply with the freehand selection tool to give them a random shape right from the start. Of course, the script would burn the edges but I wanted something a little different.