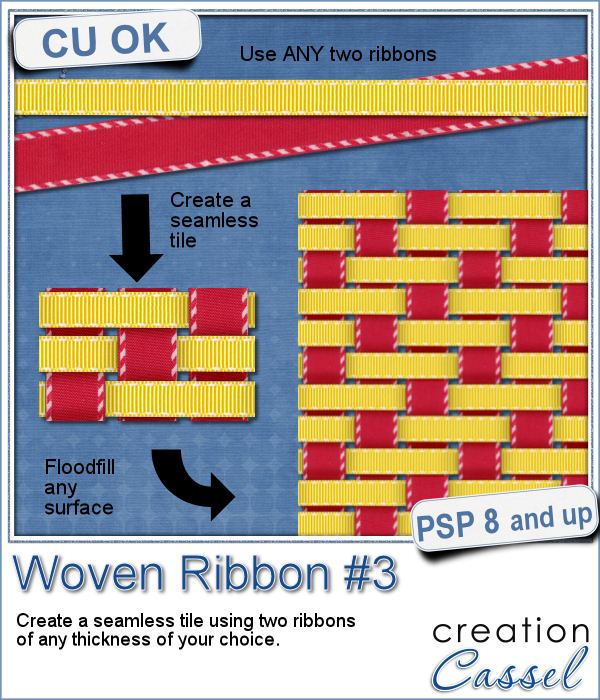
Weaving ribbons into a seamless tile is not hard but can be tedious. Using templates will only leave you with very similar patterns while only changing the colors.
This script will use YOUR own ribbons and create a woven pattern that is slightly different than the typical 1 over and 1 under.
The fun part is that you can use ANY ribbon (or other straight element), of any thickness and combine them perfectly as the script will do all the calculation and measurements needed. You only have to watch!
Get this script in the store: Woven Ribbon #3
In order to win this script, add a comment on this Facebook post (remember, add a comment, not just a Like!) The winner will be announced in the newsletter, next week. Not a subscriber yet? Not a problem. You can register here and it is free (and you only get one email per week). Even better, everyone who comments will get an additional tile based on the winner's answer.
As a sample, I created this tile using two similar ribbons, colorized to match Easter/spring colors. This is a good example of using a single ribbon and duplicate it for this script.
You need to be logged in to download this sample. You can either login, or register on the top of this page.

Have you ever tried to make a seamless honeycomb pattern? It is a bit challenging because you can't create a square tile that will be seamless. It has to be rectangular, and with the various color combinations, the rectangle can't always be the same size. That is a headache, and that is probably many people wanting a honeycomb pattern had to rely on pre-made templates. But that is still limiting, don't you think?

As a sample of what this script can do, I started with a palette of 3 spring colors: yellow, pink and purple, and generated four fun patterns for you. They are full size papers so you can cut them out, use them as frames, or just as a background for your next spring theme project.
Using slats to showcase a photo makes for a fun and unique effect. However, creating slats manually is tedious, especially if you want them even or following a particular outline.
As a way for you to play around with slats (in case you never tried before), I made a large template (about 3000 pixels wide). It is in png format so you can probably use it in most graphic programs.
Do you want to add a fun edge around your element? Brushes might be one option but you can't combine brush strokes. However, with a font, you can alternate characters as you want to create unique designs.
Do you want a closer look at these edges? I created 2 mats edged with some characters from this font. One is a rounded square and one is a circle. You can colorize those mats, or if you lock the transparency, you can "paint" on them, even with a paper!
If you like jewelry, you will love this script to create gold or silver elements.
As a free sample, I created some "tags" illustrating some common life events (first day of school, first car, graduation, new baby, new house, trip/retirement) that you can use for your various projects.
Slats are a fun way to display images as if we had multiple frames, but if you want to add a word or phrase, it makes for an even more custom display.
As a free sample, i converted the slats used in the preview into a template. You can use it for your own photo. Make it sideways if you prefer. Cut the slats if you have a wider image that is not as high. Be creative!
It is fun to have variety in the letters we can use for titles, but it might be hard to find something that really suits our projects, its feel and its color palette.
This week, i ran the script 4 times, using a different font and a different color each time. That just gives you a complete alpha with some variety. You will then be able to get some mix of different letters as if they came from different sources.
This week, I figured I would create a script to allow you some fun effects on photos. Those effects would be yours to choose.
As a free sampler, this week, I could not use this script since it applies to a particular image of yours, so, since the Bronze It script was SO popular, I created a set of tags for the 12 months of the year. You can use them to date your layouts, your adventures, or anyone's birthday.
If you want to get the edges of a photo to be torn, it is fairly easy to do manually since the edges are straight. You can also find some standard size templates for those photos (like in the freebies below). However, if you want to have a torn edge around an element of a different shape, it can be a tedious task to do manually.
As a free sampler, i could have created a set of digits or an alphabet, but i thought of making a series of templates that you can use for your photos or your journaling cards. I created 4 templates with fairly standard sizes. Once the script was completed, i extracted the edges to add them as a new layer. That can now allow you to replace the grey layer by your own photo or card or paper.
You have often seen bronzed busts or bronzed baby shoes. Those are "luxurious" elements. You can now add the same rich look to any element for your projects.
This week, I thought of making an alphabet but i thought that the bronze texture inspired me to create elements with the 12 zodiac signs. I used a font to create those designs (you didn't think i drew them myself, did you?)