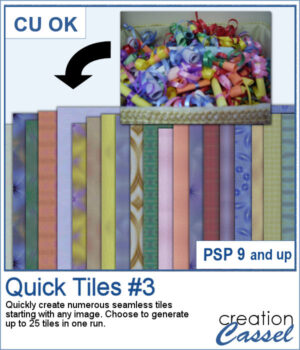
To create patterns from photos is a great way to have matching colors for your papers. In addition, it is a great way to use "bad" photos, those out of focus, with odd colors, etc.
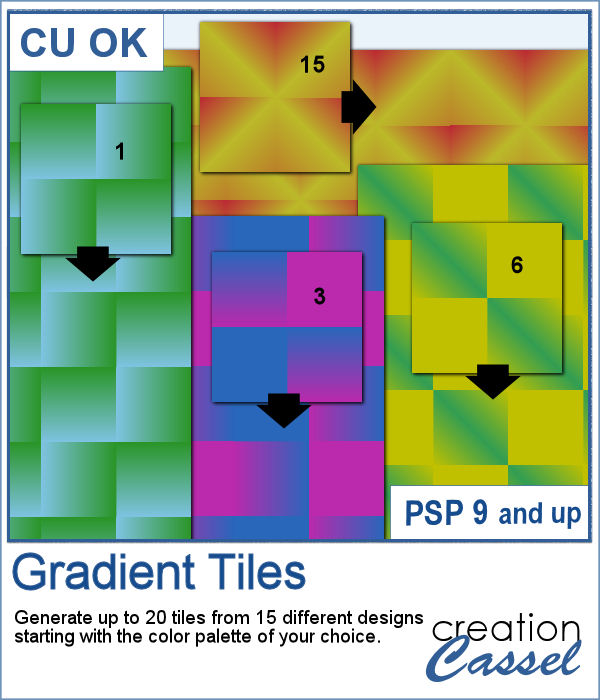
The script will create up to 25 tiles in just a few seconds. Some designs will be great, others, maybe not-so-great, but you can just discard those that don't suit you. And if needed, run the script again to generate more tiles. With the random feature integrated in the script, you will always get different results.
Get this script in the store: Quick Tile 3
In order to win this product, add a comment on this Facebook post telling us if you knew about the first two scripts in the Quick Tiles series (remember, add a comment, not just a Like!) The winner will be announced in the newsletter, next week. Not a subscriber yet? Not a problem. You can register here and it is free (and you only get one email per week).
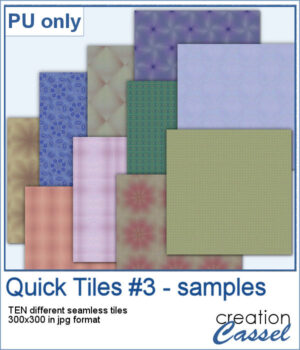
As a sampler, I created 10 seamless tiles using the same starting image as for the previous Quick Tile scripts. That means our tiles will match the other 20 patterns you can download.
You need to be logged in to download this sample. You can either login, or register on the top of this page.

This set of brushes will allow you to paint or cut intricate designs in the middle of a paper (or a photo). Create cutouts away from the edges and corners.
As a sample, I created a set of greyscale bookmarks with a central cutout. One has the year 2023 cut out of it, while the other is blank for you to add anything else you want. The design can even be cut from actual paper/cardstock using a cutting machine. You can colorize these strips any way you want. Each "bookmark" is 600x3000 pixels long and can also be used as an element on your next project.
Another script will allow you to create a variety of decorated beads. This time, the beads will be a slightly different shape than the previous scripts. Furthermore, you can create monochrome beads in addition to the duotone ones. Different rotations will be associated with the correct bevel and shadows to give a more realistic effect.
For a sampler, I used the same color palette as for the previous freebies for the Beads Maker 1 and the Beads Maker 2. This way, you will have a total of 45 matching beads to play with and create a variety of elements.
Whether you want to showcase school pictures or flowers in your garden, you might also want to feature one special photo. This script will create a template for you with all the settings you want.
As a sampler, I created a 6x6 template with small images on top and on the left only, leaving an even larger area in the bottom right.
You can add one of our 6 types of wood fence, in just about any size but also, in any length. You can draw those fences on a perfectly straight line or follow a slight hill.
As a sampler, I created one long fence (4000 pixels) and added some vines and a lovely cat. It is in PNG format so you can use it with any program.
You can draw any design in one of the 20 picture tubes of icing. You can hand draw any design or use one of the included four preset shapes as paths. Or you can use your own vector work to create a custom path, and then use the VectorTube script to add the icing evenly.
For a sample, I created two phrases (with separate words) that you can use for any summer project. Arrange the words as you want, since they are individual files in PNG format. No shadow is included so you can add your own.
Sometimes, you have long filenames for your supplies and for whatever reason, you would like to shorten them. Doing it manually, one file at a time is tedious to say the least.
For today's free sample, I created a series of summer-themed phrase strips. A set of 15 strips are available for you to embellish any summer project.
Another way to add a date, a name, a location, or a short phrase in a unique way on your project.
For a sample, I created four seasonal tags and left the rectangle with lines so you could add your own message or customize the tag further. You can distress it, stain it, add a stamp to it, etc. Then, tie it to something with a string or a ring.
Gradients can be really helpful to create unique patterns, but in order to make such a tile, you have to create a new gradient every time. That is tedious and a lot of work since you might not need those gradients afterward.
For a sample, I used the color palette from the DigitalScrapbook July 2023 blog train, and generated 16 different tiles. Each tile is 400x400 pixels in jpg format so you should be able to use them in most graphic programs.
This is the third of the series of edge punches. Just like the punches you would get to cut out the edges of traditional paper products, you can use the Eraser tool to cut out of the edge of your digital element.
For a sample, I created a template for a greeting card. It is simply in png format so it can be used in any program. If you have a cutting machine, you can cut this card for a unique effect, once you have customized and printed it.