This set of brushes will allow you to paint or cut intricate designs in the middle of a paper (or a photo). Create cutouts away from the edges and corners.
You can also use the UNerase function to re-add paper where the punches would otherwise remove it. You can then customize the designs even further.
You get 10 different designs, mostly using diamonds and squares.
Get these punches in the store: Punches B
In order to win this script, add a comment on this Facebook post telling us how you would use these cutouts (remember, add a comment, not just a Like!) The winner will be announced in the newsletter, next week. Not a subscriber yet? Not a problem. You can register here and it is free (and you only get one email per week).
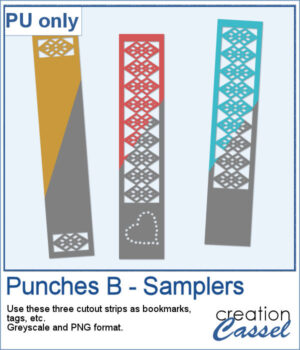
As a sample, I created a set of greyscale bookmarks with a central cutout and one with cutouts on the ends. One has a heart shape punched out, while the others are blank for you to add anything else you want. The design can even be cut from actual paper/cardstock using a cutting machine. You can colorize these strips any way you want. Each "bookmark" is 600x3000 pixels long and can also be used as an element on your next project.
You need to be logged in to download this sample. You can either login, or register on the top of this page.

Yes, this is another bow script, but honestly, who can have too many different bows in their stash? This script will generate a bow that will be kind of droopy.
For a sample, I created three bows that would be suitable for Valentine Day's projects. I used various straight ribbons and colorized them to get that traditional red color for the occasion. Each bow is in PNG format.
If you want to convert a part of your photo into a "technical" pencil sketch drawing, this script will help you with it. You can use any image and any section to convert.
o, sketch, As a sample, I used pictures of isolated flower clusters and ran the script. I added a separate frame and removed the "technical" drawings as they didn't seem to fit with the theme. Each card is 4x6 and has enough space for you to write a sentiment, a quote, or a message.
You can now add some painted frames around any photo, element, or even just a selection. This means that you can even work directly on your work in progress.
As a sample, I created two frames for 4x6-inch photos. I left the layers unmerged so you can use the Lock Transparency to change the colors of the different layers.
You can now display your favorite quote or title in a unique way.
For a sample, I created a whole alphabet in basic font and a single row board for you to display a title of your choice.
Whether you are doing a "Project 52" or just want to showcase your photos, sometimes, it can be fun to have an overlay to show the week and year of that particular photo.
As a sampler, I created a whole set of raster overlays for you to showcase the year 2023. All the layers are in white, but you know that you can change that easily, right? The format is 6x4, which is fairly standard for printing, but also if you are doing pocket scrapbooking.
In the store, we have some garlands that are bold and full, but this time, we offer you some more delicate variations on those garlands. You get 10 different colors with white ends. In addition, there is one gold and one silver set for more festive projects.
For a sampler, I drew the text for this Happy Holidays sign using the gold tinsel tube. I also used the VectorTube script to outline the sign. Each section is on an individual layer so you can use the sign without the text, or the text without the sign. You can even replace the red background with something else.
This set now includes 15 additional designs to create your own Christmas ornaments with your choice of colors and color combinations. This will allow you to create up to a dozen Christmas balls in one run.
As a sampler, I ran the script using a red background for the balls and a single red color for the design. You get 6 different designs to use in your holiday projects.
Whatever theme you are using for your next graphic project, you might want to add some light to it. I mean, literally. With this script, you will be able to turn any vector object into a lit lightbulb, with your choice of color.
For a sampler, I created a simple set of digits for you to add any date you want. I used basic colors so they will be as versatile as possible. Each one is in png format so you can add them onto any background. They are in png format so you can use them with most graphic programs and they have some transparency so you will be able to see through them.
It might be a design of the past, but sometimes, the past comes back into fashion. You can create this design manually, but it is tedious. You can use a template, but it is still tedious to change the colors especially if you want more variety.
For a sample, I chose the color palette from the Digital Scrapbook November blog train and generated six fun designs that you can use as seamless patterns. They are in png format, and have no background so you can add whatever color you want behind it.