Web
Analytics

New Picture Tubes – Decorative Icing

Decorative Icing picture tubes for PaintShop Pro
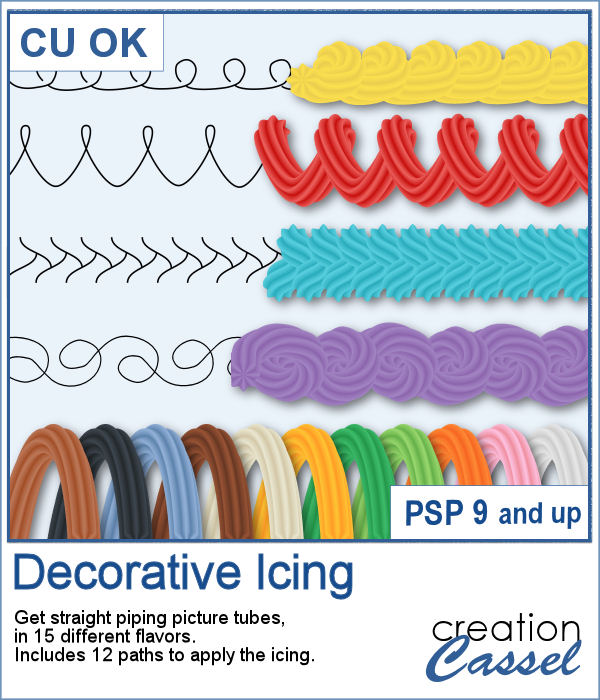
Icing with a piping bag can allow anyone to have some interesting or fancy design on a cake or cookies, but it can be also messy and full of calories.

Now, with PaintShop Pro, you can hand draw any text or design on any pastry you want. You can also write text and frames for a project that is related to baking, cooking or other celebrations.

In addition to being able to hand draw any design, you can use some of the 12 included preset shapes to place the icing in a neat and regular shape with the VectorTube script.

Get these tubes in the store: Decorative Icing

In order to win this script, add a comment on this Facebook post telling us whether you ever used a piping bag to decorate a cake or cookies (remember, add a comment, not just a Like!) The winner will be announced in the newsletter, next week. Not a subscriber yet? Not a problem. You can register here and it is free (and you only get one email per week).

Chocolate icing digits in PNG format
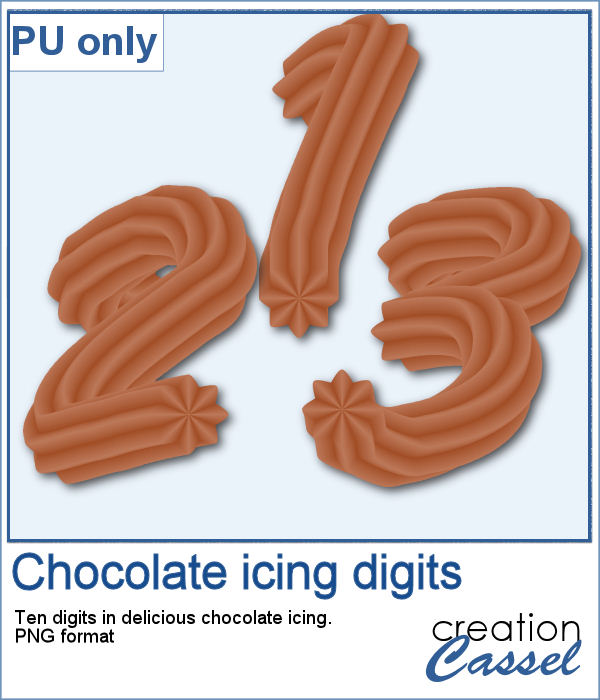
As a sampler, I created some digits with a light chocolate flavor icing. Each digit is about 700 pixels high and in PNG format.

You need to be logged in to download this sample. You can either login, or register on the top of this page.

If you want more icing elements to decorate your page, check out the Cake themed blog post in the Campus HERE.

New script – Wax Alpha

Wax alpha script for Paintshop Pro
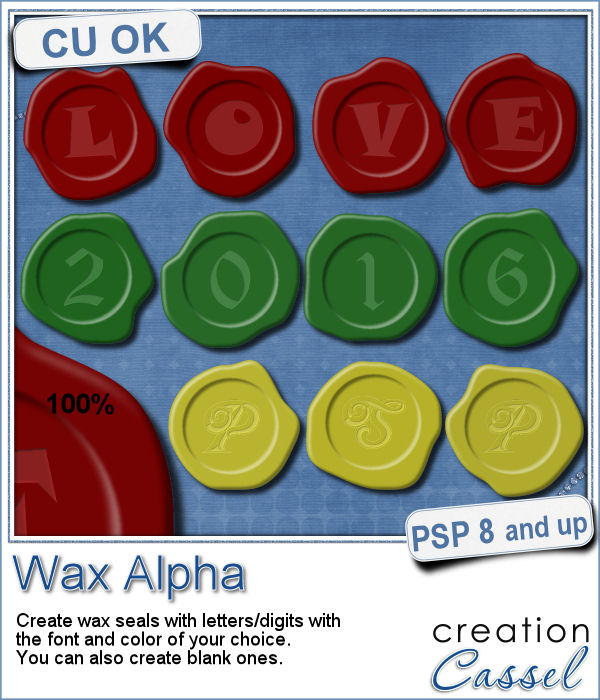
If you want to add a touch of elegance or a formal look to a project, you might be looking for a wax seal. However, what you will find is often a set of ready-made seals that will not have the color you are looking for, or the font you wish it had. Or, you might find seal templates that will give an identical shape to all the seals you would create from them.

This script will do just what you need: you can pick the color that perfectly matches the color palette you are using; you can choose any letter, digit, punctuation marks you want (or generate a blank seal to add other designs); you can even choose any font you want, whether it is a simple Arial font, or something more elegant or formal.

Get this script in the store: Wax Alpha

Would you want to get this script for free? Tell me, in the comments below, if you ever used a digital wax seal in any project? If so, how did you create them? I'll pick a winner to be announced in the newsletter, next week. Not a subscriber yet? Not a problem. You can register here and it is free (and you only get one email per week).

Wax seal alphabetDo you want to add some wax titles to your projects? You can use this complete alphabet made of blue wax.

This alphabet includes all 26 letters, 10 digits (for dates or age), a hyphen and a blank seal.

Each seal is about 450 pixels wide and you can resize them as needed.

Add a ribbon underneath, or place the seal on the edge of a paper element to act as a fastener for another use of them.

You need to be logged in to download this sample. You can either login, or register on the top of this page.


News from the Campus

MadeWithRibbons-400Did you register for our live presentation scheduled for this coming Sunday, June 5th?
Come and see various ways you can use ribbons in a project, whether you created the ribbons, or downloaded them from the net.

Register

New script – Quilling

Quilling script for Paintshop Pro
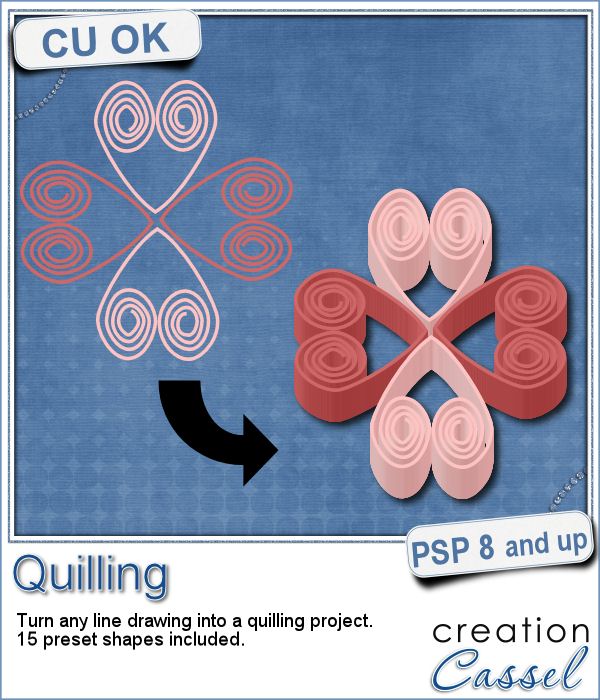
Many years ago (at least 35), my mom got me a kit to do some quilling. I had no idea what it was and didn't even have the proper tools to do it, but I improvised and created a few fund designs by rolling those long strips of papers, and shaping them in specific ways. I loved that, and often wished I could find time (and tools) to do it again.

But, in digital scrapbooking, those tiny elements are not as easy to create, until now.

This script will turn any line drawing into strips of papers shaped like that drawing. As long as you can create even lines, using the Pen tool or the Brush tool, you can turn those lines into intricate designs.

In order to help you, the zip file also includes 15 preset shapes that you can use in the color of your choice. Resize them or distort them at will. Since they are vector, they will keep nice edges. Create your design in larger size, so it will be easier to draw, and then once it is converted into quilling, you can size it down. Super easy.

Get this script in the store: Quilling script.

Did you ever do any quilling? Tell me about your experience or what you know about this art in the comments below. I'll pick a winner next week to get this script for free (or another one, if you choose to buy it immediately). Not a subscriber yet? Not a problem. You can register here and it is free (and you only get one email per week).

Qulling - Daisy in png format
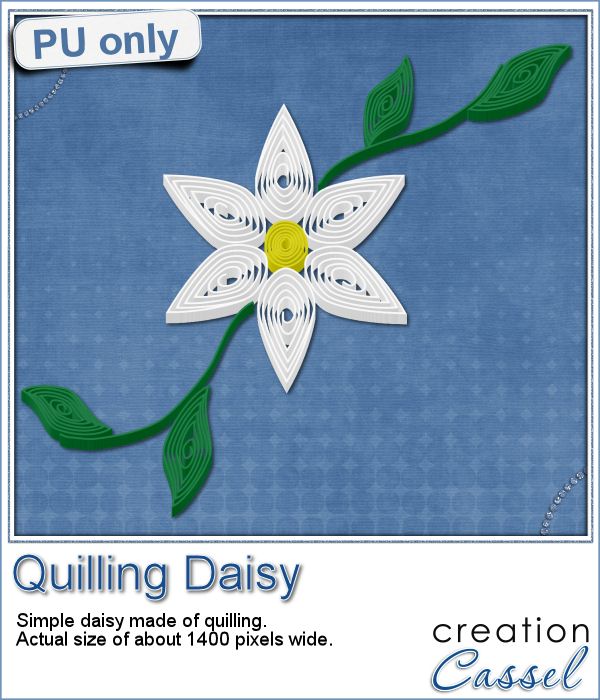
As a sampler of what can be done with this script, I made a little daisy. I used one of the preset shapes, in white. I duplicated and rotated that one petal 5 times and arrange those petals around another preset shape drawn in yellow for the center. Then, using the Pen tool, I drew a couple of free form lines. Finally, I used a third preset shape, in green, for the leaves and I placed them along those lines.

Before running the script, I merged all the layers together, and voilà! A quilled daisy, ready to be used on your projects. It is quite large so you can size it down to suit your needs.

You need to be logged in to download this sample. You can either login, or register on the top of this page.

Can you create more flowers to go with this one?


News from the Campus

Did you have a look at the forum lately? After the live class on the Out of Bound techniques, viewers have posted FANTASTIC projects using that technique. And they are so creative!

Here are just a few examples:


Do you want to see more? Check out the forum HERE.

And if you want to know how they created those masterpieces, check out the edited video. It is free to watch for a couple more weeks; you just have to be logged in. And yes, you will be able to create such projects.

New script – Knot #12

Knot 12 - Paintshop Pro scriptHow you would use knots if you had a traditional ribbon can vary from day to day. You would have options to tie that ribbon in multiple manners, attach different objects, wrap that ribbon around all kinds of things. This is why, in digital scrapbooking, there are so many different knots available.

This script for Paintshop Pro will allow you to "tie" a ribbon into a simple knot, but unlike other scripts where you can only choose the color or pattern and everything looks like it is "flood filled" with that pattern, this script will use your own straight ribbon. This is perfect to have a match if you are using the other ribbon in the project, whether it is left straight, or tied into a different knot or bow created with another script.

Grab this script in the store: Knot #12.

For a chance to win this script, tell me how you would customize a knot for your project otherwise. Do you colorize greyscale ribbons? Do you manually create a knot with your ribbon? Do you use a script that asks you for the color to use? Leave a comment below and i'll announce the winner in the newsletter, next week. Not a subscriber yet? Not a problem. You can register here and it is free (and you only get one email per week).

Knot 12 - free samples in PSD formatThis week, i created three straight ribbons (from greyscale ones) and ran the script to end up with three simple knots. Each one is left in unmerged layers so you can put them around any object or insert something in the middle of the knot.

I had fun with colorizing those ribbons with a gradient instead of a solid color. I think that gives a different kind of look to the knot that makes it more interesting (at least, that is what i think).

I also included the straight ribbons so you can use them with other scripts, or as is on your project to match. Or you can insert the straight ribbon directly in the knot too. Why not?

Remember to show off what you used this knot for. What project did you create using it?

You need to be logged in to download this sample. You can either login, or register on the top of this page.


Corel Paintshop Pro Challenge

TextCheck out this week's #CorelChallenge. It is about using text on your project. Well, if you are a scrapbooker, you surely have text on your projects! It could be a fun journaling display, or an unusual title. Or how about a nice Subway art design? We can do so much with Paintshop Pro. Show off what you can do (or just what you have done already).

Post your project on their thread or tag it with #CorelChallenge

Did you see the one i posted on their thread?


News in the Campus

Text-in-silhouetteAs part of the Corel Challenge, i created a text inside a silhouette. I thought it was a great way to use the new text wrapping tool from PSP X8.

I also made a short tutorial on how to create this result. Read it HERE.

New script – Puzzle 6×6

cass-Puzzle6x6

Do you like puzzles? Do you dream of turning your favorite photo into a puzzle? You can probably do it with some plugins in PSP but most of them do not allow you to tweak, move, rotate, or remove pieces at will.

This script will do just that. Take a square photo and run the script. You can also use a rectangular image, but obviously, the pieces will be somewhat stretched, but it is a puzzle anyway, so maybe it won’t matter too much!

You can grab this puzzling script here: Puzzle 6x6 script.

And remember that you also have the possibility to get other puzzle scripts.

Puzzle 4x4
Puzzle 4x6
Puzzle 5x5
Puzzle Round

Do you want a chance to win this script? Post a comment in the box below telling me if you ever created a puzzle from a photo and if so, how you did it. I’ll be back next week with the name of a winner.

Do you want to know who won the script from last week? Check the newsletter!

cass-MiteredCornerFrame-04As a little gift this week, i obviously could not create a puzzle for you since you would surely prefer to use your own photo than any of mine. So i decided to give you a little frame made of corner brushes and the Mitered frame script. All the details of how i created it, will be in the newsletter.

You need to be logged in to download this sample. You can either login, or register on the top of this page.

News from the Campus

BrushVariance-400Did you know that the recording from the last live presentation is up for you to watch for free in the Campus?

Check it out!

And since there was so much stuff to cover, there is a need for a second part on the same topic. It is already scheduled to be on August 3rd, at the same time.

Register now

New Picture Tubes – Seed Beads 1

cass-SeedBeads1-SilverLined

Seed beads are a common supplies in many craft projects. Scrapbooking is one of those crafts where you can see those beads, but you can now do the same thing with digital scrapbooking: you can add strings of seed beads or a random spray of those tiny decorative elements.

With Paintshop Pro, you can place those picture tubes easily with the draw of a mouse. Use the directional tubes to create strings of beads in any of the 5 colors, any length you want, in any shape you want. You can place them in straight lines, curved lines or totally freehand shapes.

You also have 6 sets of tubes that will randomly place one of the 100 slightly different beads more or less along the path you will draw with the cursor. Five sets are monochrome (green, red, blue, gold and crystal) and one set includes all the colors for a truly random effect.

You can get this set of 11 picture tubes of silver lined seed beads in my store: Creation Cassel.

Do you want all those tubes too? You can enter the draw to get this set for free, by adding your name to the RAK thread here. What would you do with those randomly placed beads?

cass-SeedBeads1-Sample
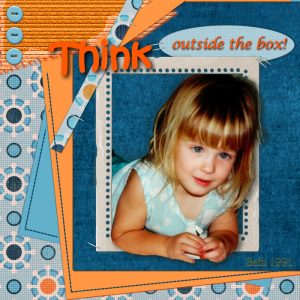
For a free sample, i created a couple of simple decorations. I placed the beads along a vector path using the VectorTube script for the flowers, and added a single “bead” in the center which was part of the Chain Beads tubes set. A little touch of colorization to match them a bit better. Then, the stems were just freehand drawn using also the string version of the green seed beads.

Finally, a little bit of multicolored beads were spilled around each element.

You get two decorative flower stems and 3 individual flowers that you can use separately.


You need to be logged in to download this sample. You can either login, or register on the top of this page.

Did you notice that it says Seed Beads 1 for this product? This means i have plans for several more types of beads tubes. Do you have any suggestion for other beads you would like to see in a picture tube format like this one? Tell me by either commenting below or by sending me an email  with a specific bead name or even an image.


News in the Campus

Tomorrow is a big day for many American and Canadian football fans (and their families). Tomorrow is also the day for our next live presentation, on Photo-Graphics with PSP – Part 3.

Join us for this presentation BEFORE the Superbowl (if you are a fan of football) or just for this ordinary Groundhog day.

RegisterNow-01-200


In the mean time, remember that the video of last month’s presentation is still available to watch (free if you are logged in).


CreateMagicWithPSP

New script – Bar Code

cass-Barcode

Bar codes have become almost a boring fact of life whenever you go shopping since every single item has one of those. It is meant for faster checkout by allowing a machine to read the information instead of a cashier. But that “boring” design can be simulated and made much more interesting when used in conjunction with legible text, and fun colors.

This is exactly what this Paintshop Pro script will do. You can pick ANY text, in ANY font, in ANY color and then decide to replicate the traditional black design, or add fun colors. That is the perfect way to match your label to your current project or kit.

You can also choose to have a common white paper background or another color, or even have no paper at all, so you can apply the “label” onto any background as if it were stamped directly onto it without a paper support.

cass-Barcode-extraYou can use any text so that leaves you with so many options: names, locations, dates, phrases. Do you want even more ways to use those labels by modifying them? Check out the newsletter for that additional tip.

Do you know you can use those labels as printables? Check out what you can do (i am giving you three ideas, can you think of more?)

You can get this fun Bar code script in my store.

You have a chance to win this fun script by sharing some of your great ideas. Hop over to this thread, and tell me of ways to use this script in a printable format. What would you use those labels for?


cass-Barcode-sample-ChristmasObviously, i would not be able to create a sampler with the name of your kids, or the school subjects for you to stick them on their notebook, but we all know that Christmas is coming (yeah, i am serious!) and whether you are celebrating Christmas or not, it would likely be a time for gift exchanging, even if it is only between colleagues at the office or the little newspaper carrier, so i thought of creating some holiday season labels with this script.

You can get these 5 labels and print them out. Because they have some blank spots, you can handwrite the name of the recipient or the giver, and put them on presents for the holiday season.

They are pretty simple, but you surely don’t want to overpower the present you would offer, do you?

You need to be logged in to download this sample. You can either login, or register on the top of this page.

News from the Campus

Did you see that the free video of the November presentation is already up in the Campus?

StretchaSketch-400

You can watch it for free, as long as you are logged in (registration to the Campus is totally free). So head over to watch it.

See how you can turn a flat sketch into a layered template.

See how you can use a single sketch and create a variety of layouts.

See how you can turn a square scrapbook layout into a card or a Facebook cover image.

Check it NOW

New script – Custom Kit Buttons

cass-CustomKitButtons

A kit is not complete without buttons, right? Creating buttons within a specific palette is fairly easy (there is even a script for it called theButton Machine), but creating individual buttons out of papers for a perfectly matching result is a little more tedious. So i bring you the Custom Kit Buttons script.

This script will allow you to use any vector shape (round, oval, square, rectangle, octagon, etc.) and then choose all the papers you want to use (at once!) and it will create a variety of buttons from those choices of yours.

A single run of the script can yield many similar buttons, but since they are “cut out” from different spots on the papers, you might get some slight variations for each. You can keep them all, or just keep a few and delete the rest.

This script is perfect to help you complete your kit, to complete a layout, or even to create clusters with buttons that will all be matching.

Grab this time saving tool in my store HERE.

Do you want a chance to win this script for free? Hop over the DST Happy Place thread and add your name to it. I’ll be back next week with the name of a winner.

cass-CustomKitButtons-sampler-AlmostAutumnThis week, i used Missy’s kit called Almost Autumn to create a set of 14 octagonal buttons. Then, i tweaked them to add a slight variation in size, brightness and contrast, just to make sure they were not all exactly identical. What do you think of that?

I really could have used any shape but i thought that round or square buttons were a little too “ordinary” and common so i picked a different shape.

What shape would you like buttons to be?

You need to be logged in to download this sample. You can either login, or register on the top of this page.

What about the kit i used? You can find it here: Almost Autumn.

Can you imagine all the scripts you can use with a single kit to expand the possibilities? You can create cutout shapes, tapes, buttons, additional papers, and more.


News from the Campus

ScrappersDozen-250x250The Scrapper’s Dozen event is underway. We had some fantastic results and the comments are great. Here are some comments we got:

“I want to share my 2 linoleum pattern...TYSM Carole for this amazing tut!!!! “ – Mariscraps about the Linoleum pattern tutorial

“Great fun with a simple but very effective process.” – Marlene about the Linoleum Pattern tutorial.“

“I tried the tip you had in the e-mail and then made a frame with my doily.” – Linda about the Doilies tutorial

“[Here are] My Doily sample and the Doily frame (Fantasy Forest elements) - very simple techniques again but very effective. Also very time wasting as you try lots of different effects but who cares, we're having fun!” – Marlene about the Doilies tutorial

Although the first week is over, you can still register and get all the free kits provided by our contributing designers AND get all the 12 tutorials including those released this week. You can surely catch up. Each tutorial is less than 10 minutes and as you can see from the comments, those tutorials are easy, effective and fun!

REGISTER NOW

New scripts – Speed Scrap

cass-SpeedScrap

Using templates to create a layout is a way to speed up the process as it helps you with some precise suggestions as to where to put the photos, papers, and elements. Of course, you don’t have to follow everything exactly, but it is a start.

Using those templates still require you to open the photos, copy them, close them, paste them into the new page, resize them, move them to match the location of the shape, then you have to either Clip it (using the Clip to It script), or go through the selection process, and so on. That is a lot of steps that can be automated with these scripts.

There are 3 scripts, for different types of elements in the template. The photo script will never merge the photo to the shape, giving you the option to tweak it and adjust it to your liking. The paper script will give you the option to merge the paper to the shape from the template, if it is within the size of the template (in case it extends outside the edge). Finally, the element script will adjust the size of the element you pick to match the size of the shape in the template, and replace that shape by the element.

There is a video clip in the description, showing how fast you can create the basis of your layout using the three scripts. Of course, you still have to add the shadows, the title, the journaling and any additional detail you want to use to make the layout truly yours.

You can get this set of Speed Scrap scripts, in my store.

cass-AlphaBeads2-Halloween-string-previewDo you want a chance to win this set of scripts? Head over to the DST forum in this thread and add your name while answering the question. I’ll be back next week with the name of a winner.

Again, i cannot give you a sample of the script, since it is a tool script, but i can make something that could be used for Halloween layouts. Check this fun wordart. The letters were made using the Alpha-Beads 2 script, and the strings are from the Twisted Rope tubes (i used the white one you can see in the preview).

The whole montage is about 1800 pixels wide and is in PNG format, so everyone can use it.

You need to be logged in to download this sample. You can either login, or register on the top of this page.


News from the Campus

ScrappersDozen-250x250Did you follow the videos in the Campus related to the Scrapper’s Dozen?

The third video is now up, and you can even download something quite useful (and it is free). So go check it out.

Video #3

And while you are around the Campus, check out the blog section where you will see more about the “secret ingredients” and the designers who contributed them.